
Chevy GMC Cadillac Truck Intake Manifold From 1A Auto Doesnt Match
Created on: 2020-07-09
This video shows you new features and installation procedure of the updated Chevy/GMC/Cadillac V8 intake manifold.
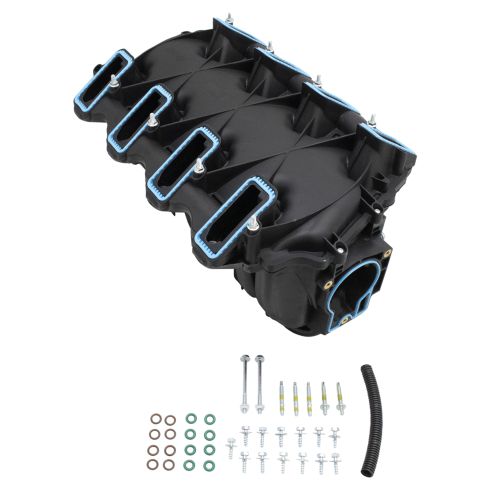
So you got a new intake manifold, and you're looking at it comparing it to the old one. And you notice it looks significantly different than the original one.
The reason for this is this intake is stronger. There is more material here. It is strengthened in areas where the original would lack and prevent future problems. In this area right here, there's more reinforcement to prevent warping. One of the major differences you might notice is the MAP sensor location. So on this newer intake does not have the MAP sensor located right here. You're actually going to mount it to the back right here. So with the old one, there's some clips that hold the MAP sensor on. Just take that out. Take the MAP sensor, slide it in position right there, just like that. In the hardware kit there's gonna be a screw with a washer, 10-millimeter socket, and just tighten this down and just snug it. And that's gonna prevent the MAP sensor from coming out.
Now for our vehicle, we have a hydraulic brake booster, but if you had a vacuum-actuated brake booster, and you're gonna have a hose that hooks up, you're gonna take this plug off, just squeeze that clamp, slide that off, put that hose right there. Now there's a vacuum port right here. If you don't need that, if you're not using that on your vehicle, which this vehicle doesn't use that, then you just leave that cap on there, and that'll be fine. Now the PCV hose that goes to the driver side valve cover, it's gonna go right here where this hose is. So you can take this off right here. Now that's not gonna attach right there, you have to take this rubber piece off of this hose. You can use a pick tool to get underneath here, just try to separate this, twist it, and slide that off. And then If you need to pull this hose up and secure that right there, and then push this back in position, that's gonna work just like that. Now I'm gonna move the purge solenoid over, just use an 8-millimeter socket. Take this out and slide that out. Now that's gonna go in the same location right here. It's just twisted a little bit sideways, and you're gonna take one of these threaded screws that comes with the kit and get that started. And snug that down. You just wanna tighten this down to about 5 newton meters. And this hose has the fitting that goes towards the back of the vehicle. Just take this hose off right here. This connects to the passenger side valve cover. Slide that off. And then there's a little cap right here, take that one off. And that hose goes right there.
From underneath the intake, you can notice that the intake gaskets themselves actually look different from the OEM ones. So when you're actually cleaning the head surface, you want to make sure you clean everything when you're putting these on, not just the area where the intake sits. And then there's bolts. There should be eight bolts with nuts installed when you get this. You're gonna have to take these nuts off. So I'm going to use a 10-millimeter wrench and a 10-millimeter socket. Take the nut off, you can discard the nut. You are gonna need to hang on to these bolts because you'll use this to install the intake. Do the same for the other ones. You'll notice on the old intake that there is these foam pieces. Those are not required on the new intake.
At this point, the intake's ready to be installed. If you have that vacuum booster, you can attach that hose. And then as you slide it into the area, you're gonna wanna plug that MAP sensor in. There's the connector for it, just move it back a little more, just make sure these wires are out of the way. Now I can slide this connector in the back. With the intake in this position it's hard to see, you're just gonna have to feel for that MAP sensor and lock it in place. At this point, we can take the studs for the throttle body and install these. These come with the kit. And snug these down. You'll use a E6 socket.
Now you can take the throttle body and slide it in position. It might be easier to hook the hose up before you tighten this down. Hook the other coolant hose up. And move the hose clamps in position. At this point, I can disconnect these hose pinchers, and you can use the original throttle body nuts. Then we can torque these nuts to 89-inch-pounds. Now we can take these intake manifold bolts, eight of these you took out of the manifold and two of them were in the kit. Get these all lined up. When we're tightening down the intake bolts, there is a sequence that you have to tighten these bolts in and you have to tighten the first pass 44-inch-pounds, make sure you're on inch-pounds, not foot-pounds. And then the second sequence you are gonna tighten those down to 88-inch-pounds. At this point, I can slide the EVAP pipe back in position, slide it down here, connect it in the back there, lock it in place, and then connect it up front, lock that down to the purge valve. We have this conduit that comes with the kit. There's no slice down this conduit, so we're just gonna take a utility knife and just slice down the middle of it. Just be careful when you're doing this. Just like that. And because this EVAP hose could potentially rub on the intake right there, I'm gonna take this conduit and she's going to go over it just like this. And that's just gonna prevent anything from rubbing through. And that should be good. Just take this connector before it falls down there. This goes to the knock sensors and just slide it in position right here.
The kit comes with new O-rings for the injectors. If you don't take the injectors off of the fuel rail, you could replace just the bottom O-rings. How you do that is just take a peek, just slide underneath the O-ring, and just walk it off. Take the new O-ring and just slide it over. You can do the same with the others. And then for the top, it's the same procedure. And before we slide the fuel rail back in, just take a little bit of motor oil and just give the O-rings a nice coat. It's just gonna make it easier to install the fuel rail. Now you can take some of the new screws from the hardware and get those started. And tighten those bolts down. Now take the fuel line, reconnect it. You can take this retainer that goes on here and slide that in position, and take this hose that goes to the PCV right there on the valve cover. And with all that hooked up we can start plugging in the injectors. Plug in the injector, and then as you plug them in, you're gonna push down on the locks. Sometimes the locks come out. So lock it in and then push down on the lock. Now attach this hose to this valve cover and we can connect the throttle body connector, lock it in place, push down on the lock. Now take one of these studs and slide this in position. Tighten this down. Just snug it down. You can use a E6 socket. Now take the wiring harness and just slide this bracket over. You can pull this pipe up a little bit and then put that pipe down. Make sure that lines up good. Now take the old nut and install that and tighten it down. Snug it down. That's good. Now plug this connector in, that goes for the knock sensors, lock it in place. Make sure these wires are good like that. Take this bracket and slide it in position. We'll take some of the hardware and line it up. And just snug these down. Just make sure you don't squish the wires. Those are good. And plug the connector in for the purge valve. Take the snorkel and line it up. And take the engine cover, slide it in position. Get the bolt started, snug it down.
Thanks for watching. Visit 1aauto.com for quality auto parts shipped to your door. The place for DIY auto repair. And if you enjoy this video, please click the subscribe button.
Shop Products
Chevrolet GMC Cadillac Hummer Intake Manifold TRQ IMA07935
- LS Swap
- Yes
- Plastic

How to Replace Intake Manifold 99 Pontiac Grand Am
If the intake manifold gasket is leaking or broken, this video will show the steps for replacing it

