How To Replace Differential Cover 1997-2010 Ford F150
Created on: 2017-08-23
New Differential Cover with Gasket from 1AAuto.com How to repair, install, fix, change or replace broken, bent, rusted, leaking, or defective differential cover on 97, 98, 99, 00, 01, 02, 03, 04, 05, 06, 07, 08, 09, 10 Ford F150
-
step 1 :Draining the Differential Fluid
- Raise and support the vehicle with a jack and jack stands
- Have a drain pan ready
- Loosen the drain fill plug with a 3/8" ratchet
- Let the fluid drain
- Hand-tighten the plug
-
step 2 :Removing the Differential Cover
- Have a drain pan ready
- Loosen the 1/4" bolts around the cover
- Remove all of the bolts except for one
- Lightly tap the cover with a mallet
- Slightly pry open the cover with a flat blade screwdriver
- Let the fluid drain
- Remove the last bolt
- Remove the cover
- Stuff a paper towel or rag beneath the mating surface
- Scrape off remaining adhesive with a razor blade
- Clean the mating surface with brake parts cleaner
-
step 3 :Installing the Differential Cover
- Align the gasket on the cover so that the holes line up
- Press the differential cover to the differential
- Hand-tighten the bolts
- Torque the bolts 28-38 foot-pounds evenly in a crossing pattern
-
step 4 :Refilling the Differential Fluid
- Remove the fill plug
- Wipe off the metal shavings from the magnet on the plug
- Refill the fluid with a fluid transfer pump until the fluid dribbles out
- Hand-tighten the fill plug
- Torque the plug to 30 foot-pounds
Tools needed
-
Razor Blade / Gasket Scraper
Torque Wrench
Rubber Mallet
Drain Pan
Ratchet
Hand Pump
Brake Parts Cleaner
1/2 Inch Socket
Raise and support your vehicle. Before removing the rear differential cover and draining all the fluid out, make sure that you can remove the fill plug. When you reinstall the diff cover, you can fill the differential back up with the fluid.
This uses a 3/8 drive. It's just a square drive, the end of your ratchet. Get this in here. This one's a little tight, but it's spinning free. You'll want to have your drain pan handy. You can also check your fluid level this way. Fluid should just be below the edge. Can try to get your finger in there. Yeah, there it is. The fluid level is actually really good. I'm just going to reinstall that for now, and I'll take it back out when I'm ready to fill it. The drain pan in place to catch all the fluid that's going to come out. I'm going to use a half-inch socket on my ratchet and start removing the bolts around the outside of the cover.
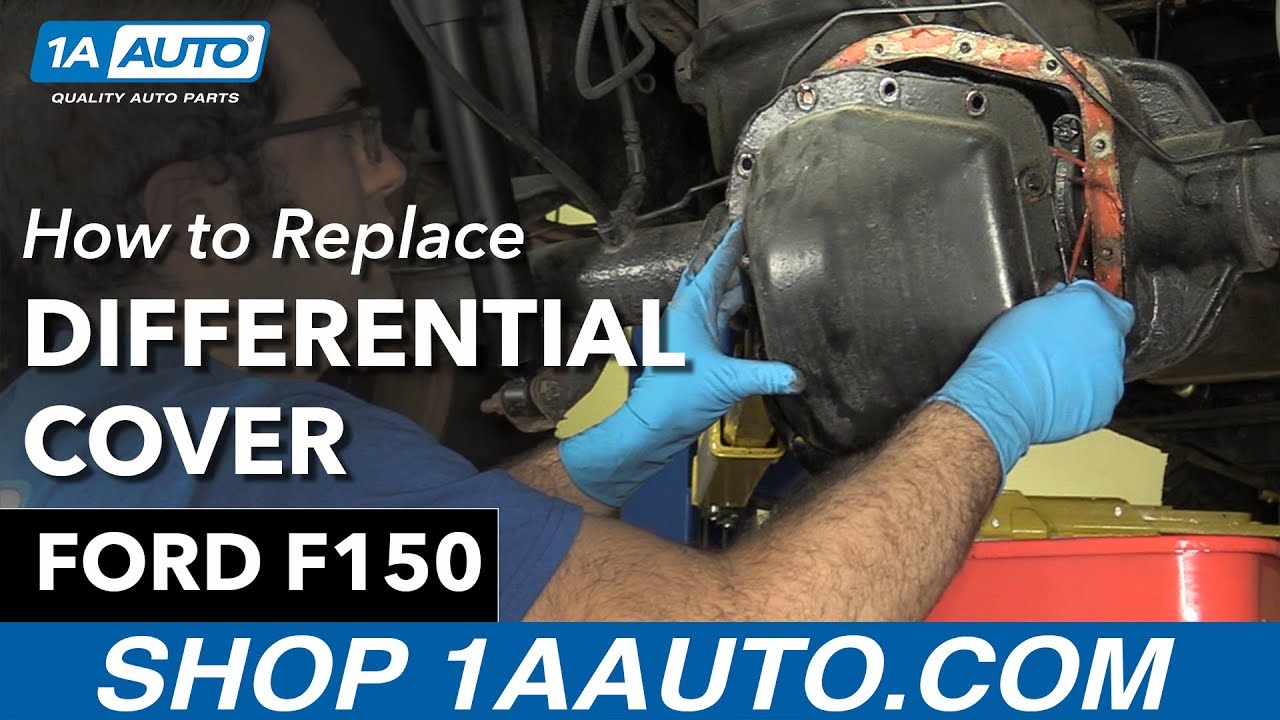
I'm going to leave this top bolt in here so when I pry the cover off, it suddenly comes loose. It won't just fall into my drain pan and splash fluid everywhere. Just going to take a flat-bladed screwdriver. Try to get it under the edge. This is sealed with like a RTV sealant. You just have to break that bond and get this off of here. Going to use a rubber mallet to try and break it free. There it is. It's free. I'm going to let that drain. Now it's free.
I'm just going to open it up just a little bit to let some of the fluid drain out. This way, it doesn't go splashing everywhere. With that pretty much drained, I'll remove that last bolt. We'll take our old cover. I'm just going to sit it in the drain pan. Before you can install the new one, this old gasket material needs to be cleaned off. Take a razor blade and a rag and just start scraping it off. Try to keep it from falling into the open differential. That's what the rag is for. It's just a matter of taking your time scraping it off. Now that the majority of it is cleaned off, I'm going to take some brake parts cleaner. I'll spray it on my rag and just finish wiping down the surface.
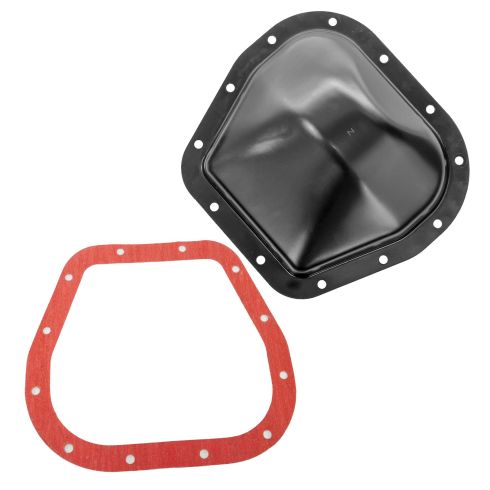
Here's our old rear diff cover from our vehicle. It's all kind of dirty, oily. Can see the old silicon sealer. This is our new cover from 1aauto.com. This one actually comes with a magnet in it to catch any metal shavings from the gears, which is really nice. You can see the O-pattern is the same, same shape. However, instead of using a silicon on this one, it comes with a cork gasket that we'll install, so you don't have to deal with messy sealers. This should work great for application.
When you're installing this cover, and you're placing the cork gasket over it, there is an orientation to it. Just double check. See, in this, when it's sitting like this, these two holes don't line up, but if we flip it over, all of the holes line up. Just double check the orientation of the gasket before you install it. I'm going to take one of our old bolts, put it through the pan, through the gasket. Place the pan and gasket in place.
Now that the pan's held in place, I can thread in the rest of the bolts. I'm just going to put these tags back where I found them. With them all pretty much seated by hand, I'm going to torque them now. The torque is 28 to 38 foot-pounds, so I'm going to torque these at 35, right in the middle. We'll just start at one side. Then, go opposite. Can move this out of the way for the time being. This way, you're tightening the cover evenly, and you're not warping it. I'm going to remove the fill plug that we loosened earlier. Put that aside so I don't lose it. This fill plug actually has a magnet on it. Just from normal driving, the gears inside the differential will wear, and you'll little bits of metal. Then, this magnet catches them. Before you refill it, just take a rag and clean off the metal shavings from the magnet.
Using a fluid transfer pump, I'm going to fill the differential with the recommended fluid from the manufacturer. You're going to want to have your drain pan in place, too. In this differential, the fluid level is supposed to be about a quarter of an inch to 9/16 of an inch below the level of the fill hole. That can be hard to tell. You can just get your finger in there and try to dip it a little bit. Or, I like to go just about now, where it's starting to dribble out. Get a little more in there. When it starts to dribble out, you should be about full. I'm just going to take my finger and just put it in. I can just feel the gear oil, and that's right about where it should be. With the level correct, reinstall the fill plug. I'll then torque it to 30 foot-pounds.
This is a 3/8 drive. I'm just going to use the 3/8 drive on the torque wrench. It is set to 30 foot-pounds. Can use some brake parts cleaner on a rag. Just wipe up any excess oil. This way, if you have a leak, it's easier to tell if it's fresh or not.
Thanks for watching. Visit us at 1AAuto.com for quality auto parts, fast and free shipping, and the best customer service in the industry.
Shop Products
Ford Lincoln Rear Differential Cover TRQ DCA34173
- Gasket
- Highest Quality Materials
- Direct Fit Replacement - Guaranteed to fit and function for your specific application
- Quality Tested - built to a strict level of product standards.

How to Replace Rear Differential Cover 2000-06 GMC Yukon
Watch this video to learn how to install a new differential cover on your 2000-06 GMC Yukon.

