
How to Replace Front Control Arms 2006-13 Volkswagen GTI
Created on: 2018-05-01
How to repair, install, fix, change or replace failing, rusted, rotted, or damaged rear upper control arms on 06, 07, 08, 09, 10, 11, 12, 13 Volkswagen GTI
-
step 1 :Removing the Wheel
- Loosen the lug nut covers with the supplied lug nut tool
- Loosen the 17mm lug nuts with the vehicle on the ground
- Raise the vehicle with a floor jack
- Secure the vehicle on jack stands
- Remove the lug nuts
- Pull off the wheel
-
step 2 :Removing the Control Arm
- Remove the two 16mm bolts from the control arm
- Remove the 18mm bolt from the control arm
- Remove the three 16mm bolts from the ball joint
- Place a lug nut on a ball joint stud
- Remove the 18mm bolt from the control arm
- Pry down the control arm from the ball joint
-
step 3 :Installing the Control Arm
- Insert the control arm into place
- Tighten the front 18mm bolt to the control arm
- Tighten the 16mm bolts to the control arm
- Tighten the 18mm bolt to the control arm
- Tighten the three 16mm bolts to the ball joint
- Torque the front 18mm bolt to 70 Newton meters
- Torque the 16mm ball joint nuts to 16 newton meters
-
step 4 :Reattaching the Wheel
- Slide the wheel into place
- Start the lug nuts by hand
- Tighten the lug nuts preliminarily
- Lower the vehicle to the ground
- Tighten the lug nuts to 120 Newton meters in a crossing or star pattern
- Tighten the lug nut covers
Tools needed
-
Socket Extensions
Torque Wrench
16mm Socket
17mm Socket
Jack Stands
18mm Socket
Ratchet
Floor Jack
Hi, I’m Mike from 1A Auto. We’ve been selling auto parts for over 30 years!
All right, we're going to take the tire off. On most Volkswagens there's little caps that go over these lugs and the caps you're going to need the tool from the spare tire kit. You'll put in and grab, it's like a hook, and you'll pull the cap off. But this vehicle does not have those on currently. We're just going to loosen up the lugs with a 17mm socket and a breaker bar. One at a time, just a little bit. Raising and jacking this vehicle.
You're not going to want to use a jack or jack stands on here, on the control arms or on this aluminum, because you may break the aluminum over there. Some places you can jack up from is over here where the pinch weld is. On this Volkswagen you can see there is specific spots where you're supposed to jack the vehicle or support the vehicle. These little arrows indicate that and right on the pinch weld is the strongest part for jacking and supporting. The same over here, this side. There's a little arrow pointing down. This one looks like it got smashed a little bit.
We're going to take off the lugs. Volkswagen has lug bolts not lug nuts or lug studs. We need to be careful in pulling off the wheel. And then you grab the wheel. It comes right down.
We're going to take off these lower control arm bolts, these two with our 16mm. We're going to use a socket, a 16mm socket and extension and a ratchet. On this bolt, I'm going to take out an 18mm and use a socket and extension and a ratchet. All right, next we're going to separate the ball joint from the control arm. We're going to use a 16mm deep socket and extension and a ratchet. Next, we're going to take this bolt out with an 18mm. I'm going to use a socket and a ratchet. I am going to put one nut here so that the control arm doesn't fall while I'm loosening this last bolt. Now I'm going to use a pry bar to go in between here to separate the control arm from the body. And I'll pull that nut back out. Pull the control arm down.
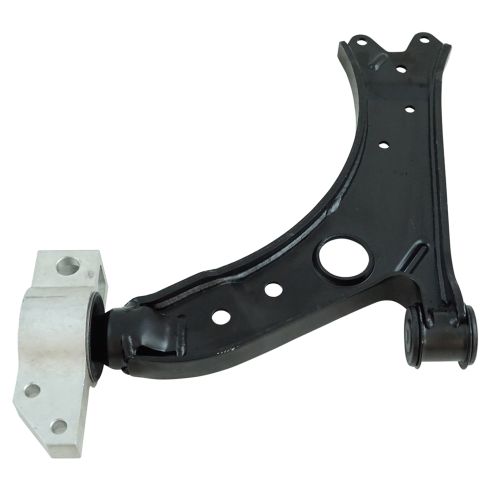
Here's your old control arm. Here's your new control arm from 1AAuto.com. As you can see, the actual design of it is very similar. There is some differences. This actually looks a little more solid than this—less likely to bend. It does comes with new nuts, as you can see. But the overall design looks very similar and it is machined the same.
Now I'm going to reinstall our control arm. I'm going to start with the front bolt. Put the nuts on. I'm going to put our other control arm bolt in. You may have to move the control arm a little bit to get the holes to line up. And I'm going to use the socket and extension, 16mm, and a ratchet. This front bolt, we're going to want to torque to 70 newton meters and it clicks. All right, we're going to use a torque wrench and these nuts are to be torqued to 16 newton meters.
Now I'm going to install the tire. Line up with the holes and hold and we'll use our 17mm socket to put our lug studs on or lug bolts, whatever you want to call it. Put our center cap on. Now we're going to torque the lug studs to 120 newton meters in a star pattern. When you do it in a star pattern, it makes the wheel go flush to the brake rotor properly.
Whenever you change front-end components or remove front-end components and reinstall, you always want to go to a local garage and have an alignment performed, because you are going to change the geometry of the wheel and tire going down the road. And you do not want premature wear on your tires, so you want to make sure you do that and you'll be all set.
Thanks for watching. Visit us at 1AAuto.com for quality auto parts, fast and free shipping, and the best customer service in the industry.
Shop Products


VW Audi Front Passenger Side Lower Control Arm TRQ PSA63746
- No
- Yes
- Steel
- Bolt In

How to Replace Passenger Side Lower Control Arm 2007-14 Ford Edge
Control arms are a crucial part of the suspension system of your vehicle. They carry the load of the vehicle to the wheel and maintain its alignment. Control arms are large and strong. They contain rubber bushings for smoother rides at the cost of eventual wear. How to install a new quality TRQ passenger side lower control arm in your 2007-14 Ford Edge.

