
How To Replace Front CV Axles 2007-17 Chevy Silverado
Created on: 2013-10-22
Watch this video to learn how to fix a worn or groaning drive axle. The experts at 1A Auto show you how to replace the CV axle on your 07-13 Chevy Silverado and GMC Sierra.
-
step 1 :Removing the Wheel
- Remove the three 18mm nuts holding the top of the strut
- Pry off the center cap with a flat blade screwdriver
- Loosen the 22mm lug nuts with the vehicle on the ground
- Raise the vehicle with a floor jack
- Secure the vehicle on jack stands
- Remove the lug nuts
- Pull off the wheel
-
step 2 :Removing the Stabilizer Link
- Turn the wheel by hand
- Hold the upper stabilizer link stud with a 15mm wrench
- Remove the lower nut from the stabilizer link with a 15mm wrench
- Pull off the stabilizer link
-
step 3 :Removing the Suspension
- Remove the shock strut with a 15mm socket and ratchet
- Press down on the suspension and pull the strut down and out
-
step 4 :Removing the Axle
- Remove the center cap with a hammer and chisel and flat blade screwdriver
- Have an assistant hold the brakes
- Remove the 36mm nut from the hub
- Place a flat blade screwdriver in the brake rotor
- Remove the six 15mm bolts holding the axle to the differential
- Pull the axle out of the differential
- Remove the axle
-
step 5 :Installing the Axle
- Insert the axle into the hub
- Insert the other end into the differential
- Insert and tighten the six 15mm bolts
- Torque the 15mm bolts between 55 and 60 foot-pounds
-
step 6 :Installing the Suspension
- Tighten the 18mm nuts to the top of the strut by hand
- Insert the strut into place
- Insert and tighten the 15mm bolt and clips to the bottom of the strut
- Torque the 15mm bolt between 70 and 75 foot-pounds
-
step 7 :Reinstalling the Stabilizer Link
- Push the stabilizer link into place
- Tighten the upper nut onto the stabilizer link with a 15mm wrench
- Hold the upper nut with a 15mm wrench
- Fasten the lower nut onto the stabilizer link with a 15mm wrench
-
step 8 :Reattaching the Wheel
- Slide the wheel into place
- Start the lug nuts by hand
- Tighten the lug nuts preliminarily
- Lower the vehicle to the ground
- Tighten the hub nut to 156 foot-pounds
- Tighten the lug nuts to 100 foot-pounds in a crossing or star pattern
- Reattach the center cap
- Tighten the three 18mm nuts to the top of the strut
- Tighten the 18mm nuts to 70 foot-pounds
Tools needed
-
Socket Extensions
Torque Wrench
15mm Socket
Rust Penetrant
18mm Socket
Slip-Joint Pliers
Ratchet
Assistant
3/8 Inch Breaker Bar
36mm Socket
22mm Socket
Brought to you by 1AAuto.com, your source for quality replacement parts and the best service on the Internet.
Hi, I'm Mike from 1A Auto. I hope this how-to video helps you out, and next time you need parts for your vehicle, think of 1AAuto.com. Thanks.
In this video, we're going to show you how to replace the right hand, or passenger side, front axle on this 2011 Chevy Silverado. This is a 1500. The procedure for the left axle is pretty much the same, and it's also the same for these trucks for model years 2007-2013 for both this Chevy Silverado 1500, as well as the GMC Sierra. In this repair we use new axle or axles from 1AAuto.com, jack and jack stands, 15 to 22mm sockets with a ratchet extension. You'll need a breaker bar and a pipe for some extra leverage, a 36mm socket, and I separate that one out because it's not one that's usually in your regular socket set. You'll need to buy that one special, some penetrating oil, and a torque wrench. You can replace these axles one at a time, or in pairs.
From the top, there are three 18mm nuts that hold the top of the strut in place. You see one there, one has a wire lube on it there that I'm going to reach down and grab and just pull off. Apologies for the camera shot, but you just grab the wire clip and pull it up off the stud. Okay, so you have your other one there and your third one there. Now use an 18mm socket with a long extension and remove those three nuts. Remove the center cap just by prying with a screw driver. If you don't have the benefit of air tools, loosen the lug nuts with the vehicle on the ground then raise and secure the vehicle and then remove the lug nuts the rest of the way. Remove the wheel and tire they are 22mm lug nuts.
Turn the wheel using hands or the steering wheel. Then you need to remove the stabilizer link. Make sure you put some penetrating oil on the top end of it there. Then use a wrench on the top side and a socket wrench on the bottom side. Remove it all the way. We're going to kind of speed up a little bit, "cheat" a little bit while using an impact wrench to take that off to speed things up for us. Here's the shock and strut in place. We're just using that 15mm socket ratchet. You might want a breaker bar to break them loose, but they come apart pretty easy on this truck. We'll fast-forward as we just take those out.
Get those bolts out. Press down on the suspension some, and bring the strut down and then up and out. Using your hammer and a cold chisel, you could also use a large pair of pliers to pull off that center cap. We just kind of get it started, and then pry it off with a screwdriver. Okay, the nut is a 36mm nut if you have the benefit of an air impact wrench. You can also just pull the brakes, use a breaker bar and a large pipe or something for extra leverage to loosen it up. We'll put the wheel back on, set the emergency brake, and take it off. Loosen it up that way, and then raise the vehicle back up and take it off the rest of the way.
We're going to put a screwdriver into the brake rotor, that's going to hold things in place. You could do that also when you're removing that 36mm nut for the end of the axle. Then there are six 15mm bolts that hold the axle to the differential, and we're just going to remove those. And once those bolts are out, pull the axle from the differential and pull it right out.
The new axle goes right up into place. Put it into the hub first, you have to twist it a little bit to get the splines to line up. Then push on the other end of the axle and put it up into place. Line it up with the differential. Now I'll just fast-forward here as we put the bolts in, start all the bolts in, and then tighten them up preliminarily. And then you want to tighten all the bolts to between 55 and 60 foot-pounds. We'll fast-forward as we make sure we torque all those bolts correctly. And we're using the screwdriver to hold the rotor in place so we can torque it.
Now we'll go back to putting the strut in, and the strut does line up. There is a, you can see where the spring goes into the mount. The end of the spring should face out. Put the strut up in place and start the bolts on. You'll notice we're putting in a new strut in here. You'll also probably notice that there's an old axle in the footage, that's because when we filmed putting the strut and everything back together, we had not replaced the axle yet.
Now put the bottom down in place and take your bolt run up through, and then those clips that you took off of the original strut, put them into place. We just kind of hold them with our fingers, get the bolts started in, and then you can press them down into place and tighten up the bolts the rest of the way. Okay, and you can see here we use a screwdriver to put through the clip to hold it in place until it gets down far enough that it holds itself in place. And repeat it for the other side as well. Okay, and you can tighten these up between 70-75 foot-pounds.
Okay, speed up as we put the stabilizer link back in place. Use a pry bar to lift up on the sway bar a little bit, put the link back in place, put the bolt up through and then tighten the nut down on top. Put the tire back on, thread the lug nuts on, and then tighten them up preliminarily. Put that center bolt back on and tighten it to 156 foot-pounds. Torque your lug nuts to 110 foot-pounds using a crossing pattern. And then put that center cap back on. And then back up top, tighten up the three nuts that hold the top of the strut in place, tighten them to 70 foot-pounds. And put that wire retainer back in place and you're all set.
We hope this video helps you out. Brought to you by www.1AAuto.com, your source for quality replacement parts and the best service on the Internet. Please feel free to call us toll-free, 888-844-3393. We're the company that's here for you on the Internet and in person.
Shop Products


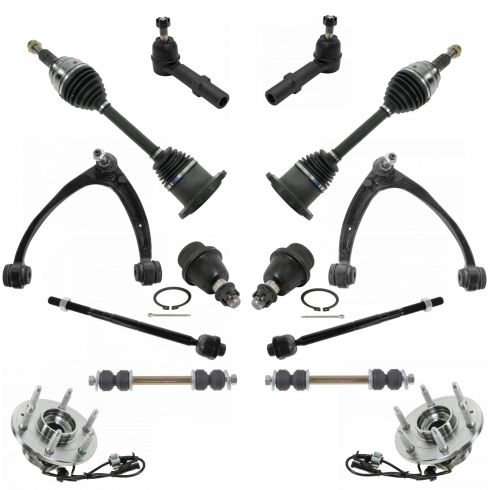
Chevrolet GMC Cadillac Front 14 Piece Steering, Suspension, & Drivetrain Kit TRQ PSA58882
- (2) Front Lower Ball Joints
- (2) Front Upper Control Arms with Ball Joints
- (2) Front Outer Tie Rods
- (2) Front Sway Bar Links
- (2) Front Wheel Bearing & Hub Assemblies
- (2) Front Inner Tie Rods
- Tapered Roller Bearing
- 14 Piece
- (2) Front CV Axle Assemblies
How to Replace Front Passenger Side CV Axle 2003-07 Honda Accord
Watch this video to learn how to replace the passenger side CV axle on your 03-07 Honda Accord. The driver side is covered in another video!

