
How to Replace Front Wheel Bearing 2000-06 Toyota Tundra
Created on: 2018-11-20
How to repair, install, fix, change or replace a worn out, vibrating or groaning wheel bearing hub on 00, 01, 02, 03, 04, 05, 06 Toyota Tundra
Tools needed
-
35mm Socket
Socket Extensions
Torque Wrench
14mm Socket
Hammer
Ball Joint Press
17mm Wrench
Pry Bar
Jack Stands
19mm Socket
21mm Socket
Flat Blade Screwdriver
Center Punch
Bungee Cord
10mm Socket
Ratchet
Floor Jack
Needle nose pliers
1/2 Inch Breaker Bar
Hi, I'm Mike from 1A Auto. We've been selling auto parts for over 30 years.
Hi, everyone. Sue here at 1A Auto and today we're going to show you how to remove the front wheel bearing on a 03 Tundra. You need any parts for your car? Click on the link below and head on over to 1aauto.com. Taking the wheel off with a 21 millimeter socket. I like to loosen them up in the star pattern, even though that's how you mount them, I still take them off the same way and make sure the weight of the vehicle is on the truck tire and loosen up the lug nuts. We're not taking them all the way off. We're just loosening them. At home, you can use a jack with jack stands. I have a two pulse lift I'll be raising my vehicle with. Now with the vehicle up in the air, it's safe for me to take the lug nuts off by hand. I'll just take them all off and then set them aside.
Now the lug nut is off. It's safe to pull the tire off. We're going to remove the ABS sensor. Detach it from the knuckle, so the mounting bolts of 10 millimeter socket. I'm going to take that bolt out of there. Then we're going to disconnect to the ... Sensor's got a little pinch in plastic connector on the bracket here. The reason we're taking it off is because when the knuckle has to go into the press, you can't have any electrical hanging out so it'll damage it. No one's taught this. Here we go, sorry. Now there's a bracket up on the upper control arm. That's just a 10 millimeter socket. Let's get that bolt out and we're just going to pull the sensor out, roll it up, and put it on top of the strut tower to get it in a safe place.
I'm just going to pull that sensor like this, wiggle it back and forth, and pull on it at the same time. It's got an O-ring where it seats inside that knuckle. You can use a flathead screwdriver if you can pry it gently, and that's the ABS sensor. It's going to bag in on the bottom. I'm going to roll that right up there, make sure it stays out of danger. We're going to disassemble or dismount the front caliper bracket, assembly everything is one piece from the knuckle. The back mounting bolts are 17 millimeter wrench. Let me hold it this way. I got more leverage with a ratchet and socket, so that's what I switched over to. Before we dismount the caliper completely and hang it with a bungee cord, I'm going to take out this lock clip.
I want it to have the flex and mobility to move over there. Take that out and I can move that. Take the bracket off. Looks like someone's been in here and the bolt is broken on that bracket. Now I can just mount the caliper. Switched over to a ratchet wrench and just go a little faster. Now I can pry the caliper off, get my bungee cord ready. You don't want that to hang down, so see if you can hold it up in the air. I like to wrap the bungee cord around the inside. Now I'm going to utilize the front coil spring, just slide those in there. Perfect. That should be out of our way enough. I can just guard the rotor, take it off. I'm going to take the dust cover off, the axle nut area, so I can get ready to take that. Might have to use a screwdriver on this because it is extra wide.
When using a flathead screwdriver, you don't want to go into the cover. It defeats the point of it. Go straighten it out after. Now I might be able to get my cover wedge in there. There we go. Upper control on ball joint. I'm going to take the cotter pin off because we have to take this whole knuckle out to do the bearing. It looks like someone took a cotter pin and use just or a piece of metal. Not worked and they just made a makeshift L-shaped bracket. I guess it totally is better than nothing, I will say that. Nineteen millimeter socket and we're going to take off the upper ball joint nut. Let's put that cast on the other side.
Before I disconnect the upper control arm from the knuckle, I'm going to take the axle nut off, so if the knuckle falls forward, it doesn't take any pressure on the axle shaft, CV shaft. I'm going to remove this cotter pin, and the cotter pin I get castle nut. Well, then it's not really castle nut. I think they call it a castle shield or walk shield. I got to lower the vehicle to break the axle nut free, so I'm going to put my pry bar and break it. The axle nut is a 35 millimeter socket, so I set my pry bar up in the lug nuts and I'm going to pry counterclockwise and break that's nut free. Once I take the nut out, I'll remove the pry bar and raise the vehicle back up to a good level to work on.
I have to break the upper ball joint out of the control arm, so I'm going to hit it with a hammer right here and hope to vibrate the ball joint spindle shaft out. I don't want to use a pickle fork because I don't want to rip the boot. I'm not replacing me the ball joint, so here goes nothing, and it worked. Cool. I just tap on the axle spindle, so it doesn't pull out. Now I have exposed the mounting bolts for the lower ball joint. There's four of them. I'm going to just spray those real quick and then take those out, and we'll have the knuckle out. The mounting bolts down here, 14 millimeter socket. The tie rod end does not have to come off to take the knuckle out because it has four bolts here. I didn't take it out by the ball joint stud. There's four of them.
Vacuum plate on this is seen better days. I just put the top ball joint back into the control arm, sorry, with just finger tight on the threads, so I can stop the knuckle from falling down, so I can hopefully hold this at a better angle. Here we go. Like I said, there's four of them, 14 millimeter socket. One more. Knuckles turn, here we go. Okay, we got all four out. Nope, one left. Okay, there we go. All four out. Now we can support it, hold it that's within, take that top castle nut back off, then we're going to slide it off the spindle, and there's our knuckle. We're going to take the seal off now and stop taking the bearing out and see what we get.
Okay. You can see the rubber was eating them--chewed and missed. Now I can't really see the bearing seat because of the Centrex ring. There's the seal. That's part of the rubber seal right there. I think the next step we're going to have to do is press this hub out, press the hub out of the bearing, and then take the bearing out. Now that we have the knuckle all pressed or may not press, sorry, the knuckle all set up on the press, I have to push this centerpiece out. Not the big round piece, but the centerpiece which is going to be the hub. I fit a socket, nice impact socket that fits right in there and we're going to push down on it. The spindle's been pushed down, so now I can take the spacer off.
I'm just going to see if I can tap it with a hammer out because it's going to fall. Okay. Let's get there the black seal out of the way. Now I need to remove this seal, so we just pressed the hub out from this side that way and now to get the bearing out, I have to take the seal out and remove the lock clip. Lock ring should I say. We're going to go on this side see if I can hammer it out. Okay, and there's the lock ring right there. Now to remove the lock ring, you can use lock ring pliers. I have great success with these needle nose pliers, so I'll squeeze the clip and if you can't work it up like that, you can always use a small screwdriver, but I luckily got it up there so I'm just going to hook this way around.
I'm going to hold on to it because if not, once it reaches, it could fly away. Now that's the lock ring. We're going to reuse that. It's in good shape. Set the other side. Now we can press this bearing out this way. Before I press the bearing out, I'm going to take the ABS eccentric ring out. That's just you grab onto and pull it out, see what we got here. You want to examine it to make sure there's no cracks, no teeth missing. I ended up putting a ball joint tool in here to press this bearing out, and we used a rotor to compensate for pieces of press equipment. Let's see if it works. Got one. Here we have the new wheel bearing from 1aauto.com and here is the wheel bearing that we just pressed out of our 03 Tundra.
They looked the same, pretty much except that the 1A the manufacturer is probably pretty close if not still an OE. It has Japan stamped on it and it has like an OE number. This has zero numbers on it, except for some printed number that doesn't match up to anything one number and the bearing actually was coming apart and it's fairly new. Someone has just put it in and I can physically take it apart with my hand. I'm hoping that it was just a low grade model and that solves our problem and like I said, I really like this one from 1A Auto. If you need this part or any other part for your car, click on the link below and head on over to 1A Auto. Now I'm going to press in the new bearing in the knuckle.
Before I put it and place it in there, I take a rag and I make sure that I have no rust globs of grease, especially any foreign materials. You don't want any rust in there. It's not the best thing for the bearing, so get everything out. Looks pretty good. Now I'm going to line up my bearing. You want to make sure that you press it in flush, as flush as possible. Yeah, sitting pretty steady. I'm going to use an aluminum block until I get it down as flush as I can. The setup I have here, I have the new bearing in here. This is the old bearing, so that I can get on the outside diameter. This piece of right here literally is what we want to push on.
We don't want to push on the centerpiece of the new bearing. The old one's fine by pushing on it, but this has to guide and push the outer down. We only need to go about another maybe half an inch, so it seats itself. That sounded like it seated itself. Let's lift her up and take a look. Okay. Yup. It's seated flush all the way around. Going to install the lock ring, so I like to put one piece in like that, get it to start to see go around and I'll use my pliers, give it a squeeze. No. This will happen. Here we go, and it's locked in. I also got a new seal, inner seal from 1A Auto. You can get the whole kit or buy each piece individually, so now I'm going to install the inner seal. Just feel it around, see what it feels like. It's bottomed out.
Well good to flip it over and get ready to install the hub. It's really important when installing the hub, pressing it on. Now this is the back side of it. The hub is going to come through the other side, so this piece is going to be sliding inside this bearing piece, which you can see is a two piece system, it's split. If I was to simply slide that over this way and gets to that point and now the bearing will be on this side, so you got two pieces of the bearings. I put it on like that and say I just support this piece right her,. I put a bracket across here and stop pressing this hub through, it's going to do this. It's going to push the center bearing right out and now you've got a broken bearing and you got to start all over again.
You want to support this piece that the hub is getting pressed into. By doing that, what I do is I take a ball joint press and I'll take the cup. I'll just put it right in there and I'll use the sleeve for height, and now when I flip it over on my press, I've got an aluminum block here and I'm going to be pushing this through the other side. This will be the underneath setup that you can't see with your eyes. I think it is. This is the setup, then I'm going to flip over and place on top of my aluminum block. There we go, just like that. Going to center it. Okay, so now I'm ready to put the new hub in, center that. I ended up using my ball joint tool instead of an aluminum block on the top.
Whole time I'm pressing this down. I'm watching this inner bearing to make sure it doesn't start to move. This should go in real smooth. It shouldn't really be too much strain. Okay. I'm going to just take it out and take a visual, see what's going on. Once I got it down to the safe point and that's when I stopped, I said I could feel it bottom out, then I took this piece out so that the hub could go right through the center of the bearing. This was stopping it. I like to do that just to see it. Now I know it's through the first stage. Now I could take this out and I left just this cone underneath there, that's still supporting just the center of the bearing so that it doesn't push the centerpiece through.
Now I can go to this next second stage of the hub and there you have, the hub comes through and it comes through on this model. Doesn't look like a normal hub sometimes, but that's because we have an ABS eccentric ring that has to go on, and then we have a spacer that goes on, and this spacer should get pressed on. Now we're going to put the new inner grease seal on, so let's see the staging on it. This piece sits down inside the hub, so the cup is facing up. Push it down the best I can with my hand and I'm going to use a brass punch and work my way around. Yeah, you're still going to really seat it over here. Beautiful. Now I'm going to put the spindle in the new bearing. Well, look at that, it was like almost too easy. Okay, now I can line up the four bolts.
I'm going to have to pull on this. I think I'll get that side first and then come over to the side because I'm going to have to turn the wheel. Before I torque the bottom ball joint brace, I'm going to put the upper ball joint spindle through because just get all around help. Oh, nice. Nineteen millimeter socket and hopefully we're not spinning, but I think we are. I'm going to get a pry bar pull down on that. There we go. Be good enough to torque it now. The torque on the upper ball joint is 77 foot-pounds. Yeah, it looks like I lined it up too. Not going to put the new cotter pin in. Normally you shouldn't have to hammer it in, but it's pretty rusty in there, so I just made it a little bit easier for me. Now that flush like that.
We're going to peel the top piece back and I got to cut this about that way long enough so that I can pin it over. Now I'm going to torque the lower knuckle to ball joint. The four bolts are 59-foot pounds and that's a 14 millimeter socket. Yeah, let's go to the side. Last one. Perfect. Now I'm going to put the axle nut on. I'm setting aside of that by hand. Just going to go until it bottoms out. I'm going to put the rotor on and the caliper first before I low it down and torque that and because it's new hub, I'm just going to throw some [inaudible 00:30:05] on there mainly around where it seats on the hub because that's where the rust will form. That's not a new rotor, but it was just probably a good habit, huh. Perfect.
I'm going to clean the actual surface on the rotor with a rag. Because it's an old rotor, you want to stand clear of any rust piece like this. I've seen this through the years. It seats there and they mount it to the hub. When that goes down the road, it pulsates, so it is important to make sure you get all that out of there. Just make sure there's no little pieces at rest stuck on the hub. Looks good. Perfect. I'm going to put two lug nuts on their, seat that. It's easier for me to put the caliber on. Okay. Now we're ready to reinstall these caliper. I'm going to take the bungee cord off. Okay. Now make sure you notice how it twists. You don't want that flex hose all twisted up after you took it apart. There we go.
Okay. We got a top mounting nut bolt. Like usual, do it by hand, slide it by hand. Bottom on the same way. After I took this clip out as when I discovered that there was no bolts holding the bracket to the actual top part of the knuckle, they're just broken off into the knuckle, so I'm just going to put the clip back on the flex hose and the bracket, and then I'm going to wire tie that bracket to this knuckle, and seat that clip down on that flex hose and now we're going to get some plastic ties and tie that bracket to the knuckle. Now with my 17 millimeter ratchet wrench, I'm just going to snug these caliper mounting bolts up and then I'm going to torque them to this manufacturer's specs.
Okay, so now I'm going to torque the caliper bracket bolts down, 17 millimeter socket and it is 90 foot-pounds. That would explain why it took a lot for me to take it off with my hand. Perfect. I'm going to torque the axle nut, 35 millimeter socket. The axle torque is a 173 foot pounds, got my pry bar in there and here we go. Perfect. Now we're ready to put the cotter pin, put the castle nut lock washer on, and perfect, and put the dust cap back on. Don't forget that. Let's see. There we go. Now I'm going to put the ABS sensor back in and I'm going to look over this real quick, make sure there's no dirt or rusts, make sure there's no metal rust stuck on the magnet piece. Looks pretty good.
Okay, so I'm just going to put a little silicone on. There was a technical service bulletin online about this, about the ABS sensor, I'm sorry, not seating properly in the knuckle. I want to make sure I get a good seat on that. I can see that the O-ring has a little tear in it right there. I don't want that piece staying there, so I'm going to put a little silicone paste on there, so I can reassure myself. That's something we're going to really take a look at after we bolt it down. I want to make sure that's seated down all the way. I don't know if you can see from there where you're at. I'm going to make sure there's no dirt again, every second right up to the last minute where I put it right in there. Seat it right down.
That's just flushes, it seems like it's going to be. I get the mounting bolt. I'm going to put that moaning bolt in. Here we go. Set up a hand, that's a 10 millimeter socket. Once it's bottomed down, just going to really take her up. Okay. Now I'm going to put the ABS clip back in the bracket, poke it through, yup. The ears went through. Put this in the bracket and that pinch bracket, and then up on top on the control arm, there's a metal bracket with a 6 millimeter bolt, threaded bolt and that's a 10 millimeter socket. Tighten that down. Okay. Now I'm ready to put the wheel on.
I'm just taking a couple two little small wire ties and I'm tying this bracket onto the knuckle, well because it was rusting there and someone had broken off the mounting bolt while ago, a long time ago pretty rusted, so that was just floating there and it seemed to stay there, but I don't want my last time I touched it. I want it to be stable. I don't want it to fall down and hit the tire and rub and then wear out the flex hose or the steel line. That's a safety issue, so now I'll cut the plastic tabs off. Now I can take the lug nuts off by hand here. My rode is seated and I can reinstall the wheel. Now it's time to put the tire back on.
This is an alloy wheel, so you have a seat on the lug nuts and the metal piece goes into the aluminum, so definitely do it by hand, guide it in, and know that it's seated. I do two of them and that way when I go to lower it and tighten it, it's not off-center. Now with my lug nuts hand tightened and the truck on the ground, pressure on the tire, so the truck is not fully lowered, just pressure on the tire, I'm going to torque each lug nut to 110 foot pounds. That's the manufacturer of torque specs for this vehicle. I'm going to tighten in the star pattern. Just seats on the hub properly. I like to double check one last time, and you're all set.
Thanks for watching. Visit us at 1aauto.com for quality auto parts, fast and free shipping, and the best customer service in the industry.
Shop Products


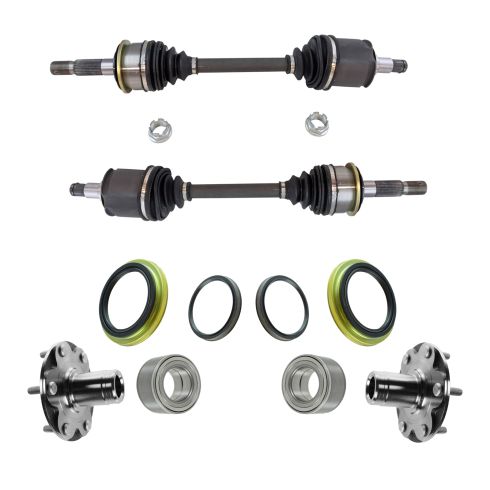
Toyota Sequoia Tundra Front 10 Piece Drivetrain Kit DIY Solutions ADS00150
- Heat Treated
- Precision Machined
- 100% New Components
- 10 Piece
- (2) Front Outer Wheel Seals
- (2) Front CV Axle Assemblies
- (2) Front Wheel Hubs
- (2) Front Inner Wheel Seals
- (2) Front Wheel Bearings
How to Replace Rear Bearings 2001-05 Honda Civic
New Wheel Bearing & Hub Assembly from 1AAuto.com

