
How to Replace Headlight Switch 2000-05 Chevy Monte Carlo
Created on: 2014-07-17
With this video you can learn how to replace the headlight switch on your 00-05 Chevy Monte Carlo. 1AAuto shows you how!
-
step 1 :Removing the Lower Dash Panel
- Press the tabs on the lower panel beneath the steering wheel and pull it down
- Twist the socket free from the panel
- Remove the bulb from the socket
- Remove the two 7mm bolts from the dash trim panel
- Unclip and pull the dash trim panel
- Remove the trunk switch harness with a flat blade screwdriver
-
step 2 :Removing the Steering Wheel Panel
- Lift up the steering wheel
- Remove the T25 screw underneath the steering wheel
- Pry out on the steering wheel lever
- Pull the lower steering wheel panel down and out
- Remove the E5 External Torx bolts from below the steering wheel
- Pull the upper steering wheel panel up and off
-
step 3 :Removing the Dash Trim Panel
- Unclip and pull out the fuse panel door
- Remove the 7mm bolt from the dash trim panel with a socket and ratchet
- Open the glove compartment and remove the 7mm bolt from the dash trim panel
- Pry off the ignition bezel with a flat blade screwdriver
- Pull out and unclip either side of the dash panel
- Pull the dash panel forward
- Use a flat blade screwdriver to disconnect the hazard switch without breaking the bezel
- Turn the car on
- Pull the shifter back all the way
- Pull the dash panel up and out
-
step 4 :Removing the Headlight Switch
- Remove the three 7mm bolts from the headlight switch
- Pull the switch out and pry out the headlight switch harness with a flat blade screwdriver
-
step 5 :Installing the New Headlight Switch
- Reinstall the headlight switch harness
- Replace and tighten the three 7mm bolts on the headlight switch
-
step 6 :Reinstalling the Dash Trim Panel
- Open the glove compartment
- Turn the car on
- Pull the shifter back all the way
- Pull the steering wheel down
- Line up the dash trim panel
- Reconnect the hazard switch
- Slide the shifter forward and remove the key
- Re-clip the dash panel
- Replace and tighten the 7mm bolts into the dash trim panel
- Replace the ignition bezel
-
step 7 :Reinstalling the Steering Wheel Panel
- Tilt the steering wheel down
- Reconnect the upper steering wheel panel
- Replace and tighten the E5 External Torx bolts
- Re-clip the hooks on the lower panel push it up until it clicks
- Replace and tighten the T25 Torx screw
-
step 8 :Reinstalling the Lower Dash Panel
- Reconnect the trunk switch harness
- Push the dash trim panel into place
- Replace and tighten the 7mm bolts
- Twist the bulb into the socket on the panel
- Push the lower panel into place beneath the steering wheel until it clicks
Tools needed
-
T25 Torx Driver
E5 Socket
Ratchet
7mm Socket
Flat Blade Screwdriver
Brought to you by 1AAuto.com, your source for quality replacement parts and the best service on the Internet.
Hi, I'm Mike from 1A Auto. I hope this how-to video helps you out, and next time you need parts for your vehicle, think of 1AAuto.com. Thanks.
In this video, we're going to show you how to replace the headlight switch on this 2003 Chevy Monte Carlo. The items you'll need includes a new headlight switch from 1AAuto.com, a 7mm socket, a ratchet, a T25 Torx bit, a flat blade screwdriver, and an E5 external Torx bit.
Underneath your steering wheel, you'll see this panel. You want to just push in these two tabs and pull it down. Then twist the socket free and pull the bulb out. Then you want to remove these two 7mm screws. Pull out your fuse panel door, especially make sure that the lower clip comes out. Then pull straight back on the lower panel on both sides. Then use a small flat blade screwdriver to help you release the clip on the harness to remove the harness.
Inside here is a T25 screw, just go ahead and remove that. Then pry out on this lever and it just pulls free, and then you can pull the panel straight down, unhook it, and pull it forward. Next, you want to remove these two E5 external Torx bolts. There's one right here and then one right here on the other side. We'll just fast-forward as Mike removes those. Once those are removed, you can pull this upper panel up and off. Now pull this panel off the rest of the way and remove this 7mm bolt right here. Pull down your glove box, and then remove this 7mm bolt right up here. Pry off this bezel. Then pull out on either side of the dash panel. You just want to feel for the clips back behind it and pull out. Once you get it free, just pull it forward.
Use a flat blade screwdriver to disconnect the hazard switch and be careful while doing this because you can break the bezel fairly easily. Now put your keys in the ignition, turn it to the on position, pull your shifter back all the way, and then lift your dash panel up and out. Now you want to remove these three 7mm bolts, and we'll fast-forward as Mike does that. Pull the switch out, and then pry out on the top and bottom tabs holding in the harness, and pull the harness free. There your switch is free.
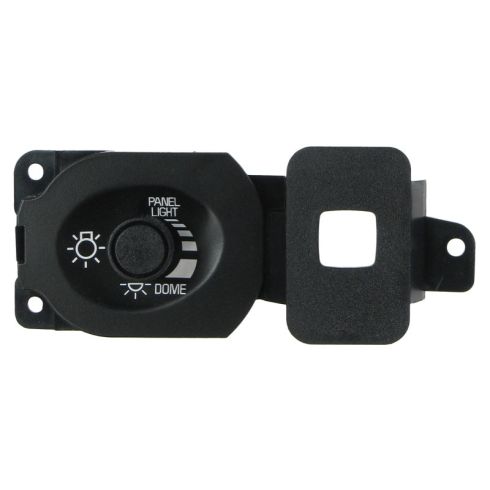
On the left is our original part; on the right is the new part from 1A Auto. You can see there's a hole on the bezel, that's because the part from 1A Auto will fit cars with the fog lights as well. The switches are the same, and they mount exactly the same. Ours just has provisions if you have the fog lights.
Our vehicle is a little more rare and doesn't have fog lights, so we do the simple and inexpensive method of closing that hole out, which is just some black electrical tape. Put it on there, and unless somebody really knows your car, they're not going to notice that little repair. Reinstall the harness connection, put it back in place, and reinstall the three screws that hold in place.
To reinstall the dash panel, open up your glove box, turn the key to the on position, and pull the shifter all the way back. Pull your steering wheel down, and then tuck the dash panel back behind the steering wheel. Now reconnect your harness, and then you can slide your shifter forward and remove the key, and then push the dash panel back in the rest of the way. Then just push in the clips all the way around it. We'll fast-forward as Mike replaces those two 7mm bolts and tightens them up.
Just push this bezel back into place. Tilt the steering wheel back down and then feed this upper panel back into place and push it back down. Replace those two E5 inverted Torx bolts. Now, feed in the lower panel. You want to push the back back behind and re-clip those two hooks. Then swing up the front, push it into place, and then just replace that T25 Torx screw.
Reconnect the harness to your trunk switch. Then push this panel back up into place. Then replace those two 7mm bolts underneath the panel. Push the bulb back into the socket and twist it back into this panel. Then feed the panel back. Then push it back up into place.
We hope this video helps you out. Brought to you by www.1AAuto.com, your source for quality replacement parts and the best service on the Internet. Please feel free to call us toll-free, 888-844-3393. We're the company that's here for you on the Internet and in person.
Shop Products

How to Replace Headlight Switch 2013 Ford F250
How to repair, install, fix, change or replace a damaged, worn out, faulty or shorted headlight switch on 13 Ford F250

