
How to Replace Power Steering Pump 2001-05 Honda Civic
Created on: 2016-05-04
If the power steering pump needs to be replaced, this video will show the necessary steps to successfully remove and install it
-
step 1 :Accessing the Power Steering Pump
- Loosen the two 12mm nuts from the power steering fluid reservoir
- Loosen the wingnut by hand
- Push the pump down
- Pull the belt off the power steering pulley
- Remove the 10mm bolt from the pump
- Remove the two 12mm nuts from the power steering fluid reservoir
- Lift up the pump and reservoir
- Put the pump and reservoir into a drain pan
- Pull the mount off the pump
-
step 2 :Removing the Power Steering Pulley
- Hold the power steering pulley with a pry bar
- Remove the 19mm nut from the pulley
- Pull off the pulley
-
step 3 :Removing the Pump
- Remove the two 10mm bolts from the power steering supply line
- Loosen the power steering hose clamp with pliers
- Disconnect the hose
- Allow the pump to drain
-
step 4 :Connecting the Pump
- Check the power steering lines for leaks
- Clean the power steering fluid reservoir
- Remove the shipping protectors from the new pump
- Connect the supply line to the pump
- Insert the 10mm bolts for the supply line
- Tighten the 10mm bolts to 8 foot-pounds of torque
- Push the hose onto the pump
- Tighten the hose clamp with pliers
-
step 5 :Installing the Power Steering Pulley
- Put the pulley in place with the flat side out
- Start the 19mm nut onto the pulley
- Hold the pulley in place with a pry bar
- Tighten the 19mm nut
-
step 6 :Installing the Pump
- Position the lower pump bolt
- Lower the pump into place
- Start the bolts and nuts onto the pump
- Put the pump mount into place
- Tighten the nuts preliminarily
- Pull the belt onto the power steering pulley
- Turn the vehicle's wheels
- Pull back the inner fender
- Pull the belt onto the crankshaft pulley.
- Tighten the wingnut on the pump mount, until belt moves 1/4" or less by hand
- Tighten the two 12mm bolts to 17 foot-pounds of torque
-
step 7 :Refilling the Power Steering Fluid
- Put the reservoir into place
- Fill the reservoir to between the minimum and maximum fill lines with power steering fluid
- Run the engine
- Check the power steering fluid level
- Add fluid as necessary
- Check the belt tension
- Retighten the belt if necessary
Tools needed
-
12mm Socket
Socket Extensions
Flat Blade Screwdriver
Pry Bar
19mm Socket
Drain Pan
10mm Socket
Ratchet
Cloth Rags
Needle nose pliers
12mm Wrench
Brought to you by 1AAuto.com, your source for quality replacement parts and the best service on the Internet.
Hi, I'm Mike from 1A Auto. I hope this how-to video helps you out, and next time you need parts for your vehicle, think of 1AAuto.com. Thanks!
In this video, we're going to show you how to remove, re-install, and replace your power steering pump. This is a 2003 Honda Civic. It's the same for a 2001-2005 Honda Civic, as well as Acura EL. Items you'll need are a new power steering pump from 1AAuto.com, 10-19mm sockets with ratchets and extensions, 12mm wrench, pliers, flat-head screwdriver, small pry bar, and Honda power steering fluid.
There are two 12mm nuts. Loosen them up, one here, and then pull your reservoir up and out. The other one is in here. You'll want to get that with a socket and ratchet. Once those are loosened up, you can just turn your loosening nut here. Turn it counter-clockwise a little bit. Then you can push the pump down which allows you to take off the belt. Now you want to remove this 10mm bolt and these two 12mm nuts the rest of the way. You can pull your pump up. Pull your top bolt out some, when you lift up push the bolt that you took the bottom nut off of and reach in and just pull it out some. Get it all the way out, and now your pump can come up. Bring the whole pump as well as reservoir up and put them into a drain pan.
You can actually take out this top mount at this point. We're going to remove the nut that holds the pulley. It's 19mm. You'll want to use a pry bar or something to put in here and that's going to hold the pulley while you put the- You can use a wrench, or an impact wrench is the best thing. It comes right off. Then pull your pulley off.
Remove these two 10mm bolts to remove the main supply line. You will get some fluid starting to come out once you get this loose. Then twist and pull to remove it. You can use a pair of pliers, squeeze the clamp, pull it back, and then get the hose to spin. You're going to get a lot of fluid in once you disconnect this. Your pump is out. Let it drain.
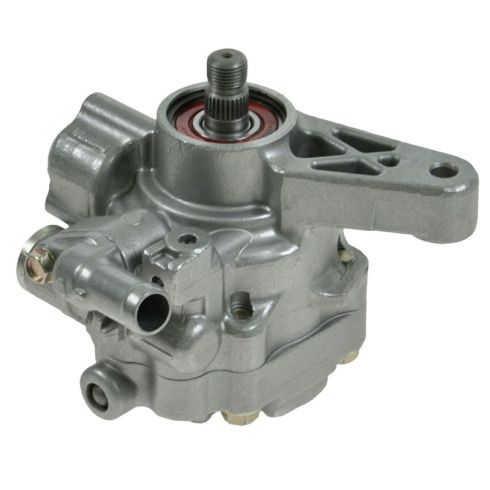
Here's the original part from the vehicle and the new part from 1A Auto. You can see they're exactly the same. You do have to remove some of the shipping protectors before you install, but it's going to go in there and then mount exactly like the original.
Before we install our new pump, just make sure you get as much fluid out as possible. Check the condition of your lines and make sure that there's- This moisture here I know is just from us removing it. Check the other end as well and check the whole length of your lines, make sure there's no leaks anywhere. We're just going to kind of do a general quick clean up of the reservoir. Make sure you kind of tilt your reservoir a few times. Try and get as much fluid out as possible. Clean off the end of your pressure line. A little clean power steering fluid just coat the o-ring that's on the pressure line. Bring this here. Push it in. Put your 10mm bolts back in. These should be tighten to 11 newton meters or 8 foot pounds. Remove this shipping protector. Install the hose and reset the clamp.
Take the shipping protector off, and put your pulley back on with the flat side out. Then put the nut back on. Put a bar in there to hold the pulley and tighten. Put this bolt in place. Then you can lower the pump down in. Push the bolt through and into the pump. Then start the nut on. Then put this top one through. Bring it up around and start the nut on the back side first. Then bolt this top bracket on. We'll tighten this up and then we'll tighten the nuts up enough so that the pump can still move so we can adjust the belt.
Pull your belt back up and put it on the power steering pump. If you turn your wheels all the way to the left and pull back in the inner fender you can access the bottom of the belt to pull it down onto the crank pulley. Then you can pull on your pump to tighten that belt up and tighten up this wing nut to the tension you want. You should be able to press on the belt, it should move about a quarter of an inch or less. Once you get that tight, now we'll tighten up these two nuts. Then we'll run the vehicle a little bit, check the tension again, and re-tighten it if necessary. These nuts should be 17 foot-pounds, although it's a little hard to get a torque wrench on them. Just get them nice and firm.
Then we'll put our reservoir back in place. You can see on the reservoir there are two marks, that's your minimum level and maximum level. Refill. Use Honda specific power steering fluid. As you fill you'll be able to see in the reservoir your fluid level, you can see it coming up. You'll want to fill it, run the vehicle, run the wheels back and forth. As far as steering, turn the steering wheel back and forth, and refill. Just make sure the first few times you run your vehicle to check and make sure you have the correct of power steering fluid in.
Start the vehicle. Then turn your wheels back and forth a few times. You can hear that whiny noise. That's happening at the end of the travel of the wheels. If you're low on power steering fluid that's the type of noise that you'll hear from your engine. After running the engine, see, our power steering fluid went down a little bit, so we'll add some more and check our belt. It's a little looser than I like, so we'll loosen it up and tighten that up. Just check around the pressure side there's no fluid so we're not getting leaks there. No leaks down at the bottom. No leaks back at the rack that we can see. You'll always want to fill your power steering fluid when the vehicle is off, not when it's on.
Thanks for tuning in. We hope this video helps you out. Brought to you by www.1AAuto.com, your source for quality replacement parts and the best service on the Internet. Please feel free to call us toll-free, 888-844-3393. We're the company that's here for you on the Internet and in person.
Shop Products

How to Replace Power Steering Pump 1996-2000 Honda Civic
Watch this video as we guide you through the process of replacing the power steering pump on your 96-00 Honda Civic.

