
How to Replace Trailing Arm 1990-2000 Chevy Lumina
Created on: 2010-04-28
This video will teach you how to remove the rear trailing arms, even if they are rusted or have jammed bolts
-
step 1 :Raise and secure the vehicle
- Jack your car up and place jack stands and the pinch weld lift points or on the brace next to the pinch weld.
-
step 2 :Remove the old control arm
- Coat the bolts on either end of the control arm with penetrating oil.
- Remove your wheel.
- Use a socket and wrench with a breaker bar to remove the bolts.
- Put the breaker bar on the nut and secure the bolt with the other socket and ratchet or wrench.
- Remove the control arm.
-
step 3 :Install the new control arm
- Put the new control arm into place and thread the bolt in, the top of the bolt on the inside of the car pointing outward.
- Apply some anti-seize grease to the ends of the bolts to help out whoever works on the car next.
- Jack up your control arm to put your suspension in the correct position before torqueing.
- Torque the control arm bolts to 80 ft lbs.
- Put the wheel back on, lower the car and torque the lug nuts in a star pattern to 100 ft lbs.
Tools needed
-
24mm Socket
15mm Wrench
24mm Wrench
Torque Wrench
15mm Socket
18mm Wrench
19mm Wrench
18mm Socket
19mm Socket
Ratchet
1/2 Inch Breaker Bar
Brought to you buy 1AAuto.com, your source for quality replacement parts and the best service on the internet. Hi, I'm Mike Green. I'm one of the owners of 1A Auto. I want to help you save time and money repairing and maintaining your vehicle. I'm going to use my 20 plus years' experience restoring and repairing cars and trucks like this to show you the correct way to install parts from 1AAuto.com. The right parts, installed correctly, that's going to save you time and money. Thank you and enjoy the video.
In this video, we'll be replacing the rear control arm on this 1992 Chevy Lumina; same process for a whole bunch of different GM cars, Buick Century, LaCrosse, Regal, Impala, Lumina, Monte Carlo, Cutlass Supreme, Intrigue, and Grand Prix. This is basically the same for any standard suspension car. As far as tools go, you need some various metric size wrenches from 15 to 24 millimeters and as you'll see in our video, we battle some rust so if you're going to be battling rust, we recommend Breaker Bar or Impact tools. Okay, obviously to start you're going to want to raise your car. These cars have a little plate in the middle of the rear suspension that you can use and that's where you can place your jack. Then you want to place your jack stands either on the pinch weld or on the brace right next to the pinch weld of the body. Coming in from behind, as you can see, New England winters have taken their toll on this old warrior. That control arm is actually totally broken, so what we're going to start out doing is we're going to coat these rusty, crusty bolts, both the rear one and the front one with lots of penetrant. We'll let those sit for a while. We're going to remove this wheel because removing the wheel is going to give us really easy access to this nut right here. Okay, so no doubt we're replacing this because of rust.
Down south you have a different problem, you don't have to worry about rust, but your bushings will wear out. Symptoms of this problem is if you're driving and you apply the brakes hard, if you have bad bushings your rear control arms will wander and your car will kind of pull. So, if you're in the South, you want to check these bushings and see if they're all dried and cracked, if they are then recommend replacing the rear control arms. All right, I'm going to try just an impact wrench on there and see what happens. Most likely this bolt's going to break, so I'm going to get this off whether it's by using the Impact wrench or try the breaker bar and if that doesn't work I'll Sawzall it off. Believe it or not here, the Impact wrench was successful, so if you got a car in the Northeast, I highly recommend having air tools for this repair. It's not impossible to do it by hand, but the air tools make it that much easier. Again, down south if you if you don't have the rust problem then this stuff will probably come apart pretty easy for you. Okay, there's half our problem. For the front here, I'm not as fortunate. I can't get the air tools onto it, so I'm going to do it by hand. I'm going to put, this is a breaker bar, nice long bar and I'm going to put it on you always want to put it on the nut end. Basically, you also always want to do you want to pull away from metal and you want I'm pushing on this one and you want to have a controlled pull because at some point the socket could slip off or a bunch of other things could happen and you don't want to just whack your face or your hand or anything else. I'm not going to hold this, because I think that bolt is frozen in there well enough, I'll just watch and see if this starts moving, but I'm going to-
Okay, the bolt did start moving. At least I'm getting good pull on it also, pulling down helps because I can use my body weight. This is actually moving. I'm going to have to- All right, mostly likely I am breaking this bolt but maybe not. It's actually turning kind of easily. I'm coming to the end here and unbelievably enough, I didn't break the bolt so I can use that to put it back together. Now excuse my French here a little bit while I pry this bolt out. Shaking that and it all comes out this car is rough. Okay, then there's the other half of my problem. Here's my whole part with some obvious issues. Here's my new part from 1A. Same thing, actually a much thicker piece of bar, or this is hollow and just kind of thick sheet metal. This is actually a closed rod. The larger end, make sure it fits nice and snug in there. You have two different widths. The bolts go in from the inside of the vehicle went through, and then this, the bolt goes in from the inside put this up in here and it's about a quarter inch away from being in there which is okay.
What I'm going to do is then take this nice big breaker bar, give myself some leverage, push the suspension forward and push that in. Just because it's habit from restoring cars put some Anti Seize on here, but most likely this new control arm's going to outlast the rest of the rust on this car anyways so it'll probably never be apart again, but if somebody ever does have to take it apart for some reason, the Anti Seize will help it. I'm going to put the bolts on and then I'll use on this back one, I'll use the Impact to tighten up some and then I'll tighten them up to about 60 foot pounds of torque. Before torqueing, what I've done here is this jack is actually pushing up and it's taking the weight basically off the lift so all the weight is on here. You want to have the weight; you want to have the suspension in the right position, before you torque the bolts up. Like I said, I'm torqueing at about 60 foot pounds. I've got my real bolt tightened into the point where the bolt's not twisting anymore, so now I'm just going to torque it to 80 pounds. Now we'll put on the wheel, torque those nuts when it's down on the ground and it'll be all set.
We hope this helps you out, brought to you by www.1AAuto.com, your source for quality replacement parts and the best service on the internet. Please feel free to call us toll free 888-844-3393. We're the company that's here for you on the internet and in person.
Shop Products


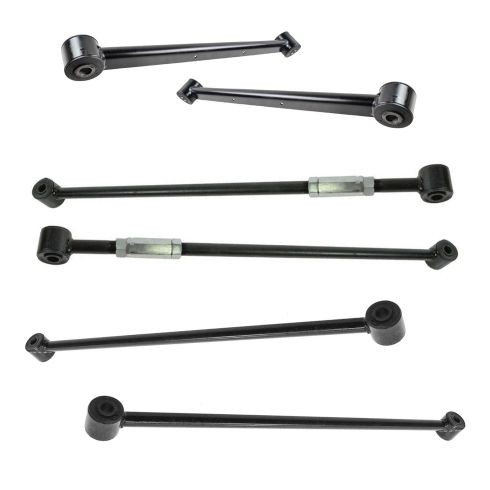
Chevrolet Buick Pontiac Olds Rear 6 Piece Suspension Kit TRQ PSA64929
- (2) Rear Trailing Arms
- 6 Piece
- (2) Rear Forward Lateral Links
- (2) Rear Rearward Lateral Links

How to Replace Rear Lower Control Arms 2009-12 Ford Escape
How to repair, install, fix, change or replace failing, rusted, rotted, or damaged control arms with ball joint on 09, 10, 11, 12 Ford Explorer

