How to Replace Window Regulator 2001-05 Honda Civic
Created on: 2012-07-13
Watch this video to learn how to fix a slow or stuck window. The experts at 1A Auto will show you how to replace the window regulator in your 01-05 Honda Civic.
-
step 1 :Removing the Door Panel
- Remove the triangle trim near the side mirror
- Use a screwdriver to remove the panel behind the door handle
- Pull off the panel on the underside of the pull handle
- Remove the two Phillips screws under the panel
- Remove the two Phillips screws behind the door handle
- Pry the door handle out and press the tab on the clip to release it
- Remove the clip from the door handle rod
- Disconnect the harness for the power windows
- Using a putty knife or door clip tool remove the clips around the edges of the door panel
- Lift the panel up and off
- Remove the water shield plugs and carefully pull the water shield down
-
step 2 :Removing the Window Regulator
- If the window doesn't stay up have a helper hold the window up
- Use a 10mm socket to remove the bolts on the regulator to free the window
- Slide the window up and out
- Disconnect the window motor wire harness
- Pull up and out on the connection to free the harness from the door
- Starting on the inside part of the door: Loosen the three 10mm bolts
- Loosen up the bolt diagonally down from those three
- Remove the bolt next to this one.
- Remove the bolt up from this bolt (the one further inside)
- Loosen the bolt next to this
- Lift up on the motor to free it.
- Pull the motor free from the door
-
step 3 :Installing the New Window Regulator
- Remove the bolts from the old regulator and regulator rail and put them into the new regulator
- Insert the new regulator into the door
- Line the regulator up with the bolt holes and hang it by the bolts
- Tighten the window motor and regulator bolts. Replace the bolts that were removed
- Reach in and pull out the harness and reconnect it
- Replace the pins
-
step 4 :Reinstalling the Window
- Put the window down into the door nose first then rotate it straight
- Line the window up into the regulator
- Insert the two bolts that secure the window to the regulator
-
step 5 :Reinstalling the Door Panel
- Replace the water shield and reinsert the water shield plugs
- Lift the panel up and towards the window
- Snap it down into place
- Hit the clips in around the door
- Reconnect the door handle to the door rod and reconnect the harness.
- Snap the door handle into place and replace the screws and panel behind the handle
- Replace the window switch harness and screws
- Snap the door pull handle panel back into place
- Snap the triangle panel at the top of the door back into place
Tools needed
-
Socket Extensions
Flat Blade Screwdriver
Phillips Head Screwdriver
Putty Knife
10mm Socket
Door Panel Removal Tool
Ratchet
Brought to you by 1AAuto.com, your source for quality replacement parts and the best service on the internet.
Hi I'm Mike from 1A Auto. I hope this how-to video helps you out and next time you need parts for your vehicle, think of 1AAuto.com, thanks.
In this video, we're going to show you how to replace a power window regulator on this 2003 Honda Civic 4-door. Procedure is basically the same with any '01 to '05 Civic 4-door with power windows. We'll show you the driver side. Passenger side is basically the same procedure. Many times it happens when your regulator fails, you'll hear a popping and a grinding noise and the window just kind of falls down to the door. Tools you'll need are a small flat blade screwdriver, Philips screwdriver, a door panel clip tool or a putty knife to help pry the door panel away from the door and a 10mm socket with a ratchet and an extension.
To remove the door panel, we'll start up here and pull firmly on that piece of trim. Get a smaller screwdriver right at the top, inside your door handle, there's a little indent little the door that comes down. Now use a screwdriver or just your fingernails and pull off this panel right here. Pull it firmly out and it comes off. Then there are two Philips screws in here and right in here so remove those. I'll speed up here as I remove those screws. Again, just using that Philips screw driver and get those out. Sometimes they don't come all the way out of the door and that's fine. Just when you pull the door panel off, just watch where they might drop out.
After you do those then there are two screws right in that door handle. Remove those. All right. Pull your door handle out. There's a little tab on back of your door lock switch. Press the tab. There's a clip that holds the door lock right on. You'll need a screwdriver or your finger to push the clip off then pull that up and off. There's a little tab right here where you're power window switch, press that and disconnect your power window switch. Now, using the door panel clip tool, get right in behind here up until you meet a clip, pull it out, go around the clip. Pull the door panel up and off. While doing that, a couple of clips came off. Just slide the clips right back in place, there and down here. Use a small screwdriver to pry up the little plug at the top corner of each door that hold the water shield on and then slowly and carefully pull the water shield down so you can actually access the inside of the door. You want to take care not to rip or stretch out the water shield too much. Okay these regulators are cable actuated and a lot of times what happens is the cable break, the window just falls down into the door and you can actually kind of grab on the window and move it up and down freely but obviously it doesn't stay up.
Now on my vehicle, in this vehicle the regulators are actually in good shape. What you would want to do is have probably a helper lift up the window so these two bolts are visible through these two holes and these bolts are the bolts that hold the window through the regulator so you need a 10mm bolt and you want to remove those. We'll speed up the video here. I'll use a 10mm socket and ratchet with an extension to remove those two 10mm bolts. Okay, lift that window up. Tilt it forward, put the front down and slide it up and out.
Okay, here is your lead for the window motor, press that and disconnect. What you'll want to do is then loosen up these three 10mm bolts. Loosen up this bolt here. Remove that bolt, remove this bolt and loosen that bolt. Okay, fast forward here as I kind of pull out and up on the connection to get it off the clips in the door and then there's another little clip. You just kind of press, squeeze the fingers and push it through and then I'll use my 10mm socket and ratchet with extension and loosen and remove the bolts as I talked about in the last scene.
Okay, lift this up. Lift them up on the motor. Here's a new regulator from 1A Auto. All the specs are the same. What I am going to do is just remove the bolts from the window motor and put them into the new regulator. I'll fast forward as I do this. What I'm doing is removing the bolts from the old window motor, the three bolts that hold it on and then just kind of threading them into the new window motor and also the two bolts remain on the regulator rail threading those into the same places on the new regulator rail.
All right, I'll put the motor in, reach in here and grab the motor and the new regulator in lifting the regulator rail up by that bolt and that bolt. Bringing the motor over here. Let's speed up the film here as I tighten up the three bolts that hold the window motor to the door and then turn my attention to the rail. You want to put the two bolts in that you removed and then tighten all four of those bolts up. When you tighten these bolts, you want them nice and firm but you don't have to crank them really, really tight. Just good and firm.
Okay, reach in and pull out your harness and reconnect it and put the pins back in place. Now take your window, feed the nose down in first, okay, and then twist or rotate it back and just make sure that the front goes into the correct channel and the rear goes into the correct channel. You should be able to get it leveled and then you will be able to slide it down nice and easy, slide it down to the regulator. Now take the two bolts that hold the window to the window regulator. You may have to just kind of move the window a little bit to get the holes line up but feed those in there with your extension and socket and then tighten them right up.
Now put your water shield back in place. Use the two plugs on the top. Pop them into place and make sure you place it on and seal it on the rest of the way around. Replace the lock first and lift it here through the harness and there, lift it up, snap it towards the window and then hit all the way around The door handle, put the broad end in. Lock the clip on, connect the lock button and put it first into place. Fast forward here as I put those two screws that hold the door handle in place back in, tighten them up firmly. Put the harness up, replace the two Phillips screws. Speed it up again as I install the two screws that hold the door pull part of the panel in place. Put this back in first and snap it right on and the two that go in the bottom. Snap that in place. Then put the trim here. Snap that up.
We hope this helps you out. Brought to you by www.1AAuto.com, your source for quality replacement parts and the best service on the internet. Please feel free to call us toll-free, 888-844-3393. We're the company that's here for you on the internet and in person.
Shop Products


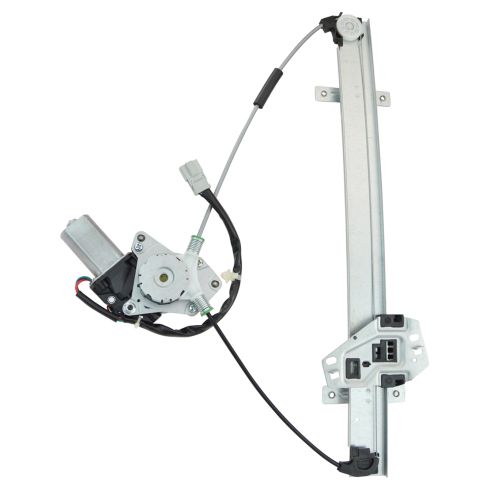
2001-05 Honda Civic Front Driver Side Power Power Window Motor & Regulator Assembly TRQ WRA51318
- Power
- No
- 8
- 4
- No
- No
- 15.75 in
- Galvanized Steel
- Nylon
- Yes
- One-Touch (Open)

How To Replace Manual Window Regulator 1980-96 Ford F150 F250 F350
Check out this video from 1A Auto to learn how you can replace the window regulator on your 80-96 Ford F-series truck.

