Top 5 Problems Dodge Grand Caravan Minivan 5th Generation 2008-20
Created on: 2020-03-28
Watch this video to learn the top problems with the 5th generation Dodge Grand Caravan according to Dodge, and mechanics across the US!
Hey, friends. It's Len here from 1A Auto. Today I wanna go over some of the top problems on this 5th Gen Dodge Grand Caravan. Let's get started.
So the first thing that I wanna talk about on this vehicle is premature brake wear. What I mean by that is that people have notated that they've had to replace the brakes on these more often than any other vehicle that they probably owned before. What I mean by that is they've said that they've replaced the brakes once, twice, and even three times in one calendar year because of undersized brakes on these vehicles. So some of the symptoms that you may notice is you might notice that your brakes are running a little bit hot. You get out of the vehicle and you can smell that smell, you feel a lot of heat coming from here. Maybe you're driving down the road, you step on the brakes, and you can feel your steering wheel shaking like this or even a vibration in the seat, and you can see it in the mirrors. That would be a brake pulsation.
Other things you may notice is a squeal. Maybe you've been driving for a while and you step on those brakes and you hear a little bit of a 'Eeeeee' super loud, high-pitched brakes squeal. Generally speaking, that would either be from one of those wear indicators saying that your brakes are worn low or it could just be because the friction material on the brake rotor has heated up and worn away so much that it's a super smooth surface, now you have a super smooth surface on another super smooth surface, and of course, it's gonna make noise.
So the causes that I found for this, overall, is the fact that for some reason, Chrysler decided they wanted to make their brakes a certain size when really, for their tow/haul capacity, they should have probably made them a little bit bigger. So what I'm trying to say is the brakes are just a little bit undersized and they really can't dissipate that heat that's created by the friction the way that they should. So what 1A decided to do is put together a brake kit for you, specifically for this vehicle that's gonna come with drilled and slotted rotors, and that's gonna help dissipate the heat and get you on the road safely.
So the second thing that I wanna talk about on this vehicle is located right under the hood, and it's called the TIPM. It's located right in the front here. And it's basically, the TIPM stands for the totally integrated power module. Essentially, you grab these little tabs, you lift it up like this, and what you're gonna see is pretty much every relay/fuse that you're gonna need to power everything up inside the vehicle, except for maybe a couple that might be located inside the dash/under the dash. Generally speaking, right inside here, you're gonna have issues with moisture, getting in and ruining up the circuit boards.
So some of the symptoms for bad TIPM, like I said, TIPM, totally integrated power module, essentially, is your car is gonna start doing wonky things. Maybe you're not even standing next to the thing and the window starts deciding they wanna go up and down. Key's not even in it. The wiper blades go, the horn starts honking. You go to start the vehicle, crank, crank, crank, crank, crank, but it's not cranking over. There's so many different things, but pretty much anything that could happen that might make you think that your vehicle's possessed in some way is more than likely controlled by the TIPM.
Okay. So hopefully I didn't scare you too much with that, but there are a couple fixes for that. Generally speaking, what you could try to do is test the box. What I would do is just pull out each fuse separately, just take a peek inside and see if it looks like it's discolored. If you find anything that's discolored, of course, I would replace that. And you'd wanna make sure that you check inside the box to make sure that there's no corrosion or anything inside there as well. If that fixed the issue, great. If it didn't and you found that there was no issues inside here, I would try to go down to the dealer and see about getting a reflash done. Overall, it's heard that that works quite often, but it's not all the time. Lastly, if none of that's worked so far and you don't wanna put any more time and effort into it, I would just go ahead and replace the whole TIPM unit with, of course, brand new fuses and relays.
Okay. The third thing that I wanna talk to you about on this vehicle is located right under the hood along the passenger side, and that's the oil filter housing. I'm gonna go over a couple symptoms and things we should be looking for. Come on. All right. So right under the hood, if you look right along the passenger side of the engine, you're gonna see this area right here. If you were to put a 24-millimeter socket on this, turn it to the left and lift up this cover, under there, you're gonna see the oil filter. That's great. Every time you do an oil change, you always replace the oil filter. That's good habit. Generally speaking, when people go to tighten them back up, they don't know what they're doing and they'll over-tighten it and maybe use something that looks a lot like this. So I'm putting the pressure on there and I tighten it. Next thing you know, I cracked that plastic housing. And obviously, boo. That is no good because you have oil pressure. It's getting pushed up through there, supposed to be forcing oil through that oil filter, you know, mesh on the inside there and it's not happening. It's kind of forcing it out through the crack and you're gonna notice it start to leak. More than likely it's gonna come down, it's gonna go right down inside here and it's gonna sit inside the belly of the engine, right down there. You might even notice it coming down along the passenger side of the engine. Okay. So the fix that I found for this is to go ahead and replace that oil filter housing. Luckily for you, we sell them at 1aauto.com. Once you're done installing, make sure you torque everything to manufacturer specifications. And every time you do that oil change, when you torque that oil filter torque it to 25 Newton meters. Come on.
The fourth thing that I wanna talk about on these vehicles is the left rear automatic sliding door module. Let's talk about some of the symptoms. So some of the symptoms for this, and they'd say that there's two, but overall, really, it's only one, the automatic function on this left rear door just doesn't work right. Whether it's you're trying to make it go all the way closed and it doesn't wanna function in an automatic state or all the way open, or even sometimes it doesn't work either way. Some of the causes for this, if the motor's definitely working, I mean, we physically saw that something's going on down there. It's just not functioning right. What we would have to do is obviously make sure that there's power going everywhere where it needs to be, and then secondly, of course, make sure nothing's really off the track. If something's off the track and the door thinks that it's binding for some reason, it might think that a child's arm or, you know, anything made its way in between the door and this panel and it's trying to make sure that nothing bad happens. That's a safety feature, but, of course, the door not functioning the way that it should is kind of a safety issue. So let's move along to some of the probable fixes.
Some of the first fixes for me would be, of course, to try to fix it before I replace it. So I pull that power diagram. I'd make sure that I have power and ground going exactly where it needs to be all along through these wires. If I didn't, of course, I would check fuses and relays and make sure that the wiring's not pinched or anything like that. If I did have power and ground going right back to the power module that's supposed to be back there and it's still not functioning correctly, I would make sure that I diagnose that module as far as I could before I went ahead and replaced it, but more than likely, you're just gonna have to replace it.
And the last I wanna talk to you about is the transmissions in these things. Generally speaking, they're not that bad, but there is a little retainer inside this transmission that's gonna go bad and it's gonna cause harsh shifting and a couple other things, but let's get into that now. So some of the symptoms that you may notice, like I said, that harsh shifting, maybe when you're going from park to reverse, you go to let go and you feel the bump or even going from reverse, waiting to get into drive, you feel that clunk. You're driving down the road, you get to a hill and the transmission should wanna shift. It takes a couple minutes, the RPMs get a little high, and then when it does shift, boom, slams into gear. Well, that's no fun for anybody.
So a couple causes for this could be something as basic as maybe you haven't checked your transmission fluid in a while and it's just running low. You could have a leak someplace. The fluid gets low, of course, the transmission's not gonna shift right. Another thing that often goes bad in these, and this is a little bit more intensive, we'll say, inside this transmission, there's a little retainer that pretty much separates your transmission lockout and your transmission TCC accumulator valve. That retainer ends up going bad and next thing you know that solenoid in there isn't functioning the way that it should. So assuming we didn't see any fluid leaks or anything like that, we're pretty sure that the fluid isn't low. The other thing that could be wrong with this transmission, and unfortunately, is inside here. You would have to do a little bit more labor, take down the pan, take a peek inside there, and you're actually gonna find a little bit that goes bad. So the retainer is located right up inside here, inside the transmission. Like I said, you're gonna have to take this down. It's gonna make a little bit of a mess. That retainer separates the lockup control valve and the TCC accumulator valve. If it goes bad, your transmission's gonna have major issues, shiftability, hard shifting, or even delayed shifting when it's supposed to, in which case you would probably have to either replace the retainer and the spring that goes with that valve or just get a transmission overhaul/replacement.
Okay, friends. So we had a lot of fun making this video. Hopefully, you had a little bit of fun too. If you did, make sure you click on that Like button right down here and subscribe while you're at it. While you're subscribing, ring the bell, that way there you'll be kept up with all of our latest content as we continue on making these videos for you. While I've still got your attention, why don't you leave me a comment and just let me know what maybe some of your top problems are, or even some of the top problem vehicles that maybe you'd like to see a video on? Thanks.
Thanks for watching. Visit 1aauto.com for quality auto parts shipped to your door, the place for DIY auto repair. And if you enjoyed this video, please click the subscribe button.
Shop Products
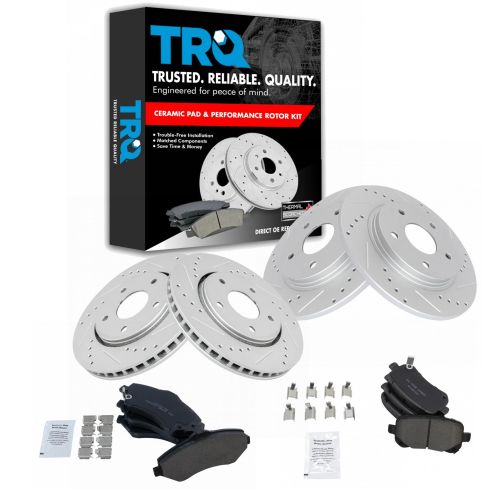
Dodge Ram VW Chrysler Front & Rear Ceramic Performance Brake Pad & Rotor Kit TRQ Performance BKA12203
- Premium Posi
- Cross Drilled & Slotted
- Ceramic
- Vented
- 11.89 in. (302mm)
- 12.01 in. (305mm)
- Vented
- 5 Lug
- Performance
- Premium G-Coated
- (1) Front Ceramic Brake Pad Set with Contact Point Grease & Hardware
- (1) Rear Ceramic Brake Pad Set with Contact Point Grease & Hardware
- (2) Front G-Coated Performance Brake Rotors
- (2) Rear G-Coated Performance Brake Rotors

How to Replace Rear Brakes 1994-2002 Dodge Ram 1500
Watch this video to learn how to replace the rear drum brakes and hardware on your 94-02 Dodge Ram.

