Replaces
Part Details
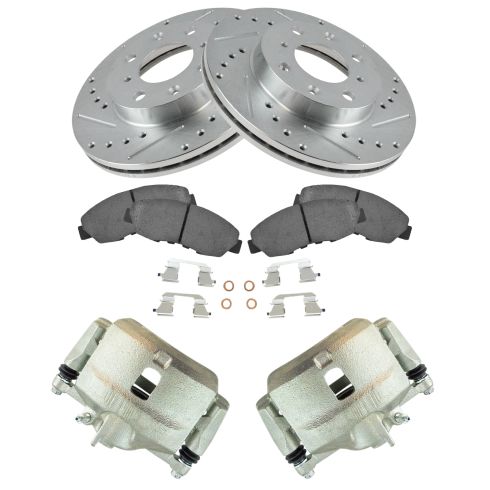
Complete Repair in One Purchase - Stop searching for parts individually and complete your repair with a customized kit or set from DIY Solutions.
High-Quality Parts from Trusted Brands - DIY Solutions' kits and sets are selected from the best automotive brands and include hard-to-find and even obsolete parts you may need for your vehicle.
Guaranteed Fit - DIY Solutions ensures its selected parts are quality-tested to guarantee fit and function.
Performance Brake Kit Features and Benefits
Item Condition:
New
Attention California Customers:
 WARNING: This product can expose you to chemicals including Lead and Lead Compounds, which are known to the State of California to cause cancer, and birth defects or other reproductive harm. For more information, go to www.P65Warnings.ca.gov.
Lifetime Warranty
This item is backed by our limited lifetime warranty. In the event that this item should fail due to manufacturing defects during intended use, we will replace the part free of charge. This warranty covers the cost of the part only.
FREE Shipping is standard on orders shipped to the lower 48 States (Contiguous United States). Standard shipping charges apply to Hawaii and Alaska.
Shipping is not available to a P.O. Box, APO/FPO/DPO addresses, US Territories, or Canada for this item.
Expedited is available on checkout to the United States, excluding Alaska, Hawaii.
Final shipping costs are available at checkout.

Created on:
Tools used
Brought to you by 1AAuto.com, your source for quality replacement parts and the best service on the internet.
Hi, I'm Jeremy from 1AAuto. I'm going to help you fix your car today, and the next time you need parts for your car think of 1AAuto.com. Thank you.
In this video, we're going to show you how to replace the front brakes on a 2003 Honda Civic. It's pretty much the same for a 2001-2005 Honda Civic. The tools that you'll need for this job include a jack and jack stands, 19mm socket and breaker bar, 12mm wrench, 17mm wrench, Phillips screwdriver, large c-clamp, wire brush, some anti-seize, and a torque wrench.
The first step is to break the lug nuts loose, and you do that by leaving the car on the ground so that the wheel doesn't spin when you lift up on it. Here we go. Now we're going to raise the car up and take the wheel off. Now we're going to pull it off.
The next step is to pull these two screws out of the rotor. Normally they're stuck in there really tight, so I try to use a screwdriver first, and then go on to more drastic measures if need be. These are actually coming out.
The next step is to remove these two 12mm bolts that hold the caliper to the caliper bracket. You can use a ratchet or the style wrench. One trick is to connect the two wrenches together, and then bump them with your fist so you can pull them out. The next thing I like to do is pull the caliper really hard toward me so that it compresses the piston inside the caliper. It makes the caliper loose, making it easier to remove. Remove the caliper.
Now we can take the brake pads out. These ones are in pretty good shape, so we'll probably end up putting these right back in. Then you're going to take off the caliper bracket, which, once again, you can use the same method of linking the wrenches together to break it loose. Now the caliper bracket is off.
Now that we have the caliper bracket off, we can take off the rotor, as you can see.
For reinstall, place the rotor back on the hub. Apply a little anti-seize to the Phillips screws, and put them back in the rotor. Clean up the brake pad slides to make sure that they're not going to make the brake pad bind up and cause uneven brake pad wear. Now we have the caliper bracket that needs to go back on.
Then we can put the bracket right back on after it's nice and clean. We are now ready to put the brake pads in. Normally, they're brand new and you can just slide them in, where this one is used. I'm probably going to put a little anti-seize on this as well. It does exactly what it is called, and it prevents the brake pads from sticking in the slides. You can see the squeaker right here. This is the thing that makes all the noise whenever you need new brake pads. That goes right here on the inside. You're going to need to compress this caliper. The best way to do that is actually with a giant C-clamp. As you can see, as you tighten the C-clamp, it pushes the piston in. Pretty awesome, right? Now it's completely compressed and you can pull the C-clamp out.
Like I said before, put the caliper on. Here's the caliper bolts. Once again, anti-seize. If you live in a dry climate, these things won't be rusty, but in New England, they're always rusty. Voila, your brakes are back together again.
It's now time to put the tire back on. Slide the wheel into place and tighten the lug nuts preliminarily. Lower the vehicle to the ground. The last step is to torque the wheels. I usually a hundred foot-pounds on pretty much all the wheels that I tighten. Basically, grab your torque wrench, always do it in a cross pattern so that the wheel goes on straight. Now the pedal's pumped and the brakes feel good again.
Hopefully this video has helped you out. You can visit us at 1AAuto.com for replacement parts and the best service on the internet.
Tools used
Brought to you by 1AAuto.com, your source for quality replacement parts and the best service on the Internet.
Hi, I'm Mike from 1A Auto. I hope this how-to video helps you out, and next time you need parts for your vehicle, think of 1AAuto.com. Thanks!
In this video, we're going to show you how to replace the front brakes. This is a 2003 Honda Civic, but the procedure is pretty much the same for the 2001 to 2005 models. This is for the sedans and coupes. We show you on the driver side, but the passenger side is the same procedure. We always recommend you replace the brakes in pairs. Items you'll need include new brakes from 1AAuto.com, 12 to 19 millimeter sockets with ratchet & extension, flat-blade and Phillips screwdrivers, both small and large, a number 3 Phillips bits as well as driver, large C clamp, pry bar, torque wrench, jack and jack stands, wire brush and grease.
Remove the front wheel, held on by four 19 millimeter lug nuts. If you have a different style hub cap, you'll need to remove that, but just use a breaker bar or your tire iron and loosen the lug nuts while the tire is on the ground. Now raise and support the vehicle. Now remove the lug nuts the rest of the way, and the wheel and tire.
With the wheel off, you can check the condition of your brakes. You can run a screwdriver or your fingernail up and down, front and back. Check for any deep grooves or ridges and actually even though the rotors look a little rusty, that's just from not being used. They're actually in pretty good shape. The outer pad, you can see right here, actually still pretty thick on this vehicle. Now in behind we can see your inner pads right here, again thick. Actually, the brakes on this vehicle are not in bad shape, but we're going to take them apart and put new ones on to show you.
Remove your caliper, we're going to remove two 12 millimeter bolts here and up here. Then later on, we'll be removing the whole caliper bracket so that's two 17 millimeter bolts here and up here. Before you remove those two 12 millimeter bolts, it's helpful, use a large screwdriver or a small pry bar. Insert it in here and pry out and this pulls your caliper out, which actually pushes the caliper piston back in. It can make it a lot easier to get the caliper off. You're just prying slowly, the calipers moving out. It'll go back some when you release it and now we'll remove those two 12 millimeter bolts. Then remove the caliper, put it up, make sure it's secure so it won't fall down. Then, with the caliper out of the way, you can see better. Here's the wear marks on your pads as they wear down, those disappear. That's when you know it's time to replace your pads.
Remove, pull the pad out and up, same thing on the back side. Out and up. Remove the caliper bracket, we're going to remove those two 17 millimeter bolts. If they're still here, you need to remove these two Phillips screws. It's possible, although not likely, that you can just use a number 3 Phillips screwdriver, then remove them. You'll need to use a number 3 bit on a ratchet. If you just kind of shock them real quick, it'll come off.
Hopefully your rotor will just come right off. If you find that it doesn't come off easily, you can take a couple of M8 bolts and thread them into there and push them off with the bolts.
The original parts from the car: driver side pads, new rotors from 1A Auto, and then the pad set here and the rotors you can see exactly the same, same countersunk holes and everything. You're going to install just like the original, except your brakes. The rotor, just make sure that you line up the countersunk holes with the thread holes.
For the hub, put that on, and you can use the original screws or sometimes just use a lug nut to hold things together. These, you just want to tighten them up a little bit. You don't want to make them very tight, because you don't want to make them hard to get off next time, but just to hold things in place. Make sure that your slides here are nice and free. This one doesn't actually, it's a little bit less free than I'd like, so you can just pull them out. We'll clean it up and we'll put some new grease on it. You'll also want to clean up your slides if you don't put new slides on them, just use a wire brush on both sides.
There's some grease, spread it on, and reinstall and make sure it's really free. You're going to install the caliper bracket. It'll be 17 millimeter bolts that hold it. You want to torque these to 108 Newton-meters which is 80 foot-pounds. Make sure our caliper piston is back inside the caliper, just put your old brake pad in place. Use a large C-clamp and tighten it up. Push it back in place and remove the clamp, and remove the old pad. Spread some grease around the back.
Also, put a little bit of grease on the ends, then you can put it in place. Then grease is spread on the rear one. You want the tab on the bottom. Now you can put your caliper back down. You may have to push your slide in, in order to get it in place.
Reinstall your two 12 millimeter bolts, and these are 34 Newton-meters or 25 foot-pounds. Put your wheel back in place. Tighten your lug nuts. We'll tighten them preliminary and then torque them when the vehicle is back down on the ground. Tighten your lug nuts, 80 foot-pounds and just cross in the pattern.
Anytime you do work on your brakes, make sure you pump the pedal. Get a nice firm pedal before you test drive the vehicle.
Thanks for tuning in. We hope this video helped you out. Next time you need parts for your car, please visit 1AAuto.com. Also check out our other helpful how-to and diagnosis videos.
Tools used
Brought to you by 1AAuto.com, your source for quality replacement parts and the best service on the Internet.
Hi, I'm Don from 1A Auto. I hope this how-to video helps you out, and next time you need parts for your vehicle, think of 1AAuto.com. Thanks.
In this video, we show you how to replace the front brakes on this 1998 Honda Civic and it's the same part and process on these Civics from '96 to 2005. We show you on the passenger side, but the driver's side is the similar procedure. The items you'll need for this are a new brake pad and rotor kit from 1AAuto.com; 12mm, 17mm, and 19mm sockets and ratchet with a piece of pipe for leverage; a Phillips bit or an impact driver; flat blade screwdriver; wire brush; brake grease; a torque wrench; jack and jack stands; and a large C-clamp.
Start off by removing your wheel. If you don't have the benefit of air tools, you want to loosen the lug nuts with the vehicle on the ground and raise it and secure it with jack and jack stands and remove the lug nuts and the wheel and tire the rest of the way.
To inspect your brakes, you want to check the rotor for any deep gouges. This one has several. Then, you want to check your brake pads and you can check this one here and you can also check them right through here on your caliper.
Now, remove this 12mm bolt right here. Use a flat blade screwdriver and pry the inside brake pad back. That will push the piston and the caliper back so you can lift it out and then pull it back off the slide and just put that up and out of the way. Pull the brake pads off.
Back here, you'll see two 17mm bolts. Just go ahead and remove those and you may need a piece of pipe for some added leverage to help you with this. Once those are removed, your caliper bracket will come right off. There's two Phillips plugs on this rotor and you can use a Phillips bit, but if it doesn't work, if it's too hard to remove them, you may need to use an impact driver like we're using here. Let me just hammer the end of it and turn and you want to remove those two Phillips plugs. Once they're removed, the rotor pulls right off.
On the right, are the old rotor and brake pads. On the left are the new ones from 1A Auto. You can see they're identical and the mount exactly the same. Use some mineral spirits or thinner to just clean the packing grease off of your rotor and take some brake grease and put it on the ends of your brake pads. Use a wire brush to just clean off your caliper bracket, primarily where the brake pads fit in.
Put an old brake pad in front of the caliper piston and use a C-clamp and just push that brake pad in and this will reset that caliper piston. Slide your new rotor in place and we'll fast forward as Don replaces those two Phillips plugs and put your caliper bracket into place and replace those two 17mm bolts that hold it. You want to torque these bolts to 85 foot-pounds.
Apply some brake grease to the slide and put your brake pads into place. Pull your caliper down and put it into place to slide it on the slide and push it down and replace that lower slide bolt.
We'll just fast forward as he tightens that up nice and firm and then replace your wheel and your wheel cover and then the four lug nuts. You want to tighten them preliminarily. Lower the vehicle and then tighten them the rest of the way and then torque each of them in a crossing pattern to 100 foot-pounds.
Before taking the vehicle out on the road, you want to first pump the brakes until they firm up and then do a stopping test from five miles per hour and then ten miles per hour.
We hope this video helps you out. Brought to you by www.1AAuto.com, your source for quality replacement parts and the best service on the Internet. Please feel free to call us toll-free, 888-844-3393. We're the company that's here for you on the Internet and in person.