Hi, I'm Mike from 1A Auto. We've been selling auto parts for over 30 years.
Hi, everyone. Sue here from 1A Auto, and today, I'm going to show you on our '06 Honda Element how to change the headlight assemblies. If you need these parts or any other parts for your car, click on the link below, and head on over to 1AAuto.com.
Okay, to start with, we have to take the front bumper off to access both headlight assemblies. I'm going to raise my vehicle up on a two-post lift. You can use a jack or jack stands at home, and you're going to get all the bolts underneath first.
To start with the bumper, I'm going to take the outer cover off, and there is two on each corner--10-mm socket-style bolts. They're probably pretty rusted, but you can't get up in there with a spray, unfortunately. Let's see if this one will come down, or if it's spinning in place. Yep. I'm going to try to get some spray up there because this clip does have a cut out right here. I'm going to have to let that soak, and this one I think is spinning in place. I'm going to come over here and get these ready. At this point, we tried to remove these little bolts here holding, so they're metal clips with welded nuts on them that hold the plastic down, and they're so rusted that the nut has broken off on the metal clip so all four bolts, two on that side, two on this side, are just spinning in place. What we're going to do is bring it back down, and we're going to disconnect the top of the bumper and see if pry it out if we can access these and go from that point.
I'm going to remove this plastic clip that's still intact. The other one's missing. Now I've got one piece out from underneath. Now I'm going to bring it down halfway because I've got to go in the fender well and see if I can take the two bolts out from the fender well.
I'm going to take the fender flare, this bolt off both fenders so that I can access the bumper that goes in here on a clip. That's an 8mm socket. I'm going to do the same thing to the other side. Obviously, everything on this vehicle is somewhat broken and causing havoc. You've just got to get this piece out. Now, we're going to move on to this one. I hope they all don't break. There's five total on this. Oh, look at that. Just like the way it's supposed to go. Obviously, we're going to have to get a whole bunch of body clips for this vehicle because we just started, and this is how much they're all just coming apart and breaking. They're so brittle. Let's see what we get. There we go. Now we just simply lift this up. There you go.
Now, we're going to remove all the other plastic clips that we see up here. I think I'm going to have to use multiple tools at the same time to try to save some of these. It's like they're made of steel. I've never seen anything like it. Okay, let's move on to the three on each headlight. Okay, we'll move over here. The reason we're changing these headlights is that they're not as foggy as they could be. I've seen a lot worse, but something else that's pretty common with these elements is these ears break off. It's a lot of weight on this front nose design and I think that has a lot to do with it. The cold and just tapping, you tap it, both headlights are broken in the assemblies. That will give an improper headlight alignment, so obviously you go down the road and the headlights will shake or they're not lined up properly.
I took this bolt out, and I took these other two body clips out. I'm going to take this last one here just to give it a little bit more flex. Now I'm going to pull this flare out like that. You've got this ear tab that goes over there. See it mounts right over that screw part. These are plastic push-ins, so you're just going to grab it from the top and pull it out. Now, we've got to do the same thing to the other side.
The clip on the inside of this fender well is just spinning, so I'm going to try a pair of angled, needle-nose pliers to try to hold that clip in place while I take my 8-mm socket and see if I can spin this free. Perfect. I'm just going to keep removing the broken clips. I'm just going to remove as much as I can. Now, I can pull this flare out, grab the bumper, and give it a pull. There we go. Now, let's lower it down and see if we can get to these broken tabs on the bottom.
Now that we have access to the bottom mounting bolts, you see the clip is broken. I'm going to use a pair of locking needle-nose pliers and see if I can grab onto this. I'm going to use an electric 3/8 drive down below here with my 10-mm socket. There we go. We're just going to end up breaking the plastic, I think. I've got one more over here. Now that I can reach it better, I'll soak it and now I'm going to put the locking pliers on this one. I'm going to go down below, and let's see what happens. I'm going to try it at this angle. Nope.
Basically, every clip is rotted, busted. Now the bumper is off the car. When it comes to the time, we're going to have to remove each one of those clips whether we have to cut them out just let them soak a little bit longer. We'll have to replace those. Now I can remove my bumper from the area.
Now with the whole grille off, we can see a whole story here. This, to me, looks like someone was in a little bumper fender bender whether they hit another car or tapped on a light post, but because there's no damage to that bumper, they thought, "Oh, everything's cool, and we're clear, ready to go." You've got to always remember behind plastic bumpers is more of a scene. You can see here, the condenser is no good anyways, the fins are rotted, but they bent it. It popped itself out of the mounting bracket, and it pushed in. It's got a U shape to it. Then we knew that the headlight was broken up here and cracked, but then once we took the bumper off, we see the whole story right here. This thing has been minimal aiming for a while, I think. All is good, so let's get to it and replace the headlight socket assemblies.
There's three mounting points on these headlight assemblies. There's one on the outside fender flair, one on the top of the main support going across, and one on the inner fender well, like radiator support. They're all 10-mm sockets. Considering this is the only one really holding it together, I'm going to take this one off first. There we go. Once we've accessed the headlight assembly, now I've got the harness, so I'm just going to pull out of that controller. Then I've got the blinker here and the headlight here. I'm going to squeeze, just pull--it's three pronged. It just basically slides right off. This one, we're going to pinch that black clip right there on the back, squeeze it and pull. Now we have our old headlight assembly. I'm going to get to the inner radiator support one. Now, it's obviously easier without that headlight here. The headlight would be sitting up here, so you might need a longer extension. Okay, we need to save the mounting bolts.
Then we get the last one--the top one here. There we go. Same three mounting points over here on the passenger side headlight, as it is the driver's. I'm going to remove the broken one first. Remember to save the hardware because we're going to need the bolts for the new headlight. We can discard the broken piece. I think I'm going to get this inner one first. It's located on the actual radiator support. I was a little worried that was going to break. That one is pretty rusted. The head of it's pretty rusted, but it still works. We're going to spray all these down before we reinstall them. The last one is the outer one. Now, you just grab the headlight, slide it forward, and disconnect the harness. This is just a plastic cut-out. Grab the headlight socket, pull it, and squeeze that black tab on the turn signal.
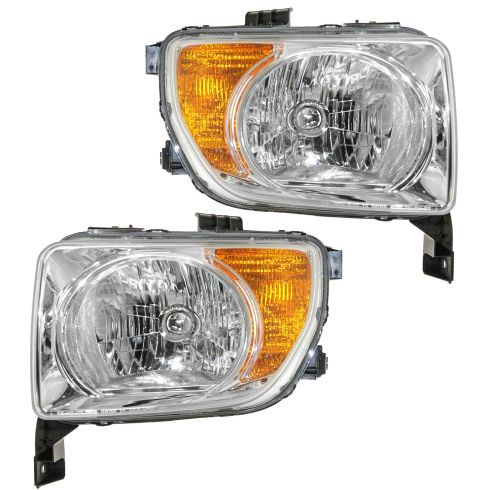
Here we have our headlights from 1A Auto. Complete assembly. It comes with clear plastic on it. You do remove this. It's a shipping package. It keeps the lens from getting marked up in the box. It comes with the headlight, so you don't need a new headlight bulb. You just have to transfer over the blinker socket and bulb. Here's the adjustments. There's only one adjustment on here. It's got all three mounting points. It has a drain for any moisture. If you need this part, or any other part for your car, click on the link below and head on over to 1AAuto.com.
On your old headlights, they come with this metal bar on the top. You have to remove this and transfer it over to the new headlight assembly, so 10-mm socket. I'm going to break the other one free while that other bolt is still in there. There we go. If you're doing headlights in a pair like I am, I'm going to make sure I keep these on the right location, left and right, passenger/driver's side because they are cut out differently. A couple of things you have to transfer over; you have to transfer over the blinker bulb assembly, so that goes underneath this little white plastic shipping tab. Turn counterclockwise and make sure the bulb is good. The turn signal bulb is a 7443. Replace it and lock it in clockwise. Now we have to transfer over these top mounting tabs. That's where that metal bracket goes. I'm going to start with a pocket screwdriver, and I'm going to reach in here and hopefully just pull this tab out like that. I'm going to transfer that over by simply lining it up and pushing it in like that.
We'll get this other one. This one's pretty rusted. Hopefully it doesn't break on us. There we go. Now you can see when it's rusted, it loses its spring tension, so I'm going to squeeze that so that way it stays on and locks itself into those little tabs it has. Perfect. I just like to line it up right. Okay, now we can get that bar and mount that bar on there.
This bar is pretty self-explanatory. We have a cut-out notch that's going to go in that notch piece, and we have a pinnacle divot, a pop-up, and that's going to go like that. It's pretty easy. I'm going to spray these mounting bolts down and get some of that rust off there for the future. Just give them a little coating. Get my 10-mm socket. Let's bring it on over to the car and install it.
I'm going to spray my mounting points before I install the new headlight. Now I'm going to install my passenger side headlight. The first thing I'm going to do is take notice of my adjuster, and what I'm going to need for a tool once it's in there, and it's a Phillips head, so that's going to be accessed through the backside here once I have this in and do my measurements. The first thing I'm going to do is install it. I'm going to plug the headlight socket in. That's three-prong. Push down. Then I grab my blinker socket and turn signal. Click that in. Line up this point divot right there, and there's one on that fender. Now I'm going to get my mounting bolts and socket. I'm going to start that bolt by hand. I'm not going to tighten it down until I have the other two in. There we go. Now I'm going to line up my other two. Okay, let's get this last one in.
Before I snug, I'm just taking a visual quickly around making sure that all the mounting points are lined up. The last one. Okay, let's take the protective covering off. Look at that. If you're doing the driver's side headlight, just repeat the process on this side.
Now we're ready to put the bumper back on, and we had a lot of hardware breakage from the age of the car--a lot of dry plastic, so we have to replace almost all of our pieces. I'm just going to line it up and show you how to line it up. You took it apart. I'm sure you can gather it. This notch is going to right into the plastic notch that's in that fender flare. This will hold it up. Line that up and just push it right in. I'm going to do the other side the same way. You can hear things starting to set themselves in. Now you're going to put all your clips back in on the top. You're going to put one center clip in, and then you're going to install your top radiator cover, and the outer fours go in after. Then don't forget to take each fender well and put this tab over. You've got to tuck up the inner fender well, put the tab over that, then you place your top fender well over it, and then put the screw in.
This is a basic tutorial on how to aim the headlights of your vehicle. Find the access of your headlights. This is usually indicated with a small dot, or the headlight bulb size on the lens. If not, it's the actual center point of your headlight bulb. Transfer this mark to a vertical wall with a preferably dark color that will allow you to back up 25 feet, pull up and find the center line of your vehicle, as well as the center line of your headlight access. Mark the wall with the height of the headlights and a straight line going across at that access height. Back your vehicle up 25 feet from the wall to the front edge of your vehicle's headlights, turn your headlights on, and locate the adjusting screw, usually on the backside of your headlights.
You'll want to rotate this until the passenger hot spot, or focus of the beam, is approximately two inches below the line and the driver's side is four inches below the line. We changed the heights on each side so you can still get a good beam to the offside of the road on the passenger side and have the driver's side low enough to not blind oncoming traffic.
Thanks for watching. Visit us at 1AAuto.com for quality auto parts, fast and free shipping, and the best customer service in the industry.