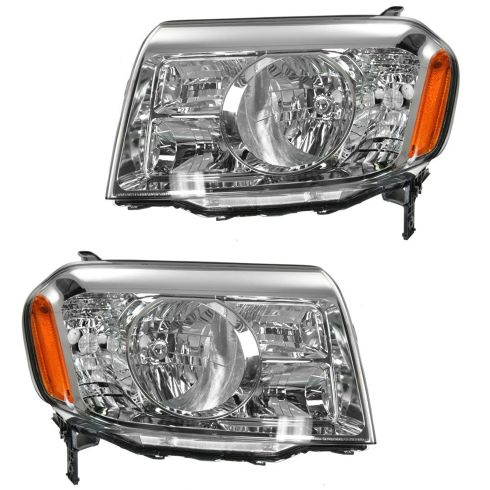
1ALHP00883-2009-11 Honda Pilot Driver & Passenger Side 2 Piece Headlight Set DIY Solutions LHT03651

Replaces
2009 Honda Pilot Driver & Passenger Side 2 Piece Headlight Set DIY Solutions LHT03651

Product Reviews
Loading reviews
4.91/ 5.0
22
22 reviews
Pilot 2011 headlights
March 21, 2017
Fit my wifes 2011 Honda Pilot perfectly. After finding a proper video on youtube about how to install them, the old ones were out and new ones in place in about an hour and a half. As usual, fast shipping and arrival. Thank you again 1A auto!
July 25, 2017
My truck looks brand new and it cost one-fifth the dealership price.
Honda Pilot
September 13, 2017
Fit perfectly, great price and really fast shipping!
Changed the appearance!!!
February 23, 2018
Wow! One of the original headlights looked really bad. The other one wasn't so bad, but I decided to replace them both so they would look the same. It changed the look of the front completely. Looks new now instead of weathered/worn. They arrived in great shape and very quickly. The fit was perfect! Would definitely recommend to anyone needing replacements.
Great quality- easy install with how to video!!
February 23, 2018
Fast shipping! Great quality and easy to install
Glad I got the pair vs. just 1 otherwise one would have looked old and very cloudy vs. the new
Honda Pilot Headdlight Assembly
November 26, 2018
I purchased a both driver and passenger side headlight assembly for my 2011 Pilot. They arrived very quickly and fit perfectly. They were fairly easy to install following the video instructions available.
Head lamp
October 27, 2019
Perfect fitment best prices on internet
New Headlights fit like a glove
December 28, 2019
Parts arrived on time and well packed. Video to replace headlights was spot on. Took less than an hour to replace both headlights. Thank you 1A Auto!
Better than New!!
June 18, 2020
These headlights are the real deal. It changed the whole look of the vehicle. Definitely Better than New.
Great Parts From a Great supplier
June 22, 2020
The replacement head light set arrived in perfect condition and fit my wife's 2009 Honda Pilot like factory parts. The Body shop that installed them even committed as to how they used parts from 1A Auto parts. great job. thank you.
Like brand new!
October 4, 2020
Im so happy to see my 2009 pilot looking like new ! Its unbelievable how a little detail on a vehicle can makes big difference! I feel great knowing that my pilot looks better than what I was before ! Now I have to find the door armrest to be replaced because its ripped:(
Perfect fit
December 14, 2020
Lights are great. They fit perfect and I cant believe how much better they make the front end look
Great Parts
July 7, 2021
Quality parts, perfect fit and very fast delivery
Bright clear headlight at good price
July 24, 2021
3 stars for price and being new. Beats my old oxidized yellow ones. A couple of issues and yes I know After market arent perfect.
1. Black sticky silcone was oozing from seams. Enough where it should have been cleaned by manufacturer.
2. Sockets weren't perfect. Some needed extra work to get bulbs in and thats the last thing you want to do with fragile bulbs.
3. One headlight did not seem to fit flush in frame. Truck never damaged and all pieces put back the way they came out (This one I may be expecting too much from a 10 yr old truck and aftermarket light)
December 23, 2021
It came earlier than the time frame they said it would, and installation was a breeze. We love our clear headlights! Makes driving after dark a breeze instead of a dread!
Excellent Product
February 3, 2022
These headlights fit perfect and had zero defects. I installed them as per the YT video without any issues. A great product!
Recommend
June 21, 2022
Installed a few weeks ago. Look and have been great so far!
August 11, 2022
Headlights fit perfectly, and installing was easy. I have been trying for last 4 months to order center console sliding cover to no avail.
Happy I Purchased
August 11, 2022
Easy to install. Good value.
Totally worth the cost and easy to install
February 7, 2023
Easy to install and they look really good!
Headlights
March 30, 2023
Great product, makes the truck look almost new.
Great price and quality!
July 9, 2024
Quick shipping and exact fit. Makes my 2009 front end look brand new with these headlight assemblies. Super happy!
Customer Q&A
Does this kit includes the plastic cover over the headlights? If not how can I find it?
December 27, 2016
10
yes, the lens cover is sealed onto the lamp assembly from the factory. Its not something that is available seperatly
December 28, 2016
Brian F
Do you sell the bracket that fits along the bottom of the headlight? If not, do you have a description or part number so I can try to find it?
December 22, 2018
10
Currently we do not carry this part for your vehicle. We're always updating our inventory so please check back soon! If you have any other questions, let us know.
December 23, 2018
T I
Are bulbs included?
November 1, 2019
10
Hey Dona,
Bulbs are not supposed to be included with this kit. However they can have tester bulbs installed to test the connections. You would need to install your original bulbs or purchase new ones.
Thank you,
Corey
November 1, 2019
Corey M
Anybody have positive reviews after 2 years of ownership?
May 1, 2022
Honda is a registered trademark of Honda Motor Co., Ltd. 1A Auto is not affiliated with or sponsored by Honda or Honda Motor Co., Ltd.
See all trademarks.


