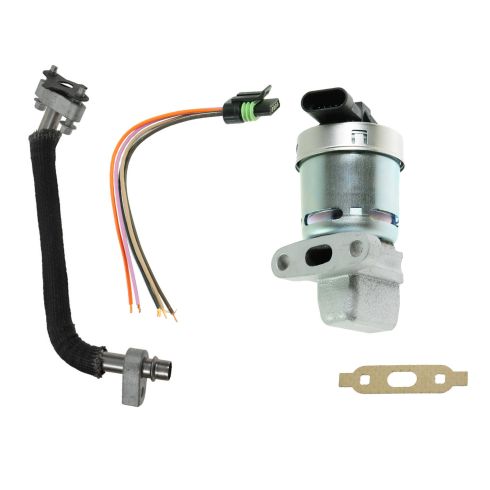
Complete Repair in One Purchase - Stop searching for parts individually and complete your repair with a customized kit or set from DIY Solutions.
High-Quality Parts from Trusted Brands - DIY Solutions' kits and sets are selected from the best automotive brands and include hard-to-find and even obsolete parts you may need for your vehicle.
Guaranteed Fit - DIY Solutions ensures its selected parts are quality-tested to guarantee fit and function.
Item Condition:New
Attention California Customers:
WARNING: Cancer and Reproductive Harm - www.P65Warnings.ca.gov.
Lifetime Warranty
This item is backed by our limited lifetime warranty. In the event that this item should fail due to manufacturing defects during intended use, we will replace the part free of charge. This warranty covers the cost of the part only.
Returns: Parts with electrical components cannot be returned once installed.
FREE Shipping is standard on Orders shipped to the lower 48 States (Contiguous United States). Standard shipping charges apply to Hawaii, Alaska and US Territories. Shipping is not available to Canada.
Expedited is available on checkout to the United States, excluding Alaska, Hawaii and US Territories as well as P.O. Boxes and APO/FPO/DPO addresses. Final shipping costs are available at checkout.
How to Replace EGR Tube 2007-09 Chevy Equinox
How to Replace EGR Valve and Tube 2005-09 Chevy Equinox
Created on:
Tools used
Socket Extensions
10mm Socket
Ratchet
1. Removing the Engine Cover
Remove the oil fill cap
Turn the bottom portion of the fill tube counter clockwise
Disconnect the EGR valve wiring harness
Lift the engine cover up and off
2. Removing the EGR Tube
Soak the bolts with rust penetrant for 5-10 minutes
Remove the three 10mm bolts from the EGR tube
Remove the EGR tube
3. Installing the EGR Tube
Insert the EGR tube into place
Tighten the three 10mm bolts to the tube
4. Installing the Engine Cover
Insert the engine cover onto the pegs on the engine
Connect the EGR valve wiring harness
Reinstall the oil fill tube
Reinstall the oil cap
Hi, I'm Mike from 1AAuto. We've been selling auto parts for over 30 years! We're dedicated to delivering quality auto parts, expert customer service, and fast and free shipping, all backed by our 100% satisfaction guarantee. So visit us at 1AAuto.com, your trusted source for quality auto parts.
In this video, we're going to be working with our 2008 Chevy Equinox 3.4-liter V6. We're going to show you how to remove and replace your EGR tube.
If you like this video, please click Subscribe. We have a ton more information on this and many other vehicles. If you need this part for your car, you can follow the link down in the description over to 1AAuto.com.
Here are the items you'll need for this repair.
Remove the oil fill cap. Grab the bottom portion of the fill tube here, turn that counterclockwise as well. Move that. The connector on top of your EGR valve is also going to be in the way, if removing your engine cover. This is a little plastic tab in here. Now, these are really prone to breaking, so I like to push down on that tab with a pick and just remove the safety from the connector completely, so we don't risk breaking it and having it be less secure when we reinstall. Push down on the tab, and remove the electrical connector from your EGR. Simply pop up, and remove your engine cover.
Remove the three bolts securing the EGR tube onto both the exhaust manifold and the EGR solenoid. We'll remove the top one with a 10 millimeter socket and ratchet and use an extension on the bottom two for a little more clearance. We soaked ours in penetrating oil for about 5, 10 minutes before we tried this, just to make sure that these bolts wouldn't snap. Remove the EGR tube.
Here we have our old EGR tube that we removed from our vehicle and our new part from 1AAuto.com. As you can see, these parts are exactly the same. These joints aren't quite on there at the moment because these need to be aligned and then this will be crushed to help seal everything together nice and tight. Same thing on the bottom there. This joint moves until we set it where we want it. A cracked EGR tube or a clogged EGR tube will cause improper flow to your EGR valve, creating emissions issues and codes in your vehicle. Whereas one being cracked or broken will create a loud noise usually because it's exhaust coming out without going through the muffler which quiets down that noise, and it'll also have a bad exhaust smell underneath the hood. If your EGR tube is cracked, broken, or clogged, this new part from 1A Auto will go in direct fit just like your original equipment and fix you up right.
A good trick for lining up this gasket when we install it is if the holes are the right size we can actually get the thread started into the gasket a little ways. It'll help make sure it doesn't move when we go to install it back onto the exhaust manifold. These do rotate and are flexible. We'll set the bottom in. Just get a couple of threads going there just to keep it pretty close to in place. Then we'll tweak it and line the top up if we can. Start that bolt as well in, just a couple of threads because we don't want to lock anything down yet. Once all that's started and everything's seated, we can tighten it all up with our 10 millimeter socket and ratchet.
Reinstall the engine cover. These bushings sit on top of these two pegs here. Snap both of those into place. Reinstall the oil fill tube, as well as the cap. Reconnect the electrical connector for the EGR, and again, I remove these safety clips. Pop that back in if you did the same thing.
Thanks for watching. Visit us at 1AAuto.com for quality auto parts, fast and free shipping, and the best customer service in the industry.
Tools used
Socket Extensions
10mm Socket
Ratchet
Pick
1. Removing the Engine Cover
Remove the oil fill cap
Turn the bottom portion of the fill tube counter clockwise
Disconnect the EGR valve wiring harness
Lift the engine cover up and off
2. Removing the EGR Tube
Soak the bolts with rust penetrant for 5-10 minutes
Remove the three 10mm bolts from the EGR tube
Remove the EGR tube
3. Removing the EGR Solenoid
Remove the two 10mm bolts on the EGR Solenoid
Remove the EGR solenoid
4. Installing the EGR Solenoid
Insert the bolts through the new valve
Insert the gasket to the EGR solenoid
Insert the solenoid into place
Tighten the 10mm bolts
5. Installing the EGR Tube
Insert the EGR tube into place
Tighten the three 10mm bolts to the tube
6. Installing the Engine Cover
Insert the engine cover onto the pegs on the engine
Connect the EGR valve wiring harness
Reinstall the oil fill tube
Reinstall the oil cap
Hi, I'm Mike from 1AAuto. We've been selling auto parts for over 30 years! We're dedicated to delivering quality auto parts, expert customer service, and fast and free shipping, all backed by our 100% satisfaction guarantee. So visit us at 1AAuto.com, your trusted source for quality auto parts.
In this video, we're going to be working with our 2008 Chevy Equinox 3.4-liter V6. We're going to show you how to remove and replace your EGR and EGR tube together. This is for the non-updated EGR or the old style EGR where the new styles will require splicing and modification to the harness as well as a software update from your local GM dealer.
If you like this video, please click Subscribe. We have a ton more information on this and many other vehicles. If you need parts for your car, you can follow the link down the description over to 1AAuto.com.
Here are the items you'll need for this repair: pick, 10mm socket, ratchet, extension
Remove the oil fill cap. Grab the bottom portion of the fill tube here, turn that counterclockwise as well. Move that. The connector on top of your EGR valve is also going to be in the way, if removing your engine cover. This is a little plastic tab in here. Now, these are really prone to breaking, so I like to push down on that tab with a pick and just remove the safety from the connector completely, so we don't risk breaking it and having it be less secure when we reinstall. Push down on the tab, and remove the electrical connector from your EGR. Simply pop up, and remove your engine cover.
Remove the three bolts securing the EGR tube onto both the exhaust manifold and the EGR solenoid. We'll remove the top one with a 10 millimeter socket and ratchet and use an extension on the bottom two for a little more clearance. We soaked ours in penetrating oil for about 5, 10 minutes before we tried this, just to make sure that these bolts wouldn't snap. Remove the EGR tube.
With the EGR tube out of the way, remove the two 10 millimeter bolts on the EGR solenoid. We'll do this using a 10 millimeter socket and ratchet. With the bolts removed, you can remove your EGR from the intake manifold.
Let's put the bolts from the EGR through the new valve. Place the gasket on there to make sure it doesn't move and it's going to make it a lot easier to line this up. Line up the two bolts. Start both of those in by hand and we'll tighten those back down with our 10 millimeter socket and ratchet.
A good trick for lining up this gasket when we install it is if the holes are the right size we can actually get the thread started into the gasket a little ways. It'll help make sure it doesn't move when we go to install it back onto the exhaust manifold. These do rotate and are flexible. We'll set the bottom in. Just get a couple of threads going there just to keep it pretty close to in place. Then we'll tweak it and line the top up if we can. Start that bolt as well in, just a couple of threads because we don't want to lock anything down yet. Once all that's started and everything's seated, we can tighten it all up with our 10 millimeter socket and ratchet.
Reinstall the engine cover. These bushings sit on top of these two pegs here. Snap both of those into place. Reinstall the oil fill tube, as well as the cap. Reconnect the electrical connector for the EGR, and again, I remove these safety clips. Pop that back in if you did the same thing.
Thanks for watching. Visit us at 1AAuto.com for quality auto parts, fast and free shipping, and the best customer service in the industry.
ESS00155
In Stock
Product Reviews
Loading reviews
3.86/ 5.07
7 reviews
5 Stars
4 Stars
3 Stars
2 Stars
1 Star
4
1
0
1
1
Worked great!
T
October 7, 2018
This retrofit EGR valve and tube fit my 2005 Equinox perfect and was easy to install. Found the wiring diagram for the new harness on the internet and was completed in less than an hour. Getting the old one off was another story!!
Awesome products
rod
November 1, 2018
once again I buy Pirates get what I need for a shot free shipping and they're good quality Pirates which is outlasted the same NAPA parts that I used locally and paid twice as much. Great service fast shipping free of charge and excellent people to deal with. Write
EGR VALVE KIT
D
November 21, 2018
I was pleasantly surprised at the promptness of my order being executed and sent on the same day of my order. I will definitely recommend your company and use again in the future. And everything was packaged well so as not to be damaged in shipping. Great job!!
equinox egr valve and tube
Karl
December 9, 2018
Had to replace both when tube went bad and GM had service bulletin change(not recall). Both parts fit as should and didn't have to reprogram to get check engine light off. I;m happy
MARK
July 1, 2019
Fixed exhaust leak but now check engine light is on! ???
Poorly made. Missing component
Jayson
October 5, 2019
Cheap, soft aluminum body. Cracks with the slightest pressure from the mounting bolts. Mine came missing the tube to valve mounting bolt. The box clearly states there are 3 items inside, but only contained the valve and gasket. No bolt.
EGR Valve
Erica
December 21, 2020
This is the exact part we needed and it was reasonably priced.
Customer Q&A
does it come with wiring instructions?September 10, 2017
Frank R
Does this kit come with a wiring diagram?December 15, 2018
Travis C
10
I seem to recall there was no wiring diagram but wires are colour coded to existing pigtail. Had it complete in less than an hour
December 15, 2018
James A
10
It has been awhile since I did this but I remember I had to do some research online to figure it out.
December 15, 2018
Dave W
10
This will not come with a wiring diagram but a Hanes manual should be able to assist you with the installation.
December 16, 2018
Emma F
Hi does this valve have to be reprogrammed in order to clear codes?June 7, 2021
Mauro C
10
Written and video installation instructions are found on the product page under the "How-To & Tools" tab.
We're constantly adding new installation video instructions. If we do not have one for your vehicle on the product listing page, please check again at a later time or check our Video Library to see similar repairs here: https://www.1aauto.com/videos
June 7, 2021
Ricale A
The original connector has different color wires than the new pigtail. How do I wire it?October 30, 2023
Phil M
10
Follow the old wire routing. The wires no matter what color should go in the same slots / connector landing points .So the routing will be that same no matter what color wires.
October 30, 2023
Reynaldo R
Customer service
877-844-3393
Monday - Friday 8:00am - 9:30pm ET Saturday - Sunday 8:00am - 4:30pm ET
Pontiac is a registered trademark of General Motors Company. 1A Auto is not affiliated with or sponsored by Pontiac or General Motors Company.See all trademarks.
Enter Vehicle Year Make Model
Specify your vehicle's year, make and model to guarantee fit.
Year
Make
Model
Options
Drivetrain
This part doesn’t fit a . Select from parts that fit.