
How to Bleed your Brakes by Yourself
Created on: 2017-03-01
How to bleed your brakes and purge your own brake fluid if you have soft brakes or have replaced your brakes. The 1A Auto experts will show you how to safely purge air from your brake system by yourself.
-
step 1 :Making the Bleeder Bottle
- Clean out a plastic bottle
- Drill a 3/16 inch hole in a plastic bottle cap
- Drill a small vent hole in the bottle cap
- Feed two feet of 3/16 inch fuel line through the cap until it reaches the bottom of the bottle
- Hold the fuel line to the cap with a zip ties on the inside of the cap
- Fill the bottle partially with brake fluid
- Twist the cap onto the bottle
-
step 2 :Filling the Brake Fluid
- Clean off the brake master cylinder
- Twist off the master cylinder cap
- Fill the master cylinder with brake fluid
- Twist on the master cylinder cap
-
step 3 :Bleeding the Brakes
- Start with the wheel with the longest brake line
- Fit the hose for your Bleeder Bottle onto the bleeder nozzle
- Loosen the bleeder screw a quarter turn
- Fully depress the brake pedal several times slowly
- Pump the brake pedal until no air bubbles come out of the bleeder
- Tighten the bleeder screw
- Pinch the end of the bleed hose closed
- Pull the bleeder hose off the bleeder nozzle
- Add brake fluid to the master cylinder as needed
- Repeat these steps moving from the remaining wheel with the longest brake line to the shortest
- Check for a firm brake pedal feel
- Fill the master cylinder again as needed
- Dispose of waste brake fluid properly at your local parts store or junk yard
Tools needed
-
Drill Bit Set
Complete Metric Wrench Set
Drill
Wire Ties
Rubber Vacuum Hose
Cloth Rags
Hi, I'm Mike from 1A Auto. We've been selling auto parts for over 30 years. We're dedicated to delivering quality auto parts, expert customer service, fast and free shipping, all backed by our 100% satisfaction guarantee. Visit us at 1AAuto.com, your trusted source for quality auto parts.
We're going to show you how to bleed brakes by yourself using only a bottle and some fuel line to make a self-bleeding tool. Now this video is on this specific vehicle, however this application can be applied to just about any vehicle. The only thing that's really going to be different is the size and location of your bleeder screws. If you like this video please click subscribe. We have a ton more information on this and many more vehicles as well as more generic help tips like this. If you ever need parts for your car, you can follow the link down in the description over to 1AAuto.com.
Real quick, we're going to talk to you about the tool we made here for bleeding brakes by yourself. This is very easy to make and inexpensive. All you do is: we just took an old soda bottle. You can use any kind of plastic bottle but just about this size is what you want. I drilled two holes in the cap. This is 3/16” fuel line. That's what you want to use because it sits pretty tight on top of the bleeder screws, so you don't need anything to tension it on to make sure no air or moisture gets in there while you're bleeding.
Drill a hole big enough to fit the fuel line through and then I threw a zip tie on there so we can hang it from the back of the vehicle and not worry about it falling or having somewhere to put it. If something happens this hose will stay down there and submerged in the fluid. We don't have to worry about this moving around or pulling out on us. It's about two feet of hose I have here. Then I just drilled a small vent hole in it because you do build up a little bit of pressure in there.
We'll take the bottle and that's brake fluid in the bottom. You want to make sure you clean out whatever fluid was in there. We'll pour some DOT 3 brake fluid in it. I'm going to fill it about a third of the way. We'll put the hose in. Put the cap on nice and tight. We're ready to bleed our brakes.
Our master cylinder reservoir is already clean because I had to fill the fluid and bleed the master cylinder in this due to a brake line failure we had, which is why we're bleeding the rest of our brakes now. If yours is dirty, wipe it off and make sure you don't let any dirt or contaminates get into the fluid. Remove your cap and fill the master cylinder all the way because we don't want this to bleed down and get air into it or we'll be starting our whole process over. Once it's full we'll throw the cap back on so nothing gets in there. Make sure you keep your fluid nice and tight too. You don't want any moisture getting in there.
The proper procedure for bleeding your brakes on the vast majority of vehicles including this one is to start at the furthest wheel from the master cylinder, which is going to be the passenger rear. We'll then go to the driver's rear, passenger front, and end on the driver's front. This is to make sure that any air or dirty fluid in the system gets flushed completely though the longest line to make sure that there isn't any trapped when we go closer and closer to the master cylinder. This vehicle does have an ABS module underneath just about the middle of the truck but it's a little more forward so these lines still hold true.
A rear mounted ABS unit will make this procedure the opposite of the way we're going to do it. If your vehicle has a rear mounted ABS module, this process will be reversed of the way we're going to do it with your brakes starting to bleed in the front and ending in the rear. This will depend on where your module is so just take a look at it and see which lines are the longest. If it's in the passenger rear corner then the farthest line is going to be the driver's front. If it's in the driver's rear, then the passenger front should be your farthest corner. A simple check over the brake lines should show you which one has the longest lines.
Underneath the truck on the inside of the frame rail, this sits actually just about dead under the driver's seat in the front. Our ABS module is not located in the engine bay like the majority of them are. It's still more to the front of the vehicle so the bleeding procedure will be the same.
Our 3/16 fuel line is actually just a little bit smaller than the bleeder fitting. You've got to kind of work it on there a bit but then it's on there good and tight. You get a nice seal. Just crack your bleeder screw loose. You don't want to spin this out much more than about a quarter of a turn because anything else could cause it to leak out of the side of the threads, which obviously means fluid isn't going to get pulled back in there, air is, and that's going to defeat the purpose of what we're trying to do here. Ours happen to be a 10 millimeter open end wrench to open those bleeder screws. Yours might be a different size depending on the specific calipers your vehicle's equipped with.
With the bleeder screw open, we'll now slowly fully depress the brake pedal because when we release normally air would come in but with that line submerged in clean fluid, more brake fluid will come in, moving the air out of our brake system. Now you should only have to do this a few times if you did something like a brake caliper or a line in the rear of the vehicle but our vehicle lost all the fluid in the system so we're going to be here awhile pushing all the air out.
After a little while, there will be no more air bubbles coming out and it is okay to get out of your vehicle and look at the hose. If there are no air bubbles in the hose, then there's nothing coming through and you've got it all out of that brake line.
Now that our brake fluid is nice and clear and there are no bubbles left in our line we'll close the bleeder screw with our 10 millimeter wrench. Make sure you get it nice and tight so it seals up. You want to make sure when you're removing the hose you pinch the bottom nice and tight. It is just rubber hose so you should be able to pinch it off, lift it up and let go to drain all that fluid back into the bottle instead of onto the ground and move onto our next cylinder.
Check the master cylinder after bleeding each corner of the vehicle because if the fluid runs too low and air gets into the master cylinder you'll need to bleed the cylinder and start the entire process over.
Now we're just going to go ahead and show you the process on the front brakes. It's exactly the same as the rear but these ones are a little older and we're going to have to go easy releasing the bleeder screws. Make sure we don't strip them. It may even be wise to use the box end of the wrench. Open that up and I'm going to use the one person method on this brake.
Now that we've got all the air out of our system and we have a good firm brake pedal inside the truck, we can go ahead and close our last line. Remove the hose. Top off our brake fluid for the final time. Reinstall our wheels and tires if you removed yours and you don't have to. We just did this to make it easier to show you. And you're good to go. Always dispose of automotive fluids properly and safely as not to create pollution. Brake fluid and other various hazardous waste from vehicles can generally be returned at your local parts store as they take in these kind of wastes or if you're local junk yard or dump has a hazardous waste bay, store these parts safely and bring them at the appropriate time.
Thanks for watching. Visit us at 1AAuto.com for quality auto parts, fast and free shipping, and the best customer service in the industry.
Shop Products
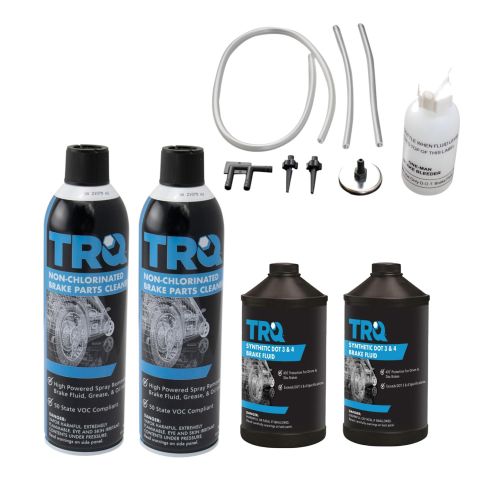
Brake Caliper Service Kit
Part Details:
- Magnetic Base
- (1) Brake Bleeding Kit
- Designed for easy one man brake bleeding
- Dot 3 & 4
- (1) Brake Cleaner & Fluid Kit

How to Locate Lift Points 1997-2005 Lexus GS300
Not sure where to put the jack or jack stands to raise your Lexus GS300? The expert mechanics at 1A Auto will show you how to do it safely and securely
