
How to Replace Combination Switch 1998-2004 GMC Sonoma
Created on: 2012-03-07
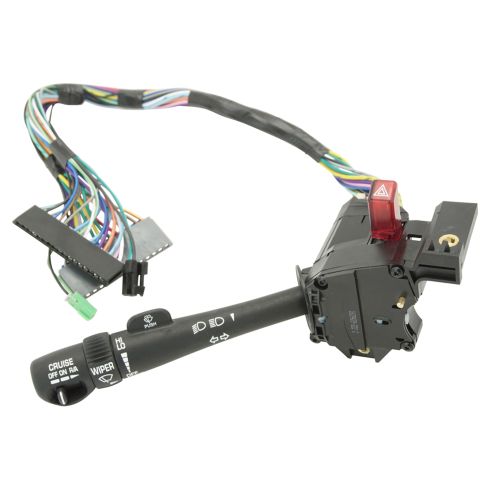
Learn how to replace the turn signal and wiper switch, also known as the combination switch, on your 1998-2004 GMC Sonoma with this 1A Auto video
-
step 1 :Disconnect the battery
- Use your 8 mm wrench to disconnect the negative battery terminal.
-
step 2 :remove the panel under the steering column
- Use your 7 mm socket and ratchet to remove the bolts.
- Remove the four 10 mm nuts securing the secondary panel under the steering column.
-
step 3 :Remove the cruise control release
- Unclip the cruise control release and disconnect it.
- Set aside somewhere safe.
-
step 4 :Remove the turn signal switch
- Carefully cut the wire ties and remove protective fabric covering the wires.
- Follow the wire ties down to the junction block and unplug them.
- Use your screwdriver to pry off your tilt lever.
- Remove the two T25 screws securing the steering column cover
- Remove the E5 Star bolt underneath by the lock cylinder
- Reinstall the tilt lever and lower the column and remove the top cover.
- Unplug the small green plug connecting the turn signal switch.
- Unscrew the T25 screws securing the switch.
- Poke the wire out of the junction block with a screwdriver.
-
step 5 :Install the new turn signal switch
- Plug in the connector to the junction block.
- Secure the switch with your T25 Driver
- Plug in the green connector for the cruise control cancel.
- Connect the junction block.
- Reconnect your negative battery terminal and test that the wiring is all working properly.
- Tidy everything up with wire ties and the shielding fabric.
- Put the steering column trim panels on, screwing in the E5 screw and a T25 Torx screws.
- Put the two panels back on with your 7 and 10 mm sockets and ratchet.
Tools needed
-
Socket Extensions
E5 Socket
8mm Wrench
7mm Socket
10mm Socket
Ratchet
T25 Torx Driver
Brought to you by 1AAuto.com, your source for quality replacement parts and the best service on the internet. Hi I'm Mike from 1A Auto, I hope this how-to video helps you out and next time you need parts for your vehicle, think of 1AAuto.com. Thanks.
In this video, I'm going to show you how to replace the turn signals dock on this 2003 GMC Sonoma, same as any GMC Sonoma. It's the S15 pickup as well as the Jimmy and the Chevy Blazer, as well as S10 pickup. This switch controls a lot of different functions; turn signals, high beams, wipers, cruise control, as well as it is your horn switch. So if you're having issues with those, could be this switch. Not too many tools needed but, some special ones. You need an 8 millimeter wrench, 7 and 10 millimeter sockets with ratchets and some long extensions. A T25 torx driver and, one that not many people are going to have is, an E5 Star Bolt Socket.
Use an 8 millimeter wrench and disconnect your negative battery cable.
Start by removing the pan that's underneath the steering column. There are four 7 millimeter bolts recessed in the panel as well as four down along the bottom edge. Okay, I'll speed through it as I remove those eight bolts. Just a couple tips; the one that's right above the emergency brake, just push the emergency brake down some. Makes it easier to get to that one. And then once this panel, it is clipped in, so once you get the bolts off you'll have to pull it firmly and it'll un-clip. And it, just because of the emergency brake cable, it doesn't come fully out of the vehicle. So you just pull it down and out your way. Okay, now you need to remove this pan underneath. There's two 10 millimeter bolts holding it there. Just two 10 millimeter bolts holding it there on the other side. So, using a 10 millimeter socket with a ratchet and a long extension, I'll remove the four nuts that hold that pan on and pull the pan right out. We're going to pull it out at an angle so it comes out. Just be careful that you don't ... Sometimes those nuts will drop down and just make sure you collect them before you move onto the next step. Underneath, on the right-hand side of the steering column is the cruise control release green tab, here. Push that out carefully and then disconnect it. This tab, right here, push on that tab. Push it out. Okay, using a pair of snips, or some other type of sharp tool, carefully cut these wire ties.
Okay, there are about three wire ties showing. Cut those, then remove that armor blanket and then there's a few more wire ties inside there that you need to cut. Again, carefully, so you don't sever any wires. Okay, then this clip, you push out. Just hammering that down. If you follow the wires down and above where your brake pedal is, you'll see a junction block. Okay, see, here's my finger. There's ... The extension was a 7 millimeter socket. I'm removing the bolt out of the center of the junction block. Okay, once you remove that bolt and this comes unplugged, we've already unplugged our parts there, and pull this out. Use a screwdriver and just pry out on your tilt lever, and it comes right out. Now there are two T25 screws to remove from the bottom of the steering column. Beat it up here, as we remove those screws, and then you pull down firmly on the bottom-half of your steering column cover. That's a part and then you move it back and it comes out. Then right over here, the ignition key side, right up under where the lock cylinder is there's an E5 star bolt and put my socket right up on there. You want to remove that bolt. Then you'll take your tilt lever, put back in. Bring this down. You want to have your ... Bring your gear shift lever all the way down. Then this comes up off. Okay, now you have another set of wires that goes up to the top of your steering column. Okay, that should be moved right back in here. I really wasn't able to film this very well. What you want to do is use a small flat-blade screw driver. Follow the wires to the plug.
You want to pry a little bit on the receptacle on top of the plug. Then pull it out and you'll pull out a small green plug, right there. Okay, now the assembly's held in by two screws. A T25 up here and one right here. You can see I've moved the steering wheel, so the top of its pointing right there so I can get to that screw. Speed it up here as I remove those two T25 Torx screws. Push that out and pull. Lift straight up. Carefully pull this out. There may be still a wire or two still stuck. Turned up, there's a couple more wire ties that I just have to clip. Bring your junction block out. And, what you need to do is take a screw driver, put right in here. Pry just a little bit and they slide forward. And there's your whole assembly. Out. Okay, my original one's on the bottom. The new one, from 1A Auto's on the top. And you can see they're exactly the same. Most importantly, the connectors that go in are exactly the same. So it's going to plug in the same. The small connector that goes on top of the steering column and the cruise control connector, you just want to take those pieces of tape off and squeeze them up. So that you can run them up and over the harness. I'm sorry, up and over the steering column and plug them in.
For this vehicle, the original one is actually working fine so I am going to reinstall the original one. For the reinstall, take your junction block, and these are designed to only go in one way, so you really can't do it wrong. So you just put it in, snap it back in place, and make sure none of this is in your way. Take this one and then snap it back in place. Route your junction block down in there. Just, kind of, roughly. And then put this up and into this loop here, just to hold it up along with our ABS wire. And then, I'll put it down and in. Okay, I'm going to use fast forward here. As putting it back together is just a reverse of the procedure. You put the switch into place. Make sure you start both T25 Torx bolts first. You may have to lift up a little bit to get the second one in. Just make sure you put them in straight. Don't cross-thread them or anything. Then once you tighten them up, route that small green connector up and over the steering column and plug it in, in the back side. Now take the green and black lead, for the cruise control cancel, and put it back. Up and over your steering column. Then plug it in and install the little safety clip as well. Okay, get our main connector pushed up in there. And start the bolt in, and tightening it up. Okay, now you can just reconnect your battery. And test everything. And you can hear as I'm reconnecting my battery, you see my flashers are on.
All right, I know they work now. Flashers off. Left blinker, right blinker, horn, wipers, flash, all that good stuff works. Now, you can disconnect your battery again if you want. You really don't have to though. Fast forward again here as I'm just using some plastic wire ties. Wire tying the harnesses together. Then putting that shield, that chafe shield, back over around the wires. And some more wire ties on that. Making sure that all the wires are grouped together and up in that clip. Now I'm putting the upper steering column trim on. Put it down in there. Make sure that you get the shifter boot slid up in there correctly. Then that E5 star bolt, put that up in and tighten it up. And now, put the lower trim panel in. It has hooks at the rear. So make sure you hook it in to the upper steering column cover. And then it comes up and the two pieces snap together. And then put those T25 Torx screws back in and tighten them up nice and firm. Put your tilt lever back in. Move it up. And then, put that belly pan, it's kind of a security pan, back in with the four 10 millimeter nuts. I just put the nuts right into the socket and then guide them right up in there with the extension. Put them in, tighten them up. Again, nice and firm. Okay, now we're going to put the trim panel back up and in place. Make sure that on the lower edge, there's the plastic that goes below it, it goes in between the plastic and the dash. Okay, and then it clips into place on the upper side. Then put the eight 7 millimeter bolts back in and tighten them up. And if you haven't already connected your battery, reconnect the battery. And you should be all set.
We hope this helps you out. Brought to you by www.1AAuto.com, your source for quality replacement parts and the best service on the internet. Please feel free to call us toll free 888-844-3393. We're the company that's here for you on the internet and in person.
Shop Products

How to Replace Combination Switch 1995-2005 Pontiac Sunfire
Learn how to replace the combination switch in your 95-05 Pontiac Sunfire. This is the stalk that controls turn signals, wipers and lights.

