
How to Replace Exhaust Manifold Assembly 2002-06 Nissan Altima
Created on: 2013-11-18
Watch this video to learn how to fix a broken, leaking, or loud exhaust. The experts at 1A Auto show you how to replace the exhaust manifold and catalytic converter in your 02-06 Nissan Altima.
-
step 1 :Disconnecting the Battery
- Disconnect the negative battery cable with a 10mm socket and ratchet
-
step 2 :Removing the Oxygen Sensors
- Disconnect the downstream O2 sensor wiring harness
- Remove the downstream O2 sensor with an O2 sensor socket
- If the O2 sensor socket does not work, cut the wires off the O2 sensor
- Then remove the O2 sensor with a 7/8 inch socket
- Disconnect the upstream O2 sensor wiring harness
- Remove the upstream O2 sensor with an O2 sensor socket
-
step 3 :Removing the Alternator
- Apply penetrating oil to the four bolts on the catalytic converter heat shield
- Let the penetrating oil sit
- Remove the 4 5mm Allen bolts from the engine cover
- Remove the engine cover
- Remove the two 10mm bolts from the alternator
- Disconnect the alternator wiring harness
- Remove the 12mm bolt from the alternator
- Attach a 14mm wrench to the serpentine belt tensioner
- Use the wrench to loosen the belt
- Pull the serpentine belt off the alternator
- Release the tensioner
- Remove the upper of the two 14mm bolts from the alternator
- Pull off the fuse box cover
- Remove the 10mm bolt from the fuse box
- Lift the fuse box and pull it aside
- Remove the lower of the two 14mm bolts from the alternator
- Pry out your alternator with a pry bar
-
step 4 :Removing the Catalytic Converter
- Remove the four 10mm bolts from the catalytic converter heat shield
- Lift the heat shield up and off
- Apply penetrating oil to the five nuts at the top of the catalytic converter
- Raise and secure the vehicle
- Apply penetrating oil to the three 14mm nuts at the bottom of the catalytic converter
- Remove the three 14mm nuts from the bottom of the catalytic converter
- If the nuts will not come off, break them off with a torch
- Lower the vehicle to the ground
- Remove the five 14mm nuts from the top of the catalytic converter
- Pull the catalytic converter up and off
- Remove the gasket from the engine head
- Clean the gasket mounting area with emery cloth or steel wool
-
step 5 :Installing the New Catalytic Converter
- Push the new gasket onto the engine head
- Push the donut gasket into place
- Put the new catalytic converter into place, lining up the studs
- Line up the studs at the top of the catalytic converter
- Start the five 14mm nuts at the top of the catalytic converter by hand
- Tighten the five 14mm nuts to 45 foot-pounds of torque
-
step 6 :Reinstalling the Alternator
- Put the alternator into place
- Start the lower 14mm bolt into the alternator
- Insert the upper 14mm bolt into the alternator
- Tighten the lower 14mm bolt
- Insert the two 10mm bolts into the alternator
- Put the alternator bracket into place
- Connect the alternator wiring harness
- Reconnect the wire from the battery to the alternator and tighten its nut
- Move the fuse box into place
- Insert the 10mm bolt into the fuse box
- Push on the fuse box cover
- Attach a 14mm wrench to the belt tensioner
- Loosen the tensioner
- Pull the belt onto the alternator
- Release the tensioner
-
step 7 :Reconnecting the Battery
- Reconnect the negative battery cable
-
step 8 :Reinstalling the Heat Shield
- Put the catalytic converter heat shield into place
- Insert the four bolts into the heat shield
-
step 9 :Reinstalling the Oxygen Sensors
- Insert the O2 sensors with the O2 sensor socket
- Connect the O2 Sensor wiring harnesses
- If you had to cut the old O2 sensors, you will need new ones
- Put the engine cover into place
- Insert the four 5mm Allen bolts into the engine cover
-
step 10 :Fastening the Catalytic Converter
- Raise and secure the vehicle
- Start the springs and the 14mm nuts onto the bottom of the Catalytic Converter
- Tighten the 14mm nuts until they bottom out
Tools needed
-
12mm Socket
13mm Socket
A Piece of Pipe (for leverage)
Socket Extensions
Torque Wrench
14mm Socket
Pry Bar
Jack Stands
5mm Hex Wrench
Flat Blade Screwdriver
O2 Sensor Socket
Acetylene torch
10mm Socket
Ratchet
Floor Jack
Needle nose pliers
1/2 Inch Breaker Bar
Wire Cutters
11mm Socket
Brought to you by 1AAuto.com, your source for quality replacement parts and the best service on the Internet.
Hi, I'm Don from 1A Auto. I hope this how-to video helps you out, and next time you need parts for your vehicle, think of 1AAuto.com. Thanks.
In this video, we're going to show you how to replace the exhaust manifold catalytic converter assembly on this 2003 Nissan Altima with the 2.5 liter four cylinder engine. It's the same process on the Nissan Altimas with this engine from 2002 to 2006. The items you'll need for this are a new exhaust manifold catalytic converter from 1AAuto.com, jack and jack stands, 10mm through 14mm sockets and a ratchet with an extension, 5mm Allen bit, 14mm wrench, O2 sensor socket, flat blade screwdriver, pry bar, pliers and depending on the condition of your vehicle you may also need a torch and wire cutters.
To start off, use a 10mm socket and ratchet to disconnect your negative battery cable.
Now, to remove this catalytic converter, we're going to have to remove a few other things, starting with this downstream O2 sensor right here. You want to start off by just pulling this harness free and disconnecting it. Now, you want to use the O2 socket and preferably this would work. In this case, it does not, because the O2 sensor's in there so well, which does mean that we going to have break it and if you have to do this you will have to buy a new O2 sensor. If it doesn't come out and you're forced to break it, what you want to do is just take some pliers and cut the wires on the O2 sensor. Now, using a 7/8 inch regular socket, you can just remove that O2 sensor. Use a piece of pipe or a breaker bar for leverage if necessary. Once that one's removed, you want to remove the other O2 sensor and you just disconnect this harness. If it's difficult, use a flat blade screwdriver to press down on the tab and then just pull it apart. Again, try using the O2 socket first and in this case, it does actually work and that O2 sensor pulls right out.
Now in the catalytic converter heat shield here, you'll see four bolts. You just want to spray each of these with some penetrating oil and just let it sit for awhile. Now you just want to remove this engine cover and it's held in by four 5mm Allen bolts. Just go ahead and remove those. On your alternator, you'll see there's one 10mm bolt right here and another 10mm bolt right here, you just want to go ahead and remove those. Now, to disconnect your alternator harness, just press the tab and pull it free. Under this cap here, you'll see there's a 12mm bolt, you just want to go ahead and remove that. Now, use a 14mm wrench and just place it onto the tensioner right here. Now when you press down on this wrench it's going to loosen the belt, pull the belt off the alternator. Try and keep it on the other pulleys and then slowly release the tension on the wrench. The alternator is secured by two 14mm bolts right here. We'll fast forward as Don removes those. With the lower bolt, you're going to realize it's very long 14mm bolt so we actually have to lift up the fuse box so that we have better access. You want to pull off that cap and then you want to remove this 10mm bolt right here. He did actually need some penetrating oil for that and then you just want to lift it up just enough so you can get that lower bolt out the rest of the way. We just actually push it down with a pry bar and it pulls right out. Now take the pry bar and pry your alternator out. Now you want to use a 10mm socket and ratchet to remove those four bolts you sprayed with penetrating oil earlier on the heat shield. Once those bolts are removed, the heat shield just lifts right up and out.
Now there are five bolts along the top of this manifold and you just want to spray each of those with some penetrating oil. Now jack the vehicle up and on the lower part of this assembly you'll see there are three 14mm bolts: two right here and one right on the side here. Spray each of these with penetrating oil. You'll see that the one on the side here pulls out really easily, but these two with the springs, they've corroded to a point where they're just not going to come out. As you can see we're having some trouble here and at this point it's okay to break these off because you're going to get new ones with the new manifold anyways. As you can see, we just show you, we're going to take a torch to it, heat them up and get them off that way. Now you can see the bolts glowing and we're just going to fast forward as Don removes that bolt and it does pull right out now. You obviously want to do the same thing on the other side. Then, you want to remove the five 14mm bolts along the top of the assembly. Once those are removed, you just pull this out and up. Remove the gasket and then clean the gasket surface on the head. The head is aluminum so be careful not to scratch it. Emery cloth and steel wool will do fine for this.
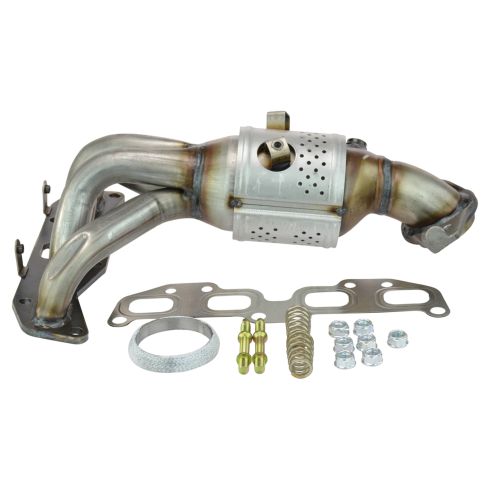
Here you can see the new one from 1A Auto on the left, the old one on the right. You can see the new one has a smaller integrated shield on it and then the upper shield bolts right on and everything else bolts right into place. Take your new gasket and push it into place. Then put the donut gasket down into place. Now put your new assembly down in place, line up the studs at the bottom as you put it in, make sure that donut gasket doesn't move as you put the bottom in and then at the same time relatively line up the studs at the top. Now replace those five nuts along the top and you want to first just put them on by hand and then tighten up all of them. We'll fast forward as Don this. Tighten these to 45 foot-pounds and if you do ever detect any leaks you can tighten them more to eliminate them.
Now, take your alternator and put it into place and you want to put it into place with that lower bolt. Again just do it from underneath the fuse box. You can leave that bolt a little bit loose. Now replace the upper bolt and once you hand thread that in then tighten both those bolts up. Now you just want to replace these two 10mm bolts along the top here. Make sure that you have that wire in place as you do that. Be sure to put this bracket back in place properly. Reconnect your alternator harness and put the battery wire back on and tighten up that nut. Now you just want to replace that 10mm bolt that secures the fuse box in place and replace the fuse box cover. Take your 14mm wrench, get it down on the belt tensioner, push it down and pull the belt on and you can see here we get it part way up and then we reposition the wrench and get the belt all the way on. Reconnect the negative battery cable and replace this upper heat shield and those four 10mm bolts.
We're going to speed through putting the O2 sensors back in. It's rather easy once you have nice new O2 sensors and we're putting new ones in. New ones are available from 1AAuto.com as well as the socket that you use to install them. Then make sure you reconnect them and reclip them on. You have to clip them to the heat shield or any brackets. Put the engine cover back into and replace those four 5mm Allen bolts. Now just jack your vehicle up again and replace those two springs and the two 14mm nuts. We'll fast forward here as we tighten those up. The nuts will just bottom out on the studs. There's also some times your manifold might come with bolts that will bottom out. Bottom them out and then tighten them up another 1/4 to 1/2 turn. We hope this helps you out.
We hope this video helps you out. Brought to you by www.1AAuto.com, your source for quality replacement parts and the best service on the Internet. Please feel free to call us toll-free, 888-844-3393. We're the company that's here for you on the Internet and in person.
Shop Products


2002-06 Nissan Altima Sentra Exhaust Manifold Catalytic Converter Assembly Cateran Inc 33134
- EPA Certified
- No
- No

How to Replace Exhaust Manifold with Catalytic Converter 1996-2000 Honda Civic
Watch this 1A Auto how-to video and you can learn how to replace the exhaust manifold and catalytic converter on your 96-00 Honda Civic.

