
How to Replace Front Brake Pads Rotors 2012-19 Nissan Versa
Created on: 2018-09-19
Front Brake Pads - How to repair, install, fix, change or replace your own worn, squeaky, fading old front brakes on 14 Nissan Versa
Hi, I'm Mike with 1A Auto. We've been selling auto parts for over 30 years.
We're gonna pull the hub cap off. We're gonna use a pry bar. You can try to grab it with your fingers and pull, it's a little tricky. Grab a pry bar or a straight blade screwdriver, get in behind here, just pry it out, pull it off.
Next we'll take a 21mm socket and a breaker bar. We're going to crack the lug nuts free before we raise the vehicle. Yep.
Now we're going to raise and support the vehicle. We're using a two post lift, you can use the jack and jack stands. I'll take these lug nuts off, pull the tire off, can you use a 14mm wrench.
I'm gonna take these two caliper bolts out, down out, and take the top one out.
All right, so I'm gonna compress the caliper a little bit. I'm just gonna use a screwdriver, get it between the rotor and the caliper and just pry it in a little bit. That's just gonna push some of the fluid back so that it can slide off the caliper easily.
And I'm gonna take a bungee cord and I'm gonna slide it through the spring right here and then loop it into the caliper holes, that'll hang on the side so we don't put any stress on the brake hose.
Next we're gonna take these spring retainers out, we're gonna push the pads out from the rotor. Just pull them up, set them aside because we're gonna reuse them. Pull those out, thanks.
We can pull the pads off, just slide it out and slide the outside one out. The inboard one has a Squealer on it on the top side, the outboard one does not.
Next I'm going to take a 17mm socket and a breaker bar. I'm going to take these two caliper bolts off, these generally are on pretty tight. Then I'm going to use a 17mm socket and a ratchet once those are broken free. Pull that bolt out and pull this bottom one out. Pull the bracket off.
I'm gonna remove this rotor. If you grab it and it pulls right off that's good. This one's on there a little bit harder, so I'm gonna take a hammer and just hammer it right in those locations. Now that it's loose, and pull the rotor off.
All right, we're gonna clean this caliper. We're gonna use a wire brush to clean the slides here, right here. We're gonna do the same for the other side, and then I'm gonna take the these pad slides off, just use a screwdriver. It'll clean underneath there as well.
We're gonna reuse are these pad slides, or sometimes they call them the anti-rattle clips. So just clean these out, they're not in too bad shape. Can we install that, they're good, and we'll do the same procedure for the other side.
Next, next I'm going to pull this caliper slide out. I'm gonna take some brake parts cleaner and a rag, clean this up, and also in the hole on the caliper bracket spray some brake parts cleaner in there, clean that up, take a rag, get in there and clean it.
Now I'm going to take some brake caliper grease, grease up this slide pin, and I'll do the same for the other one.
I'm gonna install the rotor, install the caliper bracket, just slide it over, put the caliper bracket bolts back in, get those started. I'm going to use the 17mm socket and a ratchet, just snug these up before I torque them. Now we're going to use a torque wrench and torque these 262 foot-pounds.
Now we're going to install these brake pads. The one with the Squealer goes on the inside, and the Squealer is going to go up, and the other one without the Squealer goes on the outside.
Now we're gonna take these pad return springs, I'm gonna slide this into the hole on the pads, and then that one as well. Do the same at the bottom one, slide that in there, not right there, like that.
We're gonna remove the bungee cord holding our caliper up, pull that out from the spring. You can take this old brake pad.
And we're gonna use this caliper compressor tool we got from 1AAuto.com, line this up. Now it's a good idea to check the brake fluid level before you compress this. If the brake fluid level is at the top, you're gonna want to adjust it, take some out a little bit before you compress this. If it's about halfway, then you're good.
And then we're going to compress this, and slowly brake fluid is going to go through the lines back up to the master cylinder and back into the reservoir. Once the piston is compressed into the caliper, we're going to slide that back onto the brake caliper bracket and install these caliper bolts.
Next we're going to tighten these up with a 14mm socket and a torque wrench, and we're going to torque these to 20 foot-pounds.
Now we're gonna put the tire and, we long line it up with the lugs and put the nuts on. Now I'm gonna torque these using a 21mm socket and a torque wrench, set 84 foot-pounds, and I'm gonna torque it in a star pattern or a cross pattern so that the wheel gets tightened down evenly.
Next we're gonna install the hub cap. You want to line this little groove up with the valve stem so it's in the right position. Just sometimes it's a little bit tricky, just give it a little tap, could use a rubber mallet if you need to get that back on.
Thanks for watching. Visit us at 1AAuto.com for quality auto parts, fast and free shipping, and the best customer service in the industry. You
Shop Products


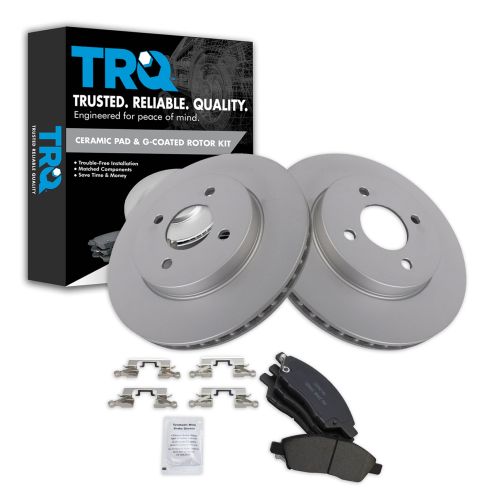
Nissan Versa Versa Note Front Ceramic Premium G-Coated Brake Pad & Rotor Kit TRQ BKA24575
Part Details:
- Premium G-Coated
- Premium Posi
- 4 Lug
- Ceramic
- (1) Front Ceramic Brake Pad Set
- (2) Front Premium G-Coated Brake Rotors
- Ceramic
- 10.24 in. (260mm)
- Vented
How to Install Rear Brake Pads Rotors 2014-17 Subaru XV Crosstrek
How to repair, install, fix, change or replace your own worn, squeaky, fading old brakes on 14 Subaru XV Crosstrek.
