How to Replace Fuel Pump Sending Unit Module 1998-2012 Ford Ranger
Created on: 2016-12-12
How to repair, install, fix, change or replace a broken, damaged, worn out, faulty or shorted out fuel pump sending unit on 01 Ford Ranger
-
step 1 :Depressurizing the Fuel Lines
- Remove the fuse panel cover
- Remove the fuel pump relay, location: 50B
- Start the vehicle and let it run until it dies
- Crank the vehicle a few more times to clear the fuel system
-
step 2 :Disconnecting the Battery
- Remove the 8mm nut on the negative batter terminal
- Lay the terminal off to the side
-
step 3 :Removing the Skid Plate
- Raise the vehicle on a jack and jack stands
- Remove the 13mm bolt at the front of the skid plate
- Remove the 13mm bolt on the frame rail
- Remove the 13mm bolt on the bed support
- Have a helper hold the skid plate
- Remove the 13mm bolt on the rear of the skid plate on the frame
- Lower the skid plate
-
step 4 :Disconnecting the Gas Tank
- Support the gas tank with a screw jack or floor jack to support the weight
- Remove two 13mm bolts from one side of the tank straps
- Carefully lower the tank to access the wiring harness
- Disconnect the fuel pump connectors
- Pry out the yellow clips and clear clips
- Push in on the red, green, and white clips
- Disconnect the connectors from the top of the tank
-
step 5 :Removing the Gas Tank
- Disconnect the filler neck hose clamps with a flat blade screwdriver
- Remove the rubber hoses slowly with a pair of pliers
- Raise the tank with the floor jack
- Pull the straps down and sideways to remove them
- Have a helper to lower the tank
- Slide the tank toward the axle and out of the vehicle
-
step 6 :Removing the Fuel Pump Sending Unit
- Gently tap the lock ring with a small hammer
- Remove the lock ring the rest of the way
- Remove the fuel pump sending unit
-
step 7 :Installing the Fuel Pump Sending Unit
- Insert the sending unit into the fuel tank
- Make sure the gasket is sitting properly
- Insert the lock ring while holding the pump down
- Tighten the lock ring
-
step 8 :Installing the Gas Tank
- Insert the gas tank with a helper, front end over the crossmember first
- Raise and support the gas tank
- Reinstall the filler line hoses
- Tighten the filler line hose clamps
-
step 9 :Reconnecting the Gas Tank
- Reconnect the fuel tank hoses
- Reinstall the clips into their connectors
- Connect the fuel pump wiring harness
- Insert the gas tank straps up into place and rotate them
- Tighten the 13mm bolts to the straps
- Lower the jacks
-
step 10 :Installing the Skid Plate
- Have a helper support the skid plate
- Tighten the 13mm bolt on the rear of the skid plate on the frame
- Tighten the 13mm bolt on the frame rail
- Tighten the 13mm bolt at the front of the skid plate
- Tighten the 13mm bolt on the bed support
-
step 11 :Reconnecting the Battery
- Tighten the negative terminal with a 10mm socket
-
step 12 :Priming the Fuel System
- Insert the fuel pump relay into its socket
- Reinstall the fuse panel cover
- Turn the key on and wait for the fuel pump to shut off
- Repeat the process three times
- Crank the vehicle
Tools needed
-
13mm Socket
Gloves
Socket Extensions
Flat Blade Screwdriver
Channel-Lock Pliers
Jack Stands
8mm Socket
Ratchet
Floor Jack
Safety Glasses
Hi, I'm Mike from 1AAuto. We've been selling auto parts for over 30 years! We're dedicated to delivering quality auto parts, expert customer service, and fast and free shipping, all backed by our 100% satisfaction guarantee. So visit us at 1AAuto.com, your trusted source for quality auto parts.
In this video, we're going to be working with our 2001 Ford Ranger. We're going to show you how to remove and replace your gas tank.
If you like this video, please click Subscribe. We have a ton more information on this truck and many other makes and models. If you need parts for your vehicle, you can follow the link down in the description over to 1AAuto.com.
Here are the items you'll need for this repair: 8-13mm socket, ratchet, socket extensions, 8-13mm wrenches, jack and jack stands, flat blade screwdriver, snips, pliers, gloves, safety glasses
Remove the under hood fuse panel cover. Lifts up. You've got to work it out from under the fender there. Remove the relay at the back of the fuse here. This is location 50B on the bottom of your fuse panel cover. Right here.
With the fuel pump relay disconnected, we'll start the vehicle and allow it to run until it dies from running out of fuel, and crank it a few more times to make sure there's no more pressure in our fuel lines. Perfect.
We're going to use an 8mm socket and ratchet to loosen the terminal on the battery, or you can use a wrench. Loosen the clamp. Wiggle it off of the terminal and tuck it somewhere down to the side where it won't accidentally come back and complete the circuit.
We're going to raise and support our vehicle on a lift to make it easier to show you what's going on. However, this job can be done either on a jack and jack stands, or you may even be able to sneak underneath the vehicle and drop the tank without raising the car.
Remove the 13mm bolt at the front of the skid plate with a socket and ratchet. There's also one on the frame rail at the driver's side. There's another 13mm bolt at the top, up on the bed support, in the center of the truck. If the captured nut on the back breaks loose, you may have to reach up into the bed support rail here and secure the back with a 15mm wrench. The last 13mm bolt is located at the rear of the skid plate on the frame, on the driver's side. You may need a helper to hold the skid plate. This bolt is pretty rusty, so we’re bringing it out as far as we can and then tightening it back up, then loosening it again. Once that bolt's out, you and your helper can lower the skid plate down from the gas tank.
We're going to support our gas tank with a screw jack because we're using the lift. You can easily do this at home with a floor jack. Don't want to put too much pressure on it, you just want to get it to touch the bottom of the tank to support the weight. Once that weight is supported, we'll remove these two 13mm bolts from the tank straps with a socket, ratchet, and some long extensions. Now, we're going to carefully lower our jack, or screw jack in our case. Notice I did not fully remove the gas tank straps because we can still partially hang our tank off of this. We'll get it down as low as we can here.
Disconnect the electrical connector for the fuel pump up at the bed support rail here. Disconnect the connections at the top of the fuel pump. These style clips, with the larger head on them, need to be pried out of the connector. Whereas the thinner clips, like our green and red ones, need to be pushed in on and pried up that way. Just go easy; you don't want to break these. We recommend you wear some safety glasses when you're doing this and keep your face as far away from it as you can because even though we released the fuel pressure there is a possibility that there's still some in the system. We don't to be sprayed.
The green connector and the red connector actually need that colored strip to be pushed in on and pried up. Push down on the white tab on the connector at the back of the tank with a flat blade screwdriver and remove it from the fitting. The filler neck on the outside of the driver's side frame rail needs to be disconnected from its hoses. Do this by loosening the two hose clamps here. These can be removed with either an 8mm socket and ratchet or a flat blade screwdriver.
Personally, I prefer to use the 8mm socket and ratchet. These don't have to come off completely. You just have to loosen them up enough until they move freely. We'll also have to cut this zip tie securing the ground strap.
You want to be careful removing these rubber hoses because they could still have some fuel pooled up in them. I find the safest and best way to remove them is with a pair of pliers. Don't really grip on there too tight, but work them back-and-forth to free up all that rust and corrosion underneath. Now, we're going to lift back up on our tank a little bit so we can remove the straps. These come down and get twisted sideways and out of their opening. Once they're out, you'll need a helper to remove the tank.
Remove the jack stand. Slide the tank down toward the axle and out of the vehicle.
Reinstall the gas tank with the front end going over the cross member first. Slide it forward. Send your filler neck tubes over the frame. Once the front end is over the cross member, have your helper set up your jack or screw jack and support the back half of the tank. Reinstall the filler line hoses under the filler neck. Once your hoses are reconnected, slide the clamps back onto the ends and tighten them back up with your 8mm socket and ratchet or your flat blade screwdriver.
Reconnect all of the hoses and the electrical connectors on the top of the fuel tank. If your clips pulled out like ours did, you'll have to reinstall them into their connectors, which then simply snap back over their original fittings.
Reinstall your gas tank straps. Remember they go sideways and then rotate. Once the tank straps are hooked in, use whatever you're using to support the tank to raise it up to its proper height. Send the bolt up and through your tank strap. Begin reinstalling it with your 13mm socket, ratchets, and extensions. Repeat this step with the other strap. Once the straps are reinstalled, lower your jack or screw jack from under the tank. Have a helper hold up and align the skid plate. It's easiest to install the two bolts along the frame first.
Once the frame bolts are reinstalled, your helper doesn't have to support the skid plate anymore and you can move on to install the rest of your hardware. Tighten the clamp back up. We're going to use an 8mm socket and ratchet or you can use a wrench. Make sure your connection is tight.
Reinstall the fuel pump relay into its appropriate socket. Reinstall the fuse panel cover. Since we de-pressurized our fuel system to work on the fuel pump, we're going to have to re-prime our fuel system. To do this, we'll turn the key on, wait for the fuel pump to shut off, turn the key off and repeat the process three times before attempting to crank the vehicle.
Thanks for watching. Visit us at 1AAuto.com for quality auto parts, fast and free shipping, and the best customer service in the industry.
Shop Products
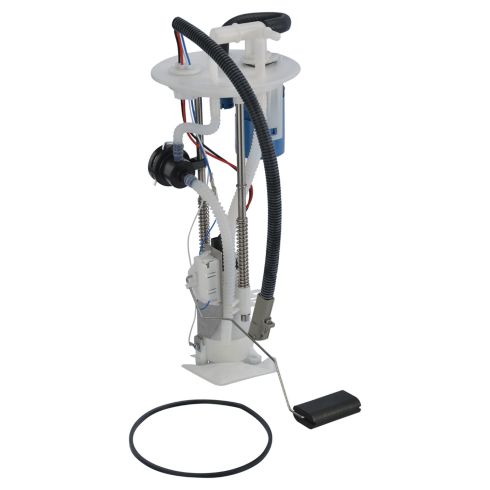
Ford Ranger Fuel Pump Module Assembly TRQ FPA61983
Part Details:
- No
- Yes
- Gas
- Strainer
- Yes
- Electric
- 9.49 mm
- In Tank
- 16 Ohms
- Yes
- 62 PSI
- 68 PSI
- 1
- 31.7 gph
- 0
- No
- 160 Ohms
- Quick Connect
- No
- 24 gph
- 28 gph

How to Replace Fuel Pump Sending Unit Module 2002-04 GMC Envoy XL
Make your repair go smoothly with this instructional video on how to replace the fuel pump & sending unit module on your 02-04 GMC Envoy XL.
