How to Replace Lower Trailing Arm 1992-2001 Toyota Camry
Created on: 2016-09-23
How to repair, install, fix, change or replace failing, rusted, rotted, or damaged front trailing arms on 92, 93, 94, 95, 96, 97, 98, 99 00, 01 Toyota Camry
-
step 1 :Removing the Wheel
- Loosen the lug nuts with the vehicle on the ground
- Raise the vehicle with a floor jack
- Secure the vehicle on jack stands
- Pull off the hub cap
- Remove the lug nuts
- Pull off the wheel
-
step 2 :Removing the Lower Trailing Arm
- Remove the 10mm bolt on the e-brake retainer
- Remove the upper 17mm nut and bolt with a 17mm wrench and socket
- Remove the lower 17mm nut and bolt with a 17mm wrench and socket
-
step 3 :Reinstalling the Lower Trailing Arm
- Hand tighten the lower 17mm bolt to the lower trailing arm
- Hand tighten the upper 17mm bolt to the lower trailing arm
- Raise the trailing arm to put the weight of the vehicle on the suspension
- Torque the two 17mm bolts to 134 foot-pounds
- Reinstall the 10mm bolt to the e-brake retainer
-
step 4 :Reattaching the Wheel
- Slide the wheel into place
- Start the lug nuts by hand
- Tighten the lug nuts preliminarily
- Lower the vehicle to the ground
- Tighten the lug nuts 76 foot-pounds in a crossing or star pattern
- Reattach the center cap
Tools needed
-
Jack Stands
21mm Socket
Ratchet
Torque Wrench
21mm wrench
17mm Wrench
10mm Socket
Socket Extensions
17mm Socket
Floor Jack
10mm Wrench
1/2 Inch Breaker Bar
Brought to you by 1AAuto.com, your source for quality replacement parts and the best service on the Internet.
Hi, I'm Mike from 1A Auto. I hope this how-to video helps you out, and next time you need parts for your vehicle, think of 1AAuto.com. Thanks!
In this video, we're going to be working with our 1998 Toyota Camry. We're going to show you how to remove and replace your rear trailing arm.
The rear trailing arm helps keep the suspension where it's meant to be and controls the travel of the suspension so it stays within a designated movement. On these, the bushings tend to wear out, but the arm can also become weak and rusted, bent from collisions or other things from the road, putting a lot of force on them—this can cause vibrations and some clunking, and the suspension will be out of line, so it may go down the road odd, create some weird tire wear, noises, or vibrations, etc.
If you like this video, please click subscribe. We have a ton more information on this car, as well as many other makes and models. If you need this part for your vehicle, you can follow the link down in the description over to 1AAuto.com.
Here are the items you'll need for this repair: 10-21mm sockets/wrenches, ratchet, socket extension, breaker bar, torque wrench, jack, and jack stands.
Grab onto the hubcap and remove it from the wheel. We're going to use a 21 millimeter socket and breaker bar to remove all five lug nuts. We'll crack them loose now, raise and support the vehicle, and then finish removing the lugs. We've put our vehicle on a lift to make it easier to film for you, but this job can be easily done with a jack and jack stands. Remove the wheel and tire.
You'll see this trailing arm in front of the rear spindle going into the body just behind the rear door. We'll remove this 10 millimeter bolt on the E-brake cable retainer so we can move it out of our way and get to the top bolt on the trailing arm. Do this using a socket, ratchet, and extension. We'll just allow that to hang out of the way for now, but remember when we install the new arm, that the back half here does cross over top of it. We'll want to be sure we put that back in the same way.
Remove the 17 millimeter nut and bolt going into the body. We'll use a socket and ratchet on the bolt side and hold the nut side with a wrench. There is a wing nut on there that will brace against the body, but we want to make sure that that moves. Once you get it moving, you can allow it to rotate around, and that wing nut will lock against the body so we don't have to use the wrench. Be sure to hold onto that nut just before the bolt comes through so it doesn't fall. We'll remove the bolt from our control arm and allow it to hang.
Again, we have a 17 millimeter nut and bolt at the bottom side here. Just be ready because when you break this loose the control arm is going to want to fall.
Here we have our old trailing arm that we removed from our vehicle and our new part from 1AAuto.com. As you can see, these parts are identical. This has a little bend here because we had a hard time getting it out of the vehicle and we had a stuck bolt we had to bend it to get around. Other than that, they're the same length and diameter.
We have the same flange on the end here. Our new part actually comes with a solid rubber bushing, as opposed to this one here you can see we have the gaps on the side there. This is a little bit beefier, and it's going to outlast the bushing that we removed from our factory unit. This trailing arm controls the movement of the rear suspension as that spindle travels up and down. It keeps it from moving forward and backwards while it has lateral links to keep it from moving in and out. This can cause clunking and vibrations while driving, as well as alignment issues and tire wear.
If you have a broken or worn trailing arm in your vehicle, this new part from 1A Auto is going to go in direct fit just like your original equipment and fix you up right. We'll be replacing our bolt into the control arm, because our old one snapped. We did manage to get it out of the bushings, so we just grabbed a new one.
Now ours is going to be a little different, but reusing yours you'll still be able to use that same 17 millimeter socket and ratchet you used to start with. We'll get that in place. Pull back and install the bolt where the control arm mounts into the body at the top here. Then we're going to use a screw jack to put the weight of the vehicle onto our suspension. If you're doing this at home on a jack and jack stands, you can just use a floor jack. Torque these bolts to 134 foot-pounds.
Now that our bushings are torqued at the ride height, we'll remove our screw jack, or your floor jack if you're doing this on the ground.
Reinstall the e-brake retainer bracket and the 10 millimeter bolt that secures it.
Reinstall the wheel and tire, and get all the lug nuts down as tight as you can by hand. Lower the vehicle carefully back onto the wheel and tire. Torque the lug nuts to 76 foot-pounds in a cross pattern. Line up the notch in the hubcap over the valve stem, tap the hubcap back into place.
Thanks for tuning in. We hope this video helped you out. Next time you need parts for your car, please visit 1AAuto.com. Also check out our other helpful how-to and diagnosis videos.

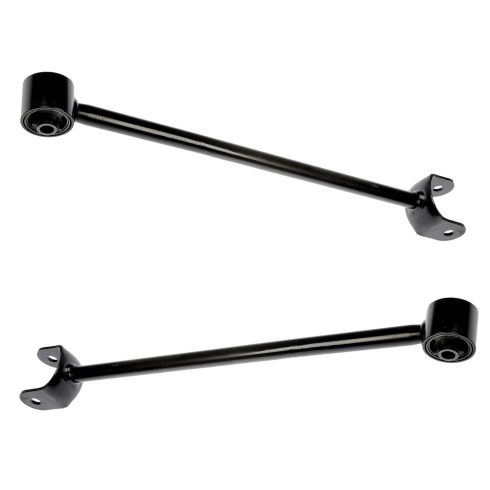
Toyota Lexus Rear Driver & Passenger Side Trailing Arm 2 Piece Set TRQ PSA54724
Part Details:
- (1) Rear Passenger Side Lower Trailing Arm
- (1) Rear Driver Side Lower Trailing Arm
- 2 Piece Set
How to Replace Rear Lower Control Arm 2004-13 Mazda 3
Need to replace the rear lower control arm? Learn how to do this straight-forward repair yourself by following the steps in this how-to video
