
How to Replace Spark Plugs Ignition Coils Spark Plug Wires 2008-12 Jeep Liberty
Created on: 2019-11-21
Ignition coils help your vehicle's engine run efficiently, cleanly, and smoothly. Rough running, lower than expected mileage, or trouble codes are sure signs that it's time to replace yours. Since worn spark plugs can damage ignition coils, it's best to replace those at the same time. And, since this model also uses spark plug wires, those should be replaced as well. This video shows you how to install new quality TRQ ignition coils, TRQ Performance spark plug wires, and new spark plugs on your 2008-12 Jeep Liberty. • Check here for more videos on the 2008-12 Jeep Liberty: https://www.youtube.com/playlist?list=PLJVpHWuCEUX9CAHC1hzA-wBtLP-tJwrFO
Tools needed
-
Torque Wrench
Socket Extensions
Drill
Silicone Paste
10mm Socket
5/8 Inch Spark Plug Socket
Ratchet
Pocket Screwdriver
All right, so we're just gonna go down the line here. Grab this one, squeeze it, pull it off. Here, take off your wires. You're gonna use your ten millimeter, and you're gonna remove the mounting bolt right here. We go, just has this little thing on there. We do the same to the others, we are all three you're out.
So what you want to do next is just make sure you blow a little bit of air inside your spark plug holes, and that's why last thing you want is any of that crud getting inside. I'll do the other ones after. Use your 5/8 spark plug socket with an extension in your ratchet, remove your spark plug, pretty great, there's our spark plug. So here's our original plug and here's our quality TRQ plug.
After you check to make sure that your spark plug gap is set to spec, you're ready to install. Carefully put this down inside the tube. So now we're gonna torque this down to 20 foot-pounds. There it is. We're gonna do the same to the other two down the line.
Okay, so if you come over on the passenger's side, you can see you have your spark plug wires right, they lead right down in here, super easy coming from the side of the vehicle. But for the purpose of this video, and to make it so you can see what I'm doing, I'm just gonna take off this air intake right here. It'd be very simple, you don't need to do that though to do what you need to do over here. Grab your wire, give it a little tug, should pop up fairly easily.
We're gonna blow some air in here, just like we did the other side. We've got our new spark plug, very carefully we're gonna torque that down. Okay, so let's torque these down to 20 foot-pounds. Beautiful.
Okay, so we're gonna take our new quality TRQ coil here. I'm just gonna put a little bit of silicone paste right on that bottom area. We're gonna put it right into the spark plug hole here, slide it down, and do the same for all the rest of the three over here.
I'm gonna torque those down to manufacturer specifications. All right, so let's torque these down to eight point eight foot-pounds. Okay, all three of these are torqued. We're gonna connect in the electrical connectors, listen for that beautiful click noise, give them a tug.
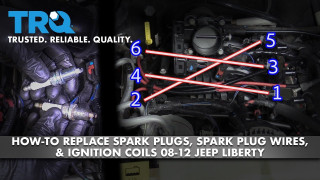
All right, let's start replacing some wires. Okay, so you might notice that you have some numbers on your spark plug wires here. If yours are original like these, and it says three and six on this particular one, that's for its corresponding cylinders, so you know that if this goes from a coil over on coil three or a cylinder three all the way over to cylinder six. And then as you move along you've got one and four, and then two and five on this one. So you've got one, three, five, and then two, four, six. So one, two, three, four, five, six, just like that.
Okay, so as we're connecting these wires we want to try to do them one at a time, that's gonna make it easiest for us. You're gonna need a small pocket screwdriver. So there's a little plastic doohickey here, just gotta get under it, lift it, pull it, you shouldn't, want to open up, which it did, beautiful.
I'm gonna take one wire at a time, just like I said. Okay, so we've got our first wire here, this one's for the three and six, it's the longest wire. So we're gonna grab our new wires and we're gonna find which one's the longest wire out of those, like this. Okay, I've got the longest wire right here, so this is the one that I'm gonna use for three and six.
I'm gonna use a little bit of silicon paste on it, that's gonna help it out. This is gonna help moisture stay out of there, and it's also going to help make it so the rubbers can slide on and off easier down the line. So let's remember, it goes all the way over here, it comes into this hole right there, and then it comes down around here, this one farthest one back. So under six, push it down. You want to make sure it's down as far as it can go. Are you sure that's inside the little area where it's gonna stay?
Let's move along, grab our next one. This one says it's four cylinders, one and four. So we're gonna go from cylinder one, which is the front one on the driver's side, to cylinder four, which would be the center one on the passenger side. This is going to go through under here. I'm gonna put it into cylinder four hole over here.
Should go on good, give it a little tug, make sure it's clipped in. This one says it's four cylinders, two and five. Slide it into the cylinder over here, sure it goes all the way down.
All right, so we got our little clip here, you want to make sure that you use this, it's very important. Just slide those into there, that's gonna hold them so they don't move around too much on you, they'll be nice and secured.
All right, let's start plugging these in. Okay, so the order that these wires are gonna go into, in case you forgot, cylinder to the wire goes over to cylinder 5, from cylinder 1 goes to cylinder 4, from cylinder 3 goes to cylinder 6.
Alright, so let's get these connected. All right, so we have our wires ran, they're hanging out in here, they're nice and secure, we don't have to worry about them shaking around. We're gonna reconnect this, assuming you took it off, like I said you didn't have to take it off, so I took it off for camera purposes. Click it in, flick the lock, give it a tug, it feels good.
All right, let's start it up. Okay, so let's start it up, we're gonna feel for a misfire and we're also gonna pay attention for a check engine light. Oh yeah, perfect, you, you.
Shop Products


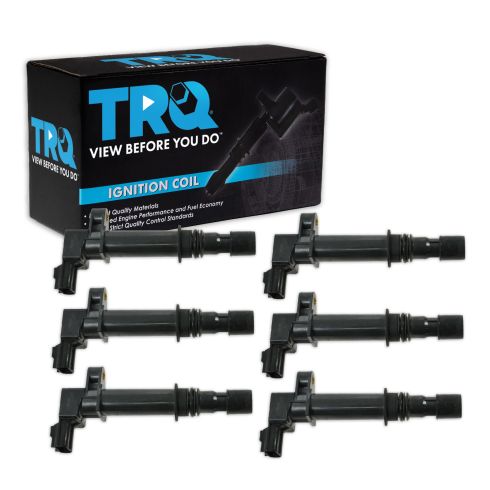
Jeep Dodge Mitsubishi 6 Piece Ignition Coil Set TRQ ICA61506
Part Details:
- 6 Piece
- (6) Ignition Coils
- Black
- Standard Replacement
- Direct Replacement
How to Replace Ignition Coils 2007-09 Honda CR-V
How to repair, install, fix, change or replace a bad or broken ignition coil / coil pack on 07, 08, 09 Honda CR-V
