
How to Replace Turn Signal Lever 2007-09 Chevy Equinox
Created on: 2017-01-13
This video will show how to remove the steering column cover to access and replace the combination switch stalk on the 07-09 Chevy Equinox
-
step 1 :Removing the Steering Column Cover
- Pull up on the upper steering cover
- Remove the upper steering cover
- Remove the three 7mm bolts on the lower steering column
- Lower the bottom steering column cover
-
step 2 :Removing the Turn Signal and Headlight Switch
- Press the tabs on the top and bottom of the switch
- Pry the switch out
- Disconnect the wiring harness
-
step 3 :Installing the Turn Signal and Headlight Switch
- Connect the wiring harness
- Press the switch into the column
-
step 4 :Installing the Steering Column Cover
- Reinstall the bottom portion of the column cover
- Tighten the three 7mm bolts to the cover
- Press the upper cover into place
Tools needed
-
7mm Socket
Ratchet
Trim Tool Set
Socket Extensions
Hi, I'm Mike from 1AAuto. We've been selling auto parts for over 30 years! We're dedicated to delivering quality auto parts, expert customer service, and fast and free shipping, all backed by our 100% satisfaction guarantee. So visit us at 1AAuto.com, your trusted source for quality auto parts.
In this video we're going to be working with our 2008 Chevy Equinox. We're going to show you how to remove and replace your vehicle's turn signal and high beam switch.
If you like this video, please click subscribe. We have a ton more information on this and many other vehicles. If you need this part for your car, you can follow the link down in the description over to 1AAuto.com.
Here are the items you'll need for this repair: trim removal tools, 7mm socket, ratchet, socket extension
Remove the upper steering column cover by gently pulling up on it. It's easiest to lift from the openings for the multifunction switch and turn signal switch. Remove the three 7 millimeter bolts on the bottom of the steering column. We'll do this with a 7 millimeter socket ratchet and extension. With the bolts out, you can lower the bottom steering column cover. It does separate into two pieces, so if you have to pull it apart a little, that's fine. It will just snap back together if needed.
On the top and the bottom of the turn signal switch are these little tabs. I'm going to reach through with one of our trim tools because it's plastic and I don't have to worry about cracking or damaging anything. Push that down and out of the way. Do the same thing at the bottom. May be easier to pry up on the tab from the front. Just wiggle the switch out. Push down and release the smaller connector. Again, we'll use our trim tool to lift up on this little tab and release the larger connector.
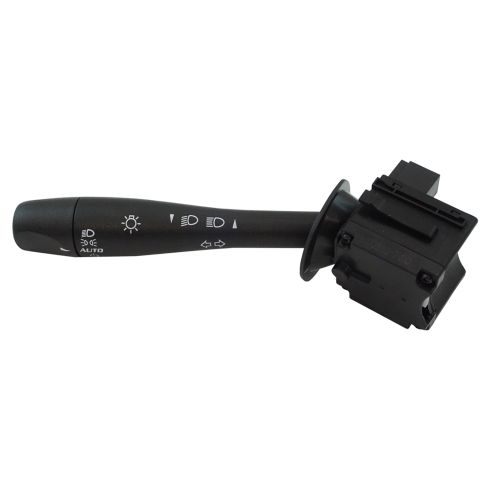
Here we have our old turn signal switch that we removed from our vehicle and our new part from 1AAuto.com. As you can see, these parts are exactly the same. We have the same graphic identifiers here on the switch to show you all your different selections and features of the switch. They have the same base with these nice little tabs that lock in. These are a really great way to remove these as opposed to a bolt that can be tricky to get to back there. Comes with a new dust boot here so it sits into your steering column and looks and fits nicely. We also have the same connectors at the bottom here to plug in the electrical connectors from the steering column, which makes our switches function exactly the same without having to modify anything in the vehicle. If your old turn signal switch is broken off, become loose, or isn't automatically disengaging, this new part from 1A Auto is going to go in direct fit just like your original equipment and fix you up right.
Reconnect the electrical connectors on your switch. Then simply line up your switch, and push it in until it snaps.
Reinstall the bottom portion of the steering column cover. I got to find just the right way to seat it in. Again, this column cover does split. You may find it easier to split it in half and line up the little hooks on the bottom of the cover. Once you've snapped it back together and laid it back into place, you can reinstall your three 7-millimeter screws. You might just want to go ahead and get each one of them started a couple of threads before you tighten them all down to make sure that everything is aligned properly.
Once you have them lined up, you can tighten them down all the way. These are just going into plastic, so you can see them just grabbing the head of the ratchet, just tightening it with my fingers. There's no need to really crank these down. It might be easier if you have a tilt column to pull down and put the column in its lowest position. Align up the top. Snap it back together. Set the column back to where you like it and close the tilt switch.
Thanks for watching. Visit us at 1AAuto.com for quality auto parts, fast and free shipping, and the best customer service in the industry.


How to Replace Combination Switch 2002-06 GMC Envoy XL
Learn how to replace the combination switch on your 02-06 GMC Envoy XL in this 1A Auto video. This switch controls the wipers, turn signals and high beams.

