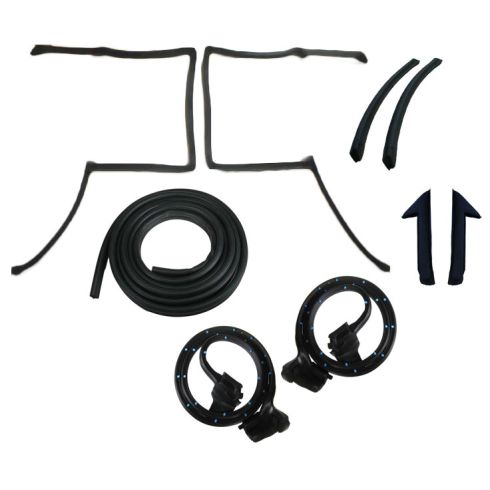
Kit Includes: (1) Trunk Weatherstrip Seal (2) Door Weatherstrip Seals (2) T-Top Roof Weatherstrip Seals (2) Front Triangle Weatherstrip Seals (2) T-Top Side Rail Weatherstrip Seals
This Aftermarket replacement weatherstrip kit includes the following pieces:
T-Top Roofrail Seals: Seal the perimeter of the T-Top, and the front/rear of the side glass to the body of the car.
T-Top Out Edge Seals: Seal the outer edges of the T-tops to the side glass.
Door Seals: Seal the back, bottom, and front of the doors to the body of the vehicle.
Hatch Seal: Seals the Hatch to the body of the vehicle.
Triangle Seals: The seals that attach to the triangles on top of the door
If your weatherstripping is causing leaks allowing damaging rain in, then this weatherstrip kit is for you. Why not replace your old, hardened, rotted seal with this new, ready to install
weatherstrip set.
NOTE:Some 82-92 Camaros and Firebirds were converted to t-top cars after they left
the factory by a company called Cars and Concepts (C&C). These aftermarket t-tops are not interchangeable with the stock ones and require different weatherstripping. To determine which top style
you have, remove one of the tops and measure the side that tucks into the center support section of the roof. Factory, or Fisher, tops will be 30 1/4" while the C&C tops will only be 28" long.
1A Auto does NOT stock or carry the replacement C&C weatherstripping.
Complete Repair in One Purchase - Stop searching for parts individually and complete your repair with a customized kit or set from DIY Solutions.
High-Quality Parts from Trusted Brands - DIY Solutions' kits and sets are selected from the best automotive brands and include hard-to-find and even obsolete parts you may need for your vehicle.
Guaranteed Fit - DIY Solutions ensures its selected parts are quality-tested to guarantee fit and function.
Item Condition:New
Attention California Customers:
WARNING: This product can expose you to chemicals including Mercaptobenzothiazole, which is known to the State of California to cause cancer, and birth defects or other reproductive harm. For more information, go to www.P65Warnings.ca.gov.
Lifetime Warranty
This item is backed by our limited lifetime warranty. In the event that this item should fail due to manufacturing defects during intended use, we will replace the part free of charge. This warranty covers the cost of the part only.
FREE Shipping is standard on orders shipped to the lower 48 States (Contiguous United States). Standard shipping charges apply to Hawaii and Alaska.
Shipping is not available to a P.O. Box, APO/FPO/DPO addresses, US Territories, or Canada for this item.
Expedited is available on checkout to the United States, excluding Alaska, Hawaii.
Final shipping costs are available at checkout.
How to Replace T-Top Roof Weatherstrip Seal 1982-92 Chevy Camaro
How to Replace Door Weatherstrip Seal 1982-92 Chevy Camaro
How to Replace Trunk Weatherstrip Seal w Adhesive 1982-92 Chevy Camaro
Created on:
Tools used
Flat Blade Screwdriver
Phillips Head Screwdriver
Putty Knife
Heat Gun
7mm Wrench
10mm Wrench
1. Removing the Trim Panels
Remove the two Phillips head screws from the rear trim panel
Remove the Phillips head screw from the front trim panel
Pull off the trim panels
2. Removing the T-Top Seals
Pull out the plastic pins from the seal with a screwdriver
Use a heat gun to release the glue
Begin pulling off the seal, keeping it in one piece if it will be reused
Remove the 10mm bolt from the headliner
Pull the headliner down
Use a putty knife and screwdriver to loosen the seal as necessary
Remove the 7mm bolt from the windshield pillar corner
Removing the seal from the roof and windshield pillar
Use a heat gun and putty knife or screwdriver to clean up any remaining glue and dirt
Brought to you by 1AAuto.com, your source for quality replacement parts and the best service on the Internet.
In this video, we're going to show you how to remove the T-Top roof rail seal, which is the seal that is attached to the car itself. Tools you'll need are a heat gun, you'll definitely need a heat gun, it makes it a whole lot easier to get the adhesive to release. You'll need a Phillips screwdriver, as well as a putty knife and a regular screwdriver to do some scrapping out of the channel. For your T-Top roof rail seals, which go all the way around here, the first thing you are going to do is, you're going to remove this trim panel and then this trim panel. The rear one, it's a screw here and a screw down here and then it will pull off. On the front one, it's a screw up here and it will pull up off. I'm going to fast forward here a little bit and these screws can be a little difficult, you really need to push your screwdriver into them to get it to grip and pull them out. Now the same thing for this front panel and you'll see here again, I changed position actually so I can get more leverage pushing that screwdriver in. Once you have that off, pull back and down. There are . it looks like they're broken on this one. You probably will have to pull harder as there are two pins that go up into the body of the car that hold it. It also clips on down there at the bottom so you have to push it up and out and then pull it up.
We're going to start with our heat gun down here. There are two pins, which you will have to pull out. As you can see, like usual, my weatherstrip is falling right apart and it should be glued in with this channel here. I'm just using a heat gun and following it right up, just pulling. The glue is usually old enough and dry enough that it doesn't really hold anyways.
As you get right up into here, see when that focuses in, there's a little 7mm bolt right here and you're going to want to remove that. Okay and we'll speed it up here as I do that and you can see a typical original headliner has basically going to fall apart when I touch it and fall down. You'd obviously, if you're saving your headliner, be a little more careful. Okay, we're going to fast forward again, and in this area you're going to encounter more glue. I'm going to use a screwdriver and a putty knife just to try and make sure I'm still taking the weatherstrip off in as a single of a piece as possible. I'm using the heat gun to release the glue again and then following it right up to the next corner. Now again here, you'll see I spend quite a bit of time on this corner, trying to heat it up really good. Usually the factory has put some glue in there and a lot of times people, when they get leaks, they try and put some extra glue in there and try to get it to seal up but again just try and get it in there. What I'm doing is with the knife and screwdriver is just pulling out some of the pieces and trying to get as whole of a piece as possible. Again, to keep pulling it out nice and smooth. Right up under here is another 7mm screw right there. I'll fast forward through removing that 7mm screw and then back at it with the heat gun and you'll notice that rather than trying to go from the far corner across, I start at this corner, rip and then just trail it across. You'll notice also that it takes a little more time, that's because this car probably leaked and the solution that the person came up with was let's throw a whole bunch of sealant at the front of the weatherstrip, which just makes it a little more difficult to get apart. It probably didn't help the problem and I'm also just making sure that I pry out from underneath that channel, make sure that you get all the residue and the glue and everything out from there.
Now I'm just doing the same thing right down the windshield pillar, this proved to be a little more difficult. You can see it comes apart, just stay at it with the heat gun and prying it out with a putty knife and/or a screwdriver. This is just a little section up near the front corner that I had left because it frustrated me. Again, just really scraping it out. Using the heat gun and this is one of those areas where a lot of owners will have put a whole bunch of extra sealant in and that's what happened here. There's a whole bunch of extra sealant and it's all gunked up in there. I'm just doing my best to get as much as possible out of there and get it as clean as possible. Once you've got the weatherstrip removed, just use your heat gun and screwdriver or putty knife and try and clean up as much as this stuff as possible. The cleaner you get this, the more time you spend cleaning it out, the better your new weatherstrip will seal and it looks like we're probably going to have to end up replacing this metal plate. This being a New England car, the metal plate is pretty much gone so we'll probably be looking for one of those before we go to ... After we paint and before we go to install the new seals.
We hope this helps you out. Brought to you by www.1AAuto.com, your source for quality replacement parts and the best service on the Internet. Please feel free to call us toll-free, 888-844-3393. We're the company that's here for you on the Internet and in person.
Tools used
Putty Knife
8mm Wrench
T10 Torx Driver
Flat Blade Screwdriver
T27 Torx Driver
Phillips Head Screwdriver
Heat Gun
8mm Socket
Mineral Spirits
Ratchet
Wire Brush
Cloth Rags
Needle nose pliers
1. Disconnecting the Battery
Disconnect the negative battery cable with an 8mm wrench
2. Removing the Door Panel
Remove the bolts from the door pull
Pull off the door pull
Remove the screws from the door handle bezel
Pull out the window switch
Disconnect the window switch wiring harness
Pull out the door lock switch
Disconnect the door lock wiring harness
Pull off the door handle bezel
Pull out the door handle trim piece
Pry out the door panel with a putty knife
Pull off the door panel
Pull off the door ledge trim piece
For more detailed instructions, please see the 1986 Camaro door panel replacement video
3. Removing the Weather Strip
Remove the four Phillips screws from the top corners of the door
Peel back the weather strip at the top corners of the door
Pull off the weather strip
Pull out the weather strip pins with needle nose pliers
4. Cleaning off the Glue
Heat the glue with a heat gun
Scrape the glue off with a putty knife
Continue heating the glue
Clean the residue with a wire brush
Clean the remaining residue with mineral spirits
Repeat this step for all of the glue spots
Brought to you by 1AAuto.com, your source for quality replacement parts and the best service on the Internet.
In this video, we are going to show you how to remove the door weather strip from the door of this 1986 Camaro IROC-Z. This is the same for any '82 to '92 Camaro IROC-Z and Z28, as well as the Firebird Trans-Am and Formula. The tools you'll need are 8mm wrench or socket and ratchet to disconnect your battery . I will say that now, you do disconnect your battery, just so you don't run down the battery with the interior lights, and also to avoid shock when you are disconnecting the power door locks ., T10 and T27 Torx driver, flat and Phillips screwdrivers, a heat gun, a putty knife, wire brush and mineral spirits or some other type of cleaner to clean off some of the residue of the glue.
We'll start out here in a little bit of fast-forward. You do need to remove your door panel and the upper ledge molding to get to a couple of screws that hold the ends of the weather strip. So I'll show you that. This is in fast motion. If you want to see this in regular speed, just check out our other videos for the Camaro door panel removal, and you can see it there.
There are two Phillips screws to remove so you can pull back the top of the weather strip up here. Then, right into here, you'll see there is a hole in the weather strip. Remove the screw, and you peel that back. I'll pull the screw out here so I don't lose it. Remove the two screws at this end of the weather strip. There's one there and then there is one here. You can see how rough shape the weather strip is in. Once you remove those screws, you'll see the weather strip starts to come off. It is glued there, but the thing is so old, it just came apart. I didn't even force that. Then there is a series of pins. You can probably just pull it right off. We are going to pull these pins out with needle nose pliers. Do the same thing over here. Now take a pair of needle nose pliers and you can see you can just force the pliers right in behind those clips and pry them right out. Just so you can see, a total of about twenty clips come out.
If you're doing this stuff yourself, a great investment, again, is a heat gun. This is just a middle price model from a home improvement store. Just take it, heat it up, which releases the glue. I'm going to really heat this up. I can smell it burning, now. Then I'll fast-forward through this. You just basically use the heat gun, heat up with those spots where it's been glued, and the heat releases the glue and it makes it easier to get it off nice and clean. Once you are finished with the putty knife, and then use your heat gun and heat up the remaining residue. Then, you can see I have a little wire brush. Just use the wire brush to get the remaining weather strip and glue off. Then, once you're done with that, I've get some mineral spirits on that paper towel, just remove the remaining residue. You want to make sure this is nice and clean, so that if you hit it with some paint, the paint sticks to it, or if you are just gluing on new weather strips, they have a good clean surface to stick to. Then, we'll go on very high speed, here, and you want to just repeat that process for the spot up near the front where they glued it on at the factory. Remove as much of that residue as possible. Get a nice clean surface for either your paint and/or your new weather strip to stick onto.
We hope this video helps you out. Brought to you by www.1AAuto.com, your source for quality replacement parts and the best service on the Internet. Please feel free to call us toll-free, 888-844-3393. We're the company that's here for you on the Internet and in person.
Tools used
13mm Socket
8mm Socket
Ratchet
Assistant
1. Removing the Trunk Seal
Pull the trunk seal seam apart
Pull the seal off
2. Cleaning the Trunk Seal Mounting Area
Remove the four 13mm bolts from the trunk glass
Remove the two 8mm bolts from each hatch strut
Pull off the hatch struts
Lower the trunk
Have an assistant help you lift the trunk glass up and off
Clean the trunk seal mounting area
Remove any glue residue from the trunk seal mounting area
3. Installing the New Trunk Seal
Apply adhesive around the trunk seal mounting area
Press on the new trunk seal
4. Reinstalling the Trunk Glass
Have an assistant help you lift the trunk glass into place
Put the hatch struts into place
Insert the two 8mm bolts into each hatch strut
Insert the four 13mm bolts into the trunk glass
Brought to you by 1AAuto.com, your source for quality replacement parts and the best service on the Internet.
Hi, I'm Mike from 1A Auto. I hope this how-to video helps you out, and next time you need parts for your vehicle, think of 1AAuto.com. Thanks.
In this video, we're going to show you how to remove the rear hatch weather strip on this 1986 Camaro Iroc Z, same as any '82-'92 Camaro or Firebird Trans Am, etc. No tools are necessary. You will need some adhesive to put your new seal back on. We do show you how to remove the hatch so you can clean up in the upper area between the hatch and the roof of the vehicle which is sometimes hard to clean. For that you will need a 13 millimeter socket and ratchet, an 8 millimeter socket and ratchet, as well as someone to assist you in lifting off the glass.
This could be a really short video, and to some people it's going to be simple, but to some that don't know all this seal just does, there's usually a seam in it right here. Pull that seam apart. It looks like they did use some adhesive. Just pull the seal right up and off.
To remove this glass, there are four 13 millimeter bolts. I'm going to undo them up in here, in the top of the body of the car. Now, you may ask why I'm taking the hatch off. To be honest with you it's: 1, because we're going to paint this car, and 2, really in order to reinstall this seal correctly you should take the hatch off and really clean up, up above on the roof. Lots of times a whole bunch of debris and dirt and stuff gets in there. It just makes it easier to glue it down and get it on there right. Now, you might think with the third brake light on there, there's some wiring, but there's not. That's what this switch is right here. The third brake light is actually wired through the window and this switch just hits contact down on the vehicle. I've got those four bolts undone. Now I'm going to undo these. These struts won't come off until you take them off. What I mean by that is you can unbolt them and they're not just going to flop off. They'll stay there until you want them to come off. Disconnect the defrost lead. Disconnect the stop light lead. Now, probably, having a helper would be the best thing here. I'm going to remove this. Put the hatch down. Now, with an assistant, pull the glass up and off.
Now with the hatch off you can really clean this properly. You can see how much gunk builds up and stuff in there. Then put your weather strip back on. You'll want to do your best to get all this . it looks like it comes off pretty easy . all this residual glue off.
Then, you just put a bead of glue right up on top all the way around and then press your weather strip down on top of it.
We hope this video helps you out. Brought to you by www.1AAuto.com, your source for quality replacement parts and the best service on the Internet. Please feel free to call us toll-free, 888-844-3393. We're the company that's here for you on the Internet and in person.
WSS00491
In Stock
Product Reviews
Loading reviews
4.54/ 5.013
13 reviews
5 Stars
4 Stars
3 Stars
2 Stars
1 Star
9
2
2
0
0
Awesome service and product
C
December 6, 2018
Service was Excellent all the people have been very helpful.Product was just as explained in description. Quality is Great. Will use 1A Auto again in the Future.
J
September 13, 2019
Great and seals perfect
Sizing issues
W
October 1, 2019
I had some fitting issues the measurements were slightly off from the originals and I had to modify them to get the kit to work, but so far its working. Will have to wait till after winter to find out if it fit well enough.
Worked great!
rebecca
July 24, 2020
This product was exactly what I needed, prices were good, instructions easy to understand and everything came with it!
1987 Trans Am seals
Sean
February 8, 2021
Replaced T-top seals and door seal. Very highly recommended. Works great..
Window gasket set
P
April 20, 2021
Fits like a glove. It was everything you said it was. Thank you.
have one for sale if anybody interested
James
December 9, 2021
great fit easy to install
Llhoyd
December 9, 2021
Perfectly fit into my 91 Z CAMARO T-Top
Mark
May 8, 2022
Fitment was off, drivers rear t top was slightly to long and passangers front was to long
anthony
July 31, 2023
fit great!
T top replacement weatherstrip
Mike
August 24, 2023
Having a very hard time getting drivers window to seal properly at the windshield corner and t top front corner drivers side. Material is great. Its a nice kit. But that is my only issue thus far.
Perfect Fit ..
John
October 14, 2023
It Fit perfectly on the T Tops for my 1986 Chevy Iroc Z28 .. No leaks .. the door weatherstripping snapped in perfectly. The only thing I was missing the triangle weatherstripping for the passenger side.
Good quality needs skilled installation.
Nathan
March 13, 2024
This seal kit is a perfect fit for third gen t-top firebirds. It takes some level of skill to install the t-top portion. I suggest installing the corners first, if you don't, you will have trouble finding proper alignment. You also may need to buy the (a pillar weather stripping channels) that the seals lock into, unfortunately I could not find them on 1A so I ordered them from classics industries for about $45. I also highly recommended using urethane sealant along the rear of the t-top and at the top of the a pillar, both of these areas often leak even with new seals. 4 out of 5 good quality but I don't believe 1A has an installation video for this item.
Customer Q&A
Are these seals comes with glue or tape?May 4, 2017
Satnam A
10
No... they don't ..
May 4, 2017
Andy O
10
You may use 3M Weatherstrip adhesive to complete the installation.
May 4, 2017
Alex P
10
No adhesive or tape is included.
May 4, 2017
T H
Will this fit on my 89 Camaro Iroc-Z Z28?June 17, 2018
Zachary F
10
Yes it will, as long as you have a factory T-Top. This kit will not fit on models that were converted to a T-Top by Cars and Concepts. More info can be found on this in the product description.
June 17, 2018
T I
When would these seals be in stock ?November 1, 2018
K E
10
These are expected back in stock 2nd week of November. You can put your email into the notify box in the listing and be advised when they are back in stock.
November 1, 2018
Christa R
when will you have this back in stock?May 4, 2021
Ezekiel D
10
This will be back in stock on May 17.
May 4, 2021
Emma F
Will this item be back in stock ? if so what would be a projected date thank you ?September 19, 2021
Josh P
10
The estimated restock date at this time is 10/5/2021
September 20, 2021
Cristina P
Do the kit include the plastic drip rail at the top of the windows?December 9, 2021
Delbert M
10
This kit does not include the piece you are inquiring about.
December 9, 2021
Jessica D
i have a 1987 camaro iroc z and need to replace the t tops and doors rubber seal is this what I want and do I need glue or anything else if I buy this kit. Also looking for a back seat in black for it. Do you all carry them?February 20, 2022
Amy B
10
you do need glue
February 21, 2022
James B
10
Glue will not be included as part of this assembly.
February 21, 2022
Emma F
10
I have an && IROC Camaro and everything was perfect except the t- top rubber seal. It was not correct for my car. I checked with the dealership and it was a factory t- top so it was supposed to fit. On my Z there was a slide pc that the plastic connector on gasket slid into. Mine was on the piller rail. Others show the pc on the frame of windshield. Good luck
February 21, 2022
Mark B
Do they sell Thai kit without the t top surround seal? That's the only one that's good on my carMay 7, 2022
John D
will the weather strip kit fit my 1986 Z 28 Iroc ?June 1, 2022
John D
10
Yes these will fit your 1986 Z28 Iroc as long as you have factory T-Tops.
June 2, 2022
T I
Is it for camaro 6 cylinders?October 2, 2024
John D
10
Doesn't matter what engine, as long as it is original t top car and not the after production modification car
October 2, 2024
Gary M
10
This kit is not specific to engine size. It will fit the 1982-1992 Chevy Camaro with Factory T-Tops.
October 3, 2024
Andra M
Customer service
877-844-3393
Monday - Friday 8:00am - 9:30pm ET Saturday - Sunday 8:00am - 4:30pm ET
Enter Vehicle Year Make Model
Specify your vehicle's year, make and model to guarantee fit.
Year
Make
Model
Options
Drivetrain
This part doesn’t fit a . Select from parts that fit.