Brought to you by 1AAuto.com, your source for quality replacement parts and the best service on the Internet.
Hi, I'm Mike from 1A Auto. I hope this how-to video helps you out, and next time you need parts for your vehicle, think of 1AAuto.com. Thanks.
In this video, we're going to show you how to replace the front window regulator. We show you on the passenger side, but the driver side's is the same procedure. Same for ‘97-‘01 Camry, and you'll need new window regulator from 1AAuto.com, 10mm socket, ratchet and extension, flat-blade and Phillips screwdrivers, small pick tool, white lithium or similar type grease, rubber gloves, and painters tape.
Using a small pick, remove the plastic trim that should be inside the bezel here covering this Phillips head screw, as well as this and this plug in the door panel. Our arm rest is a little stretched out here. Normally, you'll have to take a flat-blade screwdriver, place it underneath, pop up the trim panel, pull it back, move the switch housing from the door, and disconnect the electrical connectors. You'll also want to release the top of this black cover behind the mirror with a flat blade screwdriver, pull out, lift up to release the lock tabs on the bottom. Remove with Phillips head screws from the door panel, three on the arm rest, one on the handle bezel, one here closest to the dash and two underneath with a number two Phillips screwdriver.
Using a flat-blade screwdriver, reach between the bottom of the door handle and the bezel, pop it out, do the same thing on the top just above the lock, open the handle, pull the bezel out. Pop out the bottom of the door panel, lift up and remove the panel from the door.
Using a number two Phillips head screwdriver, remove the screw at the back of the door handle. Rotate the interior door handle to release the metal latch rods from the handle in the lock. The upper is going to be for the lock and the lower for the handle. Remember that for when we reinstall. Remove the three Phillips head screws with a number two Phillips head screwdriver: here, here, and here. Begin to carefully pry back the weather shielding inside the door panel. Pull the wiring harness through the shielding before you finish removing it. Place the shielding somewhere off to the side where it won't get wrinkled or torn.
Reconnect the window switch, turn the key to the run position, roll the window up until you can access the two bolts for the window clamps. Using a 10mm socket, extension, and a ratchet, remove the bolts securing the window to the regulator. We're going to lift the window up, all the way to the highest point, and tape it up with painters tape which will secure the window up and out of the way while we remove the regulator, as well as not leaving any kind of residue on the glass or our pane.
For this step, it helps to have a pair of good rubber gloves with some grip to them, or you can use a suction cup dent puller to hold the glass and make sure that it goes all the way up. Lift up and work it out of the clamps. Keep it nice and straight. Hold it up at the highest point, apply your painters tape to the glass in a few places, being sure to keep it nice and tight. You want to do this in two or three places across the top of the window to make sure that it doesn't fall on you while your hands are in there, or even if they aren't it can fall and shatter the glass with the regulator out.
Disconnect this electrical connector to the motor, and pry the tabs out of the door skin using a flat-blade screwdriver. Remove these two 10mm screws for the guide on the regulator, these four 10mm screws for the motor brace. Using a 10mm socket and ratchet, remove the six 10mm screws. When removing the last screw, regardless of which one it is, be sure to reach in and support the regulator so it doesn't fall into the door, especially if you intend to reuse it. Carefully remove the regulator by lifting up, pull out at the bottom, and roll it back, collapse the track, slide the whole assembly out of the bottom hole in the door skin.
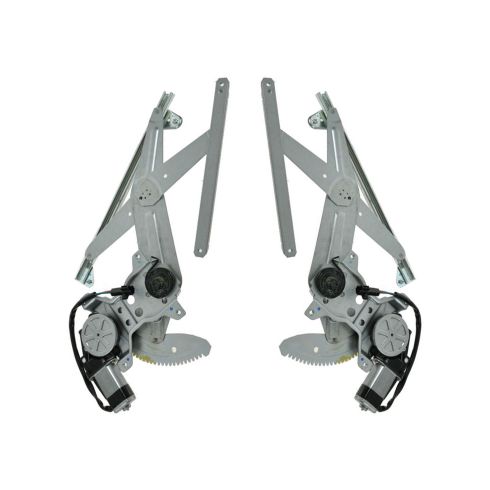
Here we have our old part from the vehicle, and our new part from 1AAuto.com. As you can see there are some minor aesthetic differences, but all the dimensions are the same, and this part is going to go in and work just like our original equipment did. You can see we have a new motor, these regulators are available without the motor as well as the motor being available separately, but since we're in here, we're going to do both at once.
You see we have the same mounting tabs for the glass, same upper track, same cross-brace here, the lower track is not fixed to the motor bracket like it is on our OAM piece, but the bolt holes are the same distance, and they'll still line up just the same. We have the same four screw holes on our motor bracket, and the same two pin connector coming off of our motor. To ensure the longevity of your window regulator, before installing use white lithium or similar type grease to lubricate the upper and lower tracks. Make sure to get not only the flat, but also into the creases. No need to put it on too thick because as the motor moves it'll work it in there. Take a second to work that grease in a little bit. Lubricate the window side of the track as well. Put just a thin layer on the contact points, on the teeth as well as on the edge here, because this rides against this metal edge as well as this one. Put a thin coat on this side as well, white lithium is some pretty resilient stuff, so this should last the lifetime of our motor and regulator.
Reinstall the motor and regulator assembly into the vehicle, be sure to pull the connector through the proper hole. Line up your bolt holes, start your 10mm screws by hand to keep the motor and bracket in place. Then line up the lower slide, start those screws as well. It's really a good idea to wear gloves, not only in general, but especially on this step where we have some sharp edges on this regulator as well as it being coated in a thick grease. Tighten down the six screws with a 10mm socket and ratchet. Make sure that the brackets for your window glass are at the appropriate height, otherwise plug in the motor and switch and adjust it, then lower your glass. Just so you can see what's what here, these two bolts here will be our lower guide on the new part, and these four bolts will be these four that secure our motor bracket. These guys here go into the bottom of the window glass. You want to make sure that those are in the windows and accessible when we lower our glass, so we can bolt it in. Hold your glass and remove your tape from the window and the door frame. Once you release the final piece of tape, be sure not to let go of the window so it doesn't fall.
Carefully lower it onto the retainers, line it up onto the studs, reinstall your two 10mm screws. Reconnect the electrical connector, it is an oblong hole here that this clip snaps in to. That'll hold our motor harness. Connect the other side of the harness back in. Before we put our door panel back on, we'll reconnect our window switch, turn the key to the run position, and check for proper operation of our regulator. Everything works as it should so we'll disconnect the window switch, reinstall the door panel. Send the wires to the lock from the window switch back through the plastic liner. Reattach the liner to the door, usually you can reuse this adhesive, but if it's having a hard time staying you can always use masking tape or duct tape to help keep it in place. Be sure to send the latch rod and lock rod through the appropriate slot in the door panel.
Reinstall the three Phillips head screws and the lower metal cover. We'll get one started while we line up the other two. Once we're all lined up, we'll tighten it down the rest of the way. Reinstall the lock rod into the top and the handle latch rod into the bottom. Reinstall the hooks on the back of the latch into the door. Slide back to engage them. Reinstall the Phillips head screw into the back of the latch only. While there is another whole in the center of the latch, that's where our bezel attaches. We'll have to wait until we reinstalled our door panel. Make sure that both rods move properly, ready to reinstall the door panel.
Reinstall your door panel. Hook this channel into the top of the door, line up the plastic clips into their appropriate holes. Make sure that your door lock and window switch wires are pulled through the panel so they don't get locked behind it. Pop the panel back into place and reinstall your hardware. Reinstall the two Phillips head screws at the bottom, three in the armrest. The screw at the top-end side edge of the panel and its plastic cover.
Reconnect the electrical connectors on your lock and window switch. Slide the front tab onto the panel and snap the back and sides into place. Open the handle, slide the hook on the back of the bezel into the square hole. Snap the rear tabs into place, reinstall your Phillips head screw. Snap the crew cover into place, and now we have a nice, new handle and bezel assembly in our door. Reinstall the back of the mirror cover, hooking this tab into the square slot, snapping this one into the plastic retainer there. Reinstall the plastic cover for your armrest grip.
Thanks for tuning in. We hope this video helped you out. Next time you need parts for your car, please visit 1AAuto.com. Also check out our other helpful how-to and diagnosis videos.