Replaces
This part doesn’t fit a . Select from parts that fit.
Frequently bought together
Part Details
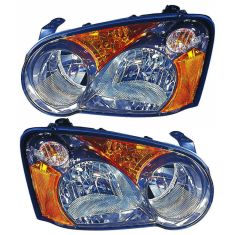
Assemblies may include halogen or incandescent test bulbs that should be replaced before installation.
Features and Benefits
Item Condition:
New
Attention California Customers:
 WARNING: This product can expose you to chemicals including Chromium (Hexavalent Compounds), which is known to the State of California to cause cancer, and birth defects or other reproductive harm. For more information, go to www.P65Warnings.ca.gov
Lifetime Warranty
This item is backed by our limited lifetime warranty. In the event this item should fail due to manufacturing defects during intended use, we will replace the part free of charge. This warranty covers the cost of the part only.
FREE Shipping is standard on orders shipped to the lower 48 States (Contiguous United States). Standard shipping charges apply to Hawaii and Alaska.
Shipping is not available to a P.O. Box, APO/FPO/DPO addresses, US Territories, or Canada for this item.
Expedited is available on checkout to the United States, excluding Alaska, Hawaii.
Final shipping costs are available at checkout.

Created on:
Tools used
Hi, I’m Mike from 1A Auto. We’ve been selling auto parts for over 30 years!
Open the hood and pull the release down here. Safety latch is under here with the prop rod up. The grille is held in with four clips on the top and two on the bottom on each outside edge. Start by unclipping the top ones. Just take a flat bladed screwdriver and just push them down like that. And gently pull this out. It's still going to be attached to the bottom, so you don't want to break the bottom ones. Go along the top edge. I'm just pushing these locks down. The head of them looks like a T, and you're just pushing it down so it pulls through the grille. The top one's released. You go down through this opening and you push it down with a flat-bladed screwdriver, and you'll unlock it. Pull it out. You'll do the same for both sides. This one's broken. You pull it straight out, and the grille is removed.
The headlights will come out without removing the bumper. I am going to pop these two push clips out to give me a little extra mobility with the bumper to be able to flex it out. Take a small flat-bladed screwdriver, pop up the middle, and pull it right out. Do the same for both to give that part of the bumper a little bit of flex. There's two 10-millimeter bolts on the top and then a hidden one inside of the bumper opening, inside this white bracket here. Use a 10-millimeter socket and ratchet to remove these two top bolts. Do the same for the other one. I'm going to spray some rust penetrant in here and get it sort of loose already. That's better. Then we go for this one in here.
I'm going to spray a little rust penetrant from behind, roughly in the space that it is. Take a 10-millimeter socket and a ratchet. There it is. Before I take the headlight out, I'll just put a little tape on the body work, and try to protect it from any scratches because I do have to slide. It is pretty tight to get it out of here. There are two pins on the outer side pushing into the fender, and then we have to maneuver the headlight up and over the bumper lip so I'm going to pull it straight out. Pop it out of the fender.
I might move the bumper a little bit, just like that. Lift the headlight up and out, and there's that bracket. Now we can unplug it, and this will be identical for the driver's side. Push in the lock. Sometimes if you push it in first and then unlock it, it helps remove it. Flip this over. You can see the locks here, just push them in. These locks can be really tight. I'm going to use a small flat-bladed screwdriver to push them in, and at the same time, push them in and then pry them out. Do that for both of them. Pull our whole headlight assembly right out of the vehicle.
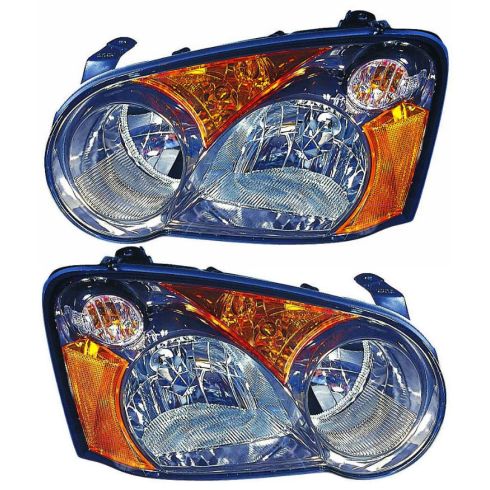
These are old headlamps we pulled out of the vehicle and a brand new one from 1aauto.com. Same exact style, same mounting holes in the top, and comes with a new bracket that we'll mount to the side just like the original. Has this protective plastic Saran Wrap on it. Has the same electrical connections on it as you original one. This particular one came with bulbs in it. If your replacement one doesn't have bulbs, now would be the time to swap them over.
To adjust the low beam up and down, you'd adjust it here on the headlamp when it's in the vehicle. They do have the little dots to help you aim them. This will fit great and make our vehicle look a lot better than it did. You do need to install this bracket like the original one, so I'm just going to protect the front of the headlamp by putting down some cardboard. I'll lay it on my work surface.
Open this up. It will sit right here just like that. Comes with two new self-tapping Phillips head screws. Use a Phillips head screwdriver and just install them. They are self-tapping. They'll thread right into the plastic, so when they get tight, just stop. Do the same for both of them. Plug the headlamp back in, corresponding plugs in the correct openings. They'll click when they're in place. That one didn't click but it is locked in.
Install the high beam. There's two pins here, going to go in the two openings, grommets, near the fender. Of course, this white bracket here goes on the inside of the bumper so I'm going to slide that in first and kind of maneuver this behind the bumper, kind of push it in there. I just push down. That's why I put tape. Let's see here. That is on the correct side. Push this down and in. I'm just going to pull on it this way, twist it, and just kind of get it beyond the fender edge just like that. That will go right into the grommets. I should pull the tape out of here. Those are going to sit in just like that. Install the two top bolts first. This one's started. This one's started. Install this one down at the bottom. When I feel it get tight, I'm going to stop.
Reinstall the push clips. If the center part comes out, it's not a big deal. Just install it and push the center part of it back in. They're locked in place. Take the masking tape off. Reinstall the grille. Slide it straight back into place. Line up the upper clips along the edge. Just push them in. They're locked in place. It's locked into the bottom, and the grille's installed. Turn the high beams on.
Thanks for watching. Visit us at 1AAuto.com for quality auto parts, fast and free shipping, and the best customer service in the industry.