Replaces
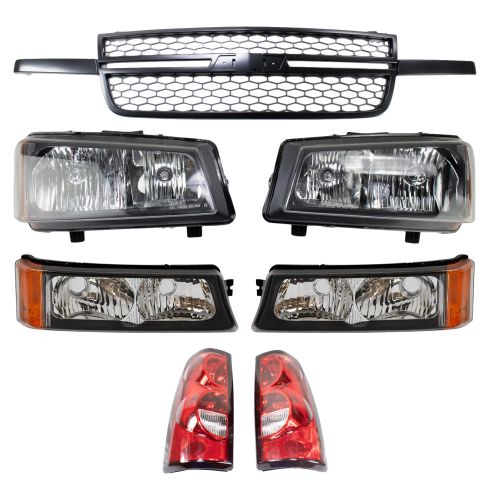
Part Details
Complete Repair in One Purchase - Stop searching for parts individually and complete your repair with a customized kit or set from DIY Solutions.
High-Quality Parts from Trusted Brands - DIY Solutions' kits and sets are selected from the best automotive brands and include hard-to-find and even obsolete parts you may need for your vehicle.
Guaranteed Fit - DIY Solutions ensures its selected parts are quality-tested to guarantee fit and function.
Assemblies may include halogen or incandescent test bulbs that should be replaced before installation.
Item Condition:
New
Attention California Customers:
 WARNING: This product can expose you to chemicals including Chromium (Hexavalent Compounds), which is known to the State of California to cause cancer, and birth defects or other reproductive harm. For more information, go to www.P65Warnings.ca.gov
Lifetime Warranty
This item is backed by our limited lifetime warranty. In the event that this item should fail due to manufacturing defects during intended use, we will replace the part free of charge. This warranty covers the cost of the part only.


Created on:
Tools used
Tools used
Tools used
To open the hood on this 2005 Avalanche, open your door. Pull the release. The secondary release is actually under the emblem here. Push it to this side, and lift the hood up. To change this headlamp, you first have to remove the turn signal lamp. Reach down, push this tab in. Push this tab in right here, pull it out. Now, we're going to pull the headlamp away from the grill, off the tabs that it's mounted on. Push this in. Turn it counterclockwise to remove the bulb and socket. Turn the marker light bulb counterclockwise to remove it.
There are two pins, L-shaped pins, one here and one here. I'm going to unlock those to remove the light. I'm going to use a flat-bladed screwdriver to pop it out. Pull it straight out. Same thing over here. Pull it straight up and out. Put those aside. Headlamp is free. I'm going to unlock the connector on the lamp on the bulb and push it down. Pull it off. I'm going to undo the other side. I'm going to pull the clip or the lock on it away from the headlamp, and I'm going to push down on the connector at the same time to pull it off. Then, you can lift the light up and slide it out.
Here's our old yellow and discolored headlamp. It's all pitted from going down the road. You can't really see that well out of this. This is our new one from 1aauto.com, perfectly clear. You're going to have great night vision with this. It comes with two new bulbs, and look at the old one. It has the same style of mounting and the same shape. It'll fit great and look great.
I'm going to take our new head lamp. I'm going to feed that up like that. That has the adjustment for it. I'm going to plug in our connectors. Place it into the little mounting area. We'll reinstall these L-pins. This one will slide down just like that, and I can move it around a little bit to line it up. You flip it over and lock it in. Same thing with the other side. You need to wiggle the headlamp a little bit to get it in there. You want to flip it over and lock it. The headlamp is installed.
Now, reinstall your turn signal lamp. Turn this clockwise to lock it. Install the side marker bulb. Turn it clockwise to lock it. Put these tabs into the radiator support. Push this up and in. If you need to adjust the aim of the headlamp, you can turn this screw in or out.
This is a basic tutorial on how to aim the headlights on your vehicle. Find the axis of your headlights. This is usually indicated with a small dot or the headlight bulb size on the lens. If not, it's the actual center point of your headlight bulb. Transfer this mark to a vertical wall with a preferably dark color that'll allow you to back up 25 feet. Pull up and find the center line of your vehicle, as well as the center line of your headlight axis.
Mark the wall with the height of the headlights and a straight line going across at that axis height. Back your vehicle up 25 feet from the wall to the front edge of your vehicle's headlights. Turn your headlights on, and locate the adjusting screw, usually on the back side of your headlights. You'll want to rotate this until the passenger hot spot or focus of the beam is approximately two inches below the line and the driver's side is four inches below the line. We change the heights on each side so you can still get a good beam to the off side of the road on the passenger's side and have the driver's side low enough to not blind oncoming traffic.
Thanks for watching. Visit us at 1AAuto.com for quality auto parts, fast and free shipping, and the best customer service in the industry.
Tools used
Tools used
Brought to you by 1AAuto.com, your source for quality replacement parts and the best service on the Internet.
Hi, I'm Mike from 1A Auto. I hope this how-to video helps you out, and next time you need parts for your vehicle, think of 1AAuto.com. Thanks.
In this video, we're going to show you how to service the lower front light. This is the side marker light, the signal light, as well as your daytime driving lights. We'll show you both changing the bulbs, as well as if you want to replace it with a whole new assembly from 1A Auto. If you go for it, a new set of lights on the front end of your truck will take miles off, make it look a whole lot better, and help you see better at night. You won't need any tools for this. You may want a flat blade screwdriver.
Open up the hood by pulling the lever here. Reach under the center of the hood, you'll see a little lever right here. Push it towards the center of the truck and lift up.
The headlights are pretty easy. There's actually a little lock bar right here. Pull it up out of the clip. You might have to work it back and forth as you pull it towards the center of the truck. This pulls right out, and then your headlight tilts back and out. Right in behind, your headlights are connected. You don't have to have the battery disconnected. As long as the truck's off, there's no power going through here. Just pull back on these tabs and push off the connectors, and your whole assembly comes out.
Now if you're just looking to change the amber signal bulb, it's right here. There's a little tab. Press down, twist counterclockwise, and that comes out. Twist back in to lock it. Do the same thing, here, with your driving light: on the little tab, push down, twist counterclockwise, and that can come out. I've pulled that out for right now.
If you want to remove the whole assembly, just push the little tab right here. Push this tab towards the outside of the truck. Most of the time I'm able to push this tab just with my fingers and pull the light out, but it's possible you may want to use a flat blade screwdriver, here, to help you push on the tab, and then even twist it a little bit to help pry that tab from the body of the truck. The whole thing comes out. Disconnect here. Your marker light is down here, just twist it counterclockwise, pull that out, and the whole marker comes out.
Just to show you, here, on these bulbs, I just pull right out of their sockets like that, and they go back in.
Reinstall the new light from 1A Auto. It's going to go in just like the original. Put your marker in first. Push through the signal bulb, and your other bulb. There's a tab right here on the inside, make sure it goes into the radiator support. Then just watch this tab go right in, and it snaps right in place.
f you had some damage or your lights are clouded or faded, the new light from 1A Auto is going to go in there just like the original. It plugs in. The bulbs plug in just like the originals. On the bottom, there are two tabs that go into slots here, so you kind of feed it in behind the grill, and peek back in there so you can see those tabs going into the right spots. Once they're in, then, line it up right here. Push it back in, put the pin in and through, and just push it through until it locks down in place again. Then, for the new light, peel off the plastic covering.
We hope this video helps you out. Brought to you by www.1AAuto.com, your source for quality replacement parts and the best service on the Internet. Please feel free to call us toll-free, 888-844-3393. We're the company that's here for you on the Internet and in person.
Tools used
Now to get started on working on this taillamp, it's important to make sure that you have your tailgate down because the mounting bolts for it are located right here and right there. Remove those with a Phillips head screwdriver. There we are. Now we have a nice clear view of the backside here. Let's go ahead and release these. It's always a good idea to take a peek at your bulbs, make sure they're in good condition. If it looks like the filaments on the inside are burnt or cooked, or they're not even connected in any way, just go ahead and replace that bulb.
All right, so now we have all this nice and free, go ahead and take all this and push it right down through this hole right here. Once you have it down in there, we're gonna get underneath the vehicle. One of the first things I always like to do is start with some nice new bulbs. Once you have some of them in there. Go ahead and plug these into the lens. Just got to get it lined up. Perfect. Now we're just gonna take this little tie off of here, we have our wiring. At this point, just take this and put it right down in there and go ahead and let it go right down to the ground if that's where it wants to go. If you wanted to, it's probably a great idea to tape off any of this wiring that might be flapping around just to try to make it nice and neat. We'll worry about that after. For now just gonna get all this wiring down in there. We'll just put our lens up here. Now I'm gonna start in a couple of those mounting screws just to hold the lens so it can't fall out.
Now we made our way underneath the vehicle. And if you grab onto that wiring harness, you're gonna notice it secured in several places. If you were to look right up here, you can see one of the supporting points. Just take a nice small pocket screwdriver or whatever you might have, get in between here and separate the two pieces. This should come right down. Do the same right on down the line all the way until you get to the end. Gonna keep on following that, it leads to this one right here. Go ahead and squeeze this tab and then draw it off. Let's get it out of here.
Now we'll just take this one and put it right back up through. Check your connector, make sure you don't see any funny colors inside there. If you see any corrosion, you need to either clean it or replace the unit. Let's go ahead and connect this in. Listen for a click and then give it a nice little tug just to make sure it's completely secured. Come up along here. We're gonna start reattaching all this in now. Go ahead and line it up, squeeze it, it should lock in. You don't want to leave this hanging.
Let's get this back off of here. Carefully pull it away. I'm just gonna go ahead and wrap up this wiring. At least just try to make it a little bit nicer. With that all set the way that it is, we're gonna carefully reset this back inside of here, should fit right in. You can see the bolt holes are lined up perfectly. Let's go ahead and install those bolts. All right, let's snug them up. Nice and tight. It's completely secured. Let's test it.
Go ahead and turn on your running lights. Make sure that works, step on the brake. That's great as well. And of course try your directionals you want to go left, want to go right, just to make sure all those lights work. Don't forget about reverse. Assuming all those looks good, you're good to go.
Tools used
Tools used
Hi, I'm Mike from 1A Auto, I hope this how-to video helps you out, and next time you need parts for your vehicle think of 1AAuto.com. Thanks.
In this video I'm going to show you how to service a tail light. This is a 2005 Silverado, pretty much the same as any '04 to '07 Silverado. We're going to show you both replacing a new tail light. If you've broken or damaged your old one you can get a great replacement from 1AAuto.com, and we also show you servicing the bulbs. You'll need a Phillips screwdriver, and you'll probably need a hammer if your truck if from up North like ours was and the clips have rusted on the backside some.
Tail lights on these vehicles, I've been guilty of it, they're susceptible to damage. I carry a lot of wood in my truck, and I've been known to load it up with wood, throw a piece and accidentally hit the tail light and wipe it out. It's pretty easy. All you need is a Phillips screwdriver. There are two screws, one here and one right down here. I'm going to get some good force in here to get them started. Sometimes these screws can be a little difficult. Put your screwdriver in; give it a couple of taps with the hammer. If that doesn't work, try twisting a little bit counter clockwise, and tap with the hammer at the same time. You just want to make sure that you don't strip the contact area where the screwdriver goes in. You might hear some stuff fall apart, that's the other thing that happens with this light, is the mounting points actually break.
The light comes right out, and if you're just looking to change a bulb you just untwist, they come out. Just twist counter clockwise until they come out. Sometimes what you get happening is the clips rust away, and usually you can solve that by just pulling out on the tail light while you're unscrewing. If you get the screws going and you notice that they're unscrewing but they're not really coming out, you can hear some crackling and crunching inside, that's usually because the clips have rusted away and you need to pull on the light while you work the screw out. I'll show you on this one once I get it out, here.
You can see, there's the clip that's rusted away, that's totally gone on that one. Your tail light from 1A Auto. You can see, just like the original there two tabs on the light that go in the holes in the bed of the pickup. Just install it just like you took it out. Put those tabs in there.
Tools used
Tools used
One of the first things you need to do is pop your hood. Once you've done that, go ahead and grab on to this right here, flip it up, go ahead and draw it away. You might have to tilt it down to get it underneath there. Grab your headlamp assembly. Carefully pull it away. And then if you were to look at the back, you're going to see the pigtails for the headlamps. Go ahead and grab that. Turn it counterclockwise. Carefully remove it. Do the same to the other one.
Now that that headlamp is out of the way, we have a clear view of what's going on down here. If you were to look right where my screwdriver is, there's a little tab. You're going to press that towards the outer portion of the fender, and then draw the assembly away. Maybe I'll try it once just so you can see. Press it. Draw it away. There we are. Go ahead and grab onto these. If you squeeze this tab right here, it should unlock, and then you can twist it. Do the same for this one, and then, of course, the marker at the end, you just twist that.
So, now we're going to get our new lamp assembly back in. Go ahead and grab this. Go ahead and turn it in. Lock it. Give it a nice wiggle. Let's get our directional bulb in here. Go ahead and twist it. Lock it in. This one, little less reach here. Lock that one in as well. Perfect. Now, when you go to install this, on the inner portion, you're going to see there's a little hookie-do. That needs to slide in over there. So, we'll go ahead and get the hookie-do into where it's supposed to sit. And then if you look right here, we're going to line this up and then carefully press it in. Make sure it's locked in. This feels great.
Now, it's going to be time to install the headlamp. Go ahead and grab these bulbs. Start them. Line them up. Twist it. Lock it in. Do the same to the other. Okay. Now we're just going to come around the backside of the grille here just like this. Come up and over that, and then rest this right in. This should line up right along there, and then this should line up right down here. Now we're going to get our pin in here. It's a good idea to just clean it up if you can get off any other rust that might be on it. Get it close to where I want it. Now I'm just going to bring the headlamp over. Squeeze this in. Bring it right on through. Line it up with this one. Flip this over. All right. So, now it's going to be time to test these lights. We've got our headlights on. We've got some high beams. Check that directional. Make sure it works. Perfect.
Tools used
Tools used
One of the first things you need to do is pop your hood. Once you've done that, go ahead and grab onto this right here. Flip it up. Go ahead and draw it away. You might have to tilt it down to get it underneath there. Grab your headlamp assembly. Carefully pull it away. And then, if you were to look at the back, you're gonna see pigtails for the headlamps. Go ahead and grab that. Turn it counterclockwise. Carefully remove it. Do the same to the other one.
Now, it's gonna be time to install the headlamp. Go ahead and grab these bulbs. Start them. Line them up. Twist it. Lock it in. Do the same to the other. Okay. Now, we're just gonna come around the backside of the grille here just like this. Come up and over that. And then rest this right in. This should like up along there. And then, this should line up right down here. Now, we're gonna get our pin in here. It's a good idea just to clean it up if you can. Get off any of the rust that might be on it. Get it close to where I want it. Now, I'm just gonna bring the headlamp over. Squeeze this in. Bring it right on through. Line it up with this one. Flip this over.
All right. So now, it's gonna be time to test these lights. We got our headlights on. We got some high beams. Check that directional. Make sure it works. Perfect. We're sure that the lights all work. You'd want to just adjust the alignment of your headlamps. If you were to turn this to the left, it's gonna bring the beam up. If you turn it clockwise or to the right, it's gonna bring the beam down.
This is going to be a general tutorial on how to aim your brand new TRQ headlamp assemblies. Okay. So looking at your brand new TRQ headlamp assembly, you're gonna see where your low beam is, and you'll see a little dot right in the center, and that is the access point. Okay? So what we're gonna do is we're gonna mark that with an erasable marker just so it's easier to see. Next, what we need to do is measure from the level ground up to this point and take note of that measurement. Now, we're just gonna pull the car up to our wall. On our vehicle, we remember that the measurement was 28 inches for our access point. Your vehicle may be different, but that's where I'm going to put this tape. Just above that 28 inches. We'll do the same on the other side.
Okay. So let's just back the vehicle up, straight back, 25 feet from the wall. And now that we moved our vehicle 25 feet back from the wall, we're gonna start with our measurement here. That's where the headlamp center is. We're gonna go down 4 inches on the driver side. On the passenger side, we have our line here. What we need to do is go down 2 inches. To adjust the driver side, we're gonna cover our passenger side headlamp. If you look at the backside of your headlamp assembly, you're gonna see something that looks like this. This is the adjustment. Some of these headlight assemblies have one, two, or even more of them, but you should at least have one. This is how we're gonna adjust the headlight beam. Now, we're gonna lower the top part of the beam down to just below this line. When you turn the adjustment to the right it brings the beam up, and if you turn it to the left it'll bring the headlight beam down, and this is this way on most vehicles. Let's continue on to doing the passenger side. All right. We properly aligned our TRQ headlight assemblies. Okay. And on the quality TRQ headlamps for our pickup truck, the procedure's gonna be the same. You're gonna find your center dot, mark it, and then you'll measure from the level ground up to your dot.
So once your headlamps are properly adjusted, it'll be time to adjust your fog lamps. You'll notice on the driver side the focal point is all the way at the bottom right now. I would like to bring it up so it meets up with approximately the bottom of the focal point of the headlight. Some fog lamps have an adjuster, others don't. The ones that do have an adjuster, you would just turn the adjustment to the left or to the right to adjust the beam up and down to where it needs to be. Now with your TRQ headlamps and fog lamps properly aligned, you can drive down the road safely.