Brought to you by 1AAuto.com, your source for quality replacement parts and the best service on the Internet.
Hi, I'm Mike from 1A Auto. I hope this how-to video helps you out, and next time you need parts for your vehicle, think of 1AAuto.com. Thanks.
Hi, I'm Mike Green. I'm one of the owners of 1A Auto. I want to help you save time and money repairing or maintaining your vehicle. I'm going to use my 20-plus years experience restoring and repairing cars and trucks like this to show you the correct way to install parts from 1AAuto.com. The right parts installed correctly: that's going to save you time and money. Thank you and enjoy the video.
To start, you're going to remove three screws, a Phillips screw right behind your door handle and then two T30 screws right down in there. We'll fast forward through removing those screws. Obviously the top one is with a Phillips screwdriver and for the T30, you'll need a T30 Torx driver. It's basically a little bit of a star bit. Once you have those screws out, you pull this up and out. It does have a little clip at the front. Then there's a connector. I'm just grabbing my screwdriver, and pushing in on a little tab with the screwdriver, prying a little bit and pulling it at the same time. You can see there's the little tab that you have to push on. Once that trim's removed, there's two more T30 screws right underneath. We'll fast forward through removing those, again. Now, remove the little rear trim piece right up here. It just has one clip on it. Just pull it, give it a good tug. It pulls free. Now, use either a door panel clip tool, or I'm just using a putty knife. Basically, you just kind of slide it. You slide it up against something which is the pin and then give it a little tug. You can hear it snap a little bit. Slide it back. Find the next pin, give it a tug. Find the next pin, give it a tug. You can see this is actually the first time this panel has ever been off so it does take a little bit of work and force. Slide the knife or tool up again. Go against the pin. Give a good tug and then eventually, you can kind of work your fingers underneath. Pull. I'm changing position here. I'm trying to release a couple of these other pins on the back of the door panel here. I'm just giving it a little tug. It comes free. Then it's off.
Now you're going to want to pull back your insulation, and its fairly easy. It is stuck on there with some pretty heavy-duty adhesive. Pull very lightly you don't want to tear this. What you can do eventually is, as you pull it down, I'm just going to take my putty knife and just work it on the adhesive, and basically cut the adhesive and pull it down.
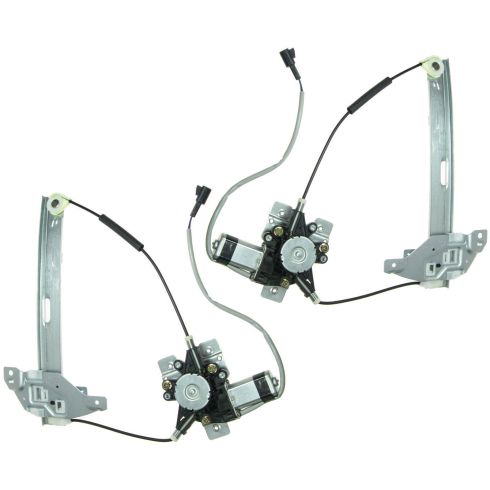
Okay, so on the window regulator, there's two components of it. There's the rail that's bolted to the door with these three bolts here I'm going to move back a little bit one here, one here, one here. Over here is the motor, and it's bolted on with three bolts as well. Okay, so these bolts that have the big holes above them, you just need to loosen them up, and then they will come up and come out. The regulators also bolted to the window with two 10mm bolts here, and then one over here.
Now, obviously, I have this in the correct position because this window is working just fine, but you can see, depending on where your window breaks, it's not that difficult to get to those. If your window does break in the up position though, what you can do is, in this case you would want to just remove all these bolts. Okay and I'll fast-forward through removing those three window regulator bolts. Now you can slide your window down so you can get to this bolt here. Then with a wrench, you can get to the other one over here.
I'll take this one off. Okay, now with a 10mm wrench, let's see if I can get in here. It's not the easiest thing but, okay, and again, we will use some fast-forward here as I use a wrench to get to that bolt and change positions to make it easier to see it and feel in there. Now, as you can see, as I remove that bolt, the regulator drops down. Then I'll slowly let my window down just for the time being.
Okay, now here were going to take a couple of pieces of painters tape, put them up on the top of the doorframe, and then well grab hold of the window, slide it up, and then just use the painters tape to hold it up just while were working. Okay, and now I'm just going to fast-forward a little bit. Unbolt the three bolts for the window motor. Obviously, I showed you when the window was stuck up. Normally what happens on these is the cable breaks and you can just slide that window up and down anyways. Anyway, so you undo the window motor, and now you need to unplug the lead, which I just use a screwdriver to push down the lead. It's the same thing as the power window switch that you disconnect when you take the door panel off. Now, the regulator comes up and out through that hole.
Okay, so here's our original regulator, a new regulator from 1A Auto. You can see the 1A Auto one is all the same. It's going to bolt in, except the only difference here is that this regulator is up while that one's down. Obviously not a big difference at all. The only other difference is this has a longer tail, so after you've plugged that in, you just want to make sure you secure that, maybe with a wire tie or something, to make sure it doesn't interfere with the window. If you were to put the new regulator in as you saw, this ones working fine in my vehicle, so I'm going to put the original one back in, but first you would transfer these bolts on to the new regulator.
Okay, so I've got my three bolts on the motor. Then I'm going to put this bolt back in here, because these have the big holes that you just put them through to slide them down. Now, you feed the motor in to the door. Then I'm going to reach through the hole with my hand and pull it through, feed the regulator in through, and then, once I get it in there, I'm going to connect the lead. Again, with the new regulator and motor from 1A Auto, it does have the longer lead on it and it makes this step a little easier, but then you would probably want to take that lead and just make sure you tape it, maybe run it up through the top of the top hole there, and tape it to the door, just so it stays out of the way of the window.
Now, you can take the motor and reach in there, and put the bolts through the holes, and then slide it down into place. Then the regulator I'm going to pause here, I try and put it up in there, but since the regulators all the way in the up position, it interferes with the window. You cannot install the regulator when it's all the way in the up position like that. Basically, what I do is I go turn on the key. I have my switch hooked up, so I'm just going to run the regulator down a little bit. Okay, now I can reach in and get those bolts lined up, drop them down into the slots, and that's in place.
Okay, now I'm going to put that third bolt into the regulator. We're doing double time here. Take my 10mm socket ratchet and extension, and tighten up all the bolts now. Okay, make sure they are good and snug; they don't have to be incredibly tight, but you want them pretty tight. Then tighten up the bolts for the window motor. Okay, now we can reach up Actually, I'm just going to turn the key on and run the regulator down so that I can see the bolt hole through that access hole, so I can get it together easily.
Now I am going to take the tape off the window, slide the window down slowly into place. Okay and now put my first bolt in between the regulator and the window; get that snug, and then use my extension with my socket, put the bolt in there and get that in, and then tighten them both up. Okay, now run the window up and down, make sure everything is good.
Once you're done your project, make sure your installation is on there well. The door panel has two locating pins, the green pins. They are longer than the other ones. You just locate them. Get them into the correct hole first. See there, I'm doing that in the front and then at the rear, the same thing. Make sure that green pin goes in the right hole. Then, that locates the door panel. Push it on. Use a little fist bump to set the pins. Now, I'll put this trim on with a clip. I notice that the door panel is sticking out too much. Just do a little adjustment with the palm. Now, you can go into a little fast forward here. You'll want to put these, the T30 screws in and tighten them up. Now, before you put that in, just make sure you uncover that little hole where the screw goes in. That makes it just a little easier than trying to put the screw through the insulation. Don't drop your screw. Put that in there. Get that nice and tight and then plug in your harness. Push the bezel down in. Then install those two T30 screws. You should be all set. Get them nice and tight.
We hope this video helps you out. Brought to you by www.1AAuto.com, your source for quality replacement parts and the best service on the Internet. Please feel free to call us toll-free, 888-844-3393. We're the company that's here for you on the Internet and in person.