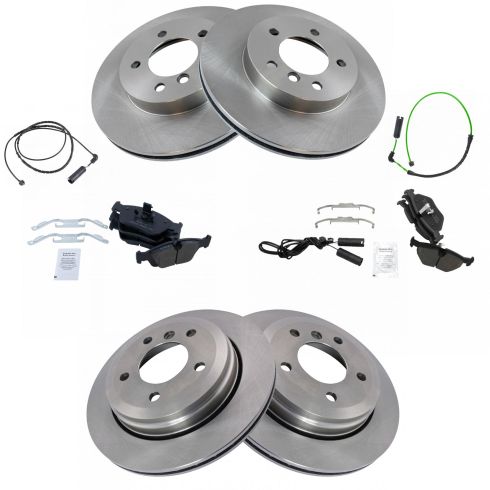
Kit Includes: (1) Front Ceramic Brake Pad Set with Contact Point Grease & Hardware (2) Front Brake Rotors (2) Rear Brake Rotors (1) Rear Ceramic Brake Pad Set with Contact Point Grease & Hardware (2) Brake Pad Wear Sensors
TRQ brake kits are designed to restore your brake system to like-new performance. TRQ brake pads are positive molded, thermal scorched, chamfered, and utilize a multi-layer shim for enhanced performance and service life. TRQ rotors have a non-directional finish that reduces the break-in period for new rotors as well as reducing vibrations throughout the rotor’s lifecycle. All products are fit and road-tested in our Massachusetts R&D facility to ensure we deliver on our promise of Trusted Reliable Quality.
Product Features
Positive Molded - Less dust resulting in clean wheels
G3000 Casting Alloy - Reduced noise and improved wear resistance
Application Specific Design - Extended service life, no modifications
Front Brake Rotor Venting TypeVentedFront Brake Rotor Diameter11.81 in. (300mm)Rear Brake Rotor Venting TypeVentedWheel Lug Count5 LugRear Brake Rotor Diameter11.57 in. (294mm)
Item Condition:New
Attention California Customers:
WARNING: This product can expose you to chemicals including Lead and Lead Compounds, which are known to the State of California to cause cancer, and birth defects or other reproductive harm. For more information, go to www.P65Warnings.ca.gov.
Lifetime Warranty
This item is backed by our limited lifetime warranty. In the event that this item should fail due to manufacturing defects during intended use, we will replace the part free of charge. This warranty covers the cost of the part only.
FREE Shipping is standard on orders shipped to the lower 48 States (Contiguous United States). Standard shipping charges apply to Hawaii and Alaska.
Shipping is not available to a P.O. Box, APO/FPO/DPO addresses, US Territories, or Canada for this item.
Expedited is available on checkout to the United States, excluding Alaska, Hawaii.
Final shipping costs are available at checkout.
How to Replace Front Brakes 2001-06 BMW 325Ci
How to Replace Rear Brake Pad Sensor 2001-05 BMW 325Xi
How to Replace Front Brake Pad Sensor 1997-2006 BMW 325 Xi
Created on:
Tools used
Tools used
Torque Wrench
17mm Socket
Needle nose pliers
1/2 Inch Breaker Bar
1. Removing the Wheel
Partially raise the vehicle off the ground
Loosen the 17 mm lug bolts
Raise and support the vehicle on jack stands
Remove the lug bolts
Replace one lug bolt loosely
Hammer the tire from the back side if the wheel is stuck
Remove the last lug bolt and the wheel
2. Removing the Rear Brake Pad Sensor
Open the brake pad sensor wire retainer attached to the brake bleeder screw
Pull the brake pad sensor out of the brake pad notch using needle nose pliers
Remove the metal clip if it does not come out with the sensor
Follow the wire and remove it from all retaining clips
Open the wire connector box door
Disconnect the sensor wire electrical connector
3. Installing the Rear Brake Pad Sensor
Connect the brake pad sensor electrical connector
Clip the electrical connector into the connector box
Close the electrical connector box
Starting at the connector end, replace the wire into the retaining clips
Insert the brake pad sensor into the brake pad
Replace the wire in the retainer mounted on the bleeder screw
4. Replacing the Wheel
Set the wheel in position and line up the bolt holes
Replace the 17 mm lug bolts
Lower the vehicle with the wheel slightly touching the ground
Torque the 17 mm lug bolts in a star pattern to 95 ft-lb
Lower the vehicle completely
What's up guys? I'm Andy from 1A Auto. In this video, I'm going to show you how to replace the rear pad sensors on this 2001 BMW 325XI. If you need this part or other parts for your vehicle, click the link in the description and head over to 1AAuto.com.
I'm going to loosen up these lug bolts. I'm going to use a 17 millimeter socket and a breaker bar. Now I'm going to raise and support the vehicle. We're using two post lift. If you're doing this at your house, you can use a jack and jack stands. I'm going to take the 17 millimeter socket and the extension just to take the lug bolts out. Now when I go to take the last one out, I am going to hold the wheel so that the wheel doesn't fall. Take that one out, set it aside and grab the wheel. And shake it off.
I want to pull this brake warning sensor out. This vehicle only has it on the passenger rear and then also on the driver's front. Certain vehicles may be different. There's a little retainer right here that goes over the bleeder screw. You can just take some needlenose pliers and try to get this off. Slide that out just like that. The needlenose pliers, just grab it right here. Grab the sensor and pull it up.
The clip actually stayed in there so I'm just going to pull the clip out. If you're going to reuse this sensor, you can put the clip back on. Generally when you're replacing brakes, you're going to replace this sensor as well. But if you have to reuse it, you can.
Then we want to take this wire off. This connects to the pad sensor. There's a clip right here. We can just slide the clip sideways and then pull the wire out. There's other clips, they come out the same way. Just take those off. Just like that. And open this door right here and the connector is inside here. Pull the connector out. There's a little bit of spiders in there. Now just take and push this button down right there, pull the connector off.
Here's the old brake pad sensor, here's the new brake pad sensor from 1AAuto.com. This is for the rear of the vehicle. The sensor themselves are the same. As you can see, the old one's worn down a little bit. It has the same clip that goes in there. And if you look at the connectors, connectors are the same. Get yours at 1AAuto.com, you can do it yourself.
Now we're going to line up, this sensor connector is slotted so you can find the slots and line them up with the connector right here. Lock it in place. Reposition it in this little housing here. Lock that in. We can close the door. Now we can take this, slide this back into these retainers and lock them back down. All right.
Before I lock these retainers in, I'm actually going to install this onto the brake pad. You can take some needlenose pliers to help you. Just slide this in position at the brake pad and push. It'll lock in place. And slide it over here where the bleeder retainer is. Push that back down. And then you can line these all up. Lock them in place.
Now I'm going to take the wheel, slide it in position. Make sure the holes lined up and hold the wheel. I'm going to take my 17 millimeter socket and the lug stud and get one started. Then I can grab the other ones. Now I'm going to use a 17 millimeter socket and a torque wrench and I'm going to torque these lug bolts in a star pattern to 95 foot pounds. You can go right around again just to make sure everything's tight. And you're good to go.
Thanks for watching. Visit 1AAuto.com, your place for DIY auto repairs, for great parts, great service and more content.
Tools used
Torque Wrench
17mm Socket
Needle nose pliers
1/2 Inch Breaker Bar
1. Removing the Wheel
Partially raise the vehicle off the ground
Loosen the 17 mm lug bolts
Raise and support the vehicle on jack stands
Remove the lug bolts
Replace one lug bolt loosely
Hammer the tire from the back side if the wheel is stuck
Remove the last lug bolt and the wheel
2. Removing the Front Brake Pad Sensor
Open the brake pad sensor wire retainer attached to the brake bleeder screw
Pull the brake pad sensor out of the brake pad notch using needle nose pliers
Remove the metal clip if it does not come out with the sensor
Follow the wire and remove it from all retaining clips
Open the wire connector box door
Disconnect the sensor wire electrical connector
3. Installing the Front Brake Pad Sensor
Connect the brake pad sensor electrical connector
Clip the electrical connector into the connector box
Close the electrical connector box
Starting at the connector end, replace the wire into the retaining clips
Insert the brake pad sensor into the brake pad
Replace the wire in the retainer mounted on the bleeder screw
4. Replacing the Wheel
Set the wheel in position and line up the bolt holes
Replace the 17 mm lug bolts
Lower the vehicle with the wheel slightly touching the ground
Torque the 17 mm lug bolts in a star pattern to 95 ft-lb
Lower the vehicle completely
What's up guys? I'm Andy from 1A Auto. In this video I'm going to show you how to replace the front brake pad sensor on this 2001 BMW 325xi. If you need this part or other parts for your vehicle, click the link in the description and head on over to 1aauto.com.
All right, I'm going to loosen up these lug bolts. I'm going to use a 17 millimeter socket and a breaker bar. Loosen them up. Now I'm going to raise and support the vehicle. We're using a two post lift. If you're doing this at your house, you can use a jack and jack stands. Now I'll take these lug bolts out, just use the socket to help you get them out. I'm going to just hold the wheel with my other hand so it doesn't fall. Take the last one out then I can grab the wheel and slide it off.
Right so I'm going to use some needle nose and I'm going to just grab right here, try to squeeze this. This is that brake pad sensor, and try to pull it out. Just like that, this little spring in there, and then we can take this off here. That's the retainer that holds it on. Take this wire, this little retainer that holds it in right here. It's slotted, push it towards the vehicle and then right here, there's another one. Just grab it and pull it out. There's a little cover right here, just pull on the snaps for the cover. We can slide the connector out. Just like that. There's a little button on the back side of the connector, push that button, slide the connector off. Here's the old brake pad sensor, here's the new brake pad sensor from 1aauto.com. If you look at the connector, connector is the same. The wire length is the same and the sensor is the same. Got the same spring on it, get yours at 1aauto.com and you can do it yourself.
Right so take the new sensor, you want to line this up with the connector. Make sure it goes that same way, slide it in, lock it in place. If it seems like you're struggling to push it in, you're probably going the wrong direction. Slide this connector back in this bracket just like that and this little elbow gets slid right in there. We can close the door. Slide this into this bracket right there and same with this one right here.
Now before I put the wire through this retainer right here, I'm just going to slide it in position on that pad, just take the needle nose pliers to help assist. Just slide that in position just like that and then put this retainer right there, lock that down. Now I'm going to install the wheel. Line it up with the lug holes and I'll hold the wheel on, grab a socket with my lug bolt, get that started. All right now I can lower the vehicle and torque the lug nuts. Now I'm going to use a 17 millimeter socket and this torque wrench that we sell at 1aauto.com. I'm going to torque these lug bolts to 95 foot pounds in a star pattern so that it torques the wheel down evenly. I'll just go around again.
Thanks for watching. Visit 1aauto.com for quality auto parts shipped to your door, the place for DIY auto repair. And if you enjoyed this video please click the subscribe button.
BKA19953
In Stock
Product Reviews
Loading reviews
4.67/ 5.06
6 reviews
5 Stars
4 Stars
3 Stars
2 Stars
1 Star
5
0
1
0
0
Great product, great price.
H
February 12, 2018
I'm really happy with my order. The parts shipped fast and I received them within a week. Everything worked great. Would definitely recommend and order from again.
Greasy handprint and finger prints on used broken rotor but CSR handled the situation the best they could.
charles
September 8, 2018
Very competitive price on a brake set for my daughter's BMW 325xi. Upon delivery of parts and started the job but when I got to the last rotor I had a problem. The last rotor had greasy hand and finger prints on it and it was not cello wrapped like the other parts. The set screw was chipped and obviously put on someone else's car, broke and then returned. The rotor was broke and unusable. The weekend job had to wait and pushed completing the task at hand forward 4 days.
I called customer service and they shipped out the part that Monday. No questions asked and I didn't have to return the defective part, I appreciated that.
I finished the job when I got the replacement rotor and am happy with the performance of the ceramic pads, just as good as factory OEM parts.
This was a odd situation but the service that A1 auto provided made the best of a odd situation. I appreciated the response of the customer service representative. A1 auto beat all other competitors on price, so ad the e
Perfect fit
Blake
August 12, 2019
Fits perfect on 2003 bmw 325xi
Excellent quality
william
November 27, 2019
I ordered front brakes and rotors, It also came with the brake wear sensor cable everything fit absolutely perfect I've had them on my car now for about a month now and no issues, very happy with this transaction and quality of the product..
Purchase
D
July 31, 2020
Service was excellent and loved the shipping, it was a quick and simple process. Definitely recommend this to other people.
William
August 18, 2020
Thank you for the service.
Customer Q&A
What are the black sensors it came with? There were four included two of which are the pad sensorsSeptember 9, 2020
Isaiah W
10
This will be able to come with the brake pad sensors as shown. Please do not hesitate to contact us with any further questions.
September 9, 2020
Emma F
Customer service
877-844-3393
Monday - Friday 8:00am - 9:30pm ET Saturday - Sunday 8:00am - 4:30pm ET
Enter Vehicle Year Make Model
Specify your vehicle's year, make and model to guarantee fit.
Year
Make
Model
Options
Drivetrain
This part doesn’t fit a . Select from parts that fit.