Replaces
This part doesn’t fit a . Select from parts that fit.
Frequently bought together
Part Details
Product Features
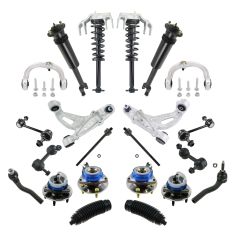
TRQ drivetrain kits are manufactured using premium raw materials to restore original performance. Each TRQ drivetrain component is designed to be a direct, maintenance-free replacement to the stock unit. To extend the service life of your drivetrain, TRQ recommends replacing wheel hubs, bearings, and constant velocity (CV) drive axles at the same time to ensure even wear of components and improved ride comfort. All products are fit and road-tested in our Massachusetts R&D facility to ensure we deliver on our promise of Trusted Reliable Quality.
Our direct fit gas-charged shock absorbers help restore your vehicle's handling and ride quality to just like new.
Replacing struts used to require specialized tools to compress, remove, and transfer the old spring and mount. Our Pre-assembled, complete strut & spring assemblies come with all new parts and make the job much quicker and easier for the do-it-yourself mechanic.
Strut & spring assembly contains:
Install Tip: When replacing steering components, have a professional alignment performed afterwards. This ensures proper tracking and even tire wear.
Our steering and suspension components are pre-greased and sealed for long life and do not require the extra maintenance typically required by greaseable versions.
Item Condition:
New
Attention California Customers:
 WARNING: This product can expose you to chemicals including Carbon black(airborne, unbound particles of respirable size), which is known to the State of California to cause cancer. For more information, go to www.P65Warnings.ca.gov.
Lifetime Warranty
This item is backed by our limited lifetime warranty. In the event that this item should fail due to manufacturing defects during intended use, we will replace the part free of charge. This warranty covers the cost of the part only.


Created on:
Tools used
Tools used
Tools used
Brought to you by 1AAuto.com your source for quality replacement parts and the best service on the internet.
Hi. I'm Mike form 1A Auto, and I hope this How-To video help you out. The next time you need parts for your vehicle, think of 1AAuto.com.
To test your tie rod, what you'd want to do is lift one of your front wheels up and grab it by the sides of the tire there and kind of move it back and forth. If you feel play more than just the steering rack moving back and forth, then that's usually your tie rod is bad.
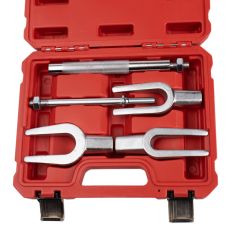
Tools you'll need are jack and jack stands, 18mm and 19mm sockets, a ratchet with a pipe or a breaker bar for some extra leverage, two large adjustable wrenches, 8mm and 18mm wrenches, tie rod fork, and a torque wrench, as well as a large hammer.
Start out by removing the front wheel, and if you don't have air tools like I do you'll want to loosen the lug nuts with the wheel on the ground, then raise your vehicle with a jack, support it with a jack stand and take the wheel off the rest of the way. Turn the wheel to make it easier to access the tie rod. Okay. So before you disassemble the tie rod, what you want to do is you want to measure from a fixed point, which I'll choose the end of the boot right here, then you want to measure to the middle of the tie rod. Okay. So, again, you're measuring from a fixed point on the rack itself, which is this clip here, to the middle of the tie rod. And you're going to set your new tie rod up that same length.
So here I just take a couple of measurements to make sure. Mine are measuring eleven and three-eighths, but it's obviously going to be different for each vehicle. Okay. Now, the tie rod is held in. There's a lock nut here. You need to grab that with a large adjustable wrench, then hold onto the tie rod itself in that slot and loosen that lock nut. Then there is a little nut here that holds the stud on, and then you need to separate the tie rod from the steering.
You put one arm through the nut here, this bolts onto the tie rod. Turn that nut about a quarter of a turn. This bolt is 18 millimeters. Take an easy way out ... so if you don't have an impact wrench you'll want to use a breaker bar or a ratchet with a piece of pipe to give you some extra leverage. Now, here, you can use either a tie rod tool only because there is limited clearance between the tie rod and the vacuum plate here. I'm actually going to use a fork. You just basically drive this fork right in that separates the tie rod and the steering knuckle.
Once you get the tie rod separated from the steering knuckle, you just turn it counter clockwise and get it off of the steering rack. Okay. The new tie rod from 1A Auto comes with a bolt, take the bolt off, and you put it back on.
Okay. It is kind of a reverse procedure. You thread the tie rod in, measure from the same point, from the end, I chose the end of the boot on the rack, make sure it measures the same distance. I take a couple of measurements. Make sure you do not twist the shaft that comes out of the steering rack because that also will change your alignment.
Speaking of alignments, we do recommend that you have an alignment performed after you do a replacement like this. Once you have the measurement correct, then you can put the tie rod back into the steering knuckle and start the bolt on there.
Okay. Now, that nut is a lock nut, so what you will want to do, or what I'm doing here, is holding the stud of the tie rod with a 8-millimeter wrench, and then using an 18-millimeter wrench to tighten up the nut.
Okay. So once I've gotten the 18-millimeter wrench tight, I grab another wrench, hook it on there, and just give it another good pull, tighten it up more before I torque it.
When I torque it to 65-foot pounds. Now, you want to put your wrench on the inner tire rod and get this locking nut back out against the outer tie rod, and then lock onto the outer tie rod and tighten so it will lock up against it.
Okay. Now, you can turn your wheels back straight, and then put your wheel and tire back on, start the lug nuts by hand first, then just preliminarily tighten them. Okay. With the car back on the ground, set your torque wrench to 90- to 95-foot pound and tighten your lug nuts using a star pattern as your guide.
We hope this helps you out. Brought to you by www.1AAuto.com, your source for quality replacement parts and the best service on the internet. Please feel free to call us toll free, 888-844-3393. We're the company that serves you on the internet and in person.
Tools used
Tools used
Tools used
Tools used
Tools used
Brought to you by 1AAuto.com, your source for quality replacement parts and the best service on the Internet.
Hi, I'm Mike from 1A Auto. I hope this how-to video helps you out, and next time you need parts for your vehicle, think of 1AAuto.com. Thanks.
In this video, we're going to show you how to replace your front strut assembly in this 2005 Cadillac CTS.
Here are the items you'll need for this repair: 13mm, 18mm socket, ratchet, torque wrench, breaker bar, 18mm wrench, hammer, penetrating oil, jack and jack stands
Using your 19 millimeter socket and breaker bar, crack the lug nuts loose. Just about a turn is fine. You just want to make sure that there's no tension on them when you jack it up. Obviously you can't remove it with the weight of the vehicle on the tire. Once your lug nuts are loose, you can jack up the vehicle and secure it with jack stands.
You'll see on the rocker panel there's a small arrow. This indicates where the jack point is on the pinch weld under the vehicle. We'll place our jack under there, bringing the vehicle up until the wheel is off the ground and we have enough height to get a jack stand underneath the car. Directly in front of your jack, you'll notice this boxed frame like piece of the uni-body. That's the point we're going to use for our jack stand.
Slowly lower the vehicle onto the stand. Once the vehicle has been raised and supported, we'll finish removing the lug nuts. Remove the wheel from the hub. We're going to use a lift to make this easier to show you guys at home, but you should be able to do this in the driveway with a jack and jack stands.
Using an 18-millimeter socket and ratchet as well as an 18-millimeter wrench, remove the pinch bolt, and the upper ball joint on the upper control arm. Leave the nut. Flush with the end of the pinch bolt, so we can tap our pinch bolt out without damaging the threads. Tap the nut until the pinch bolt's out. Once you know that it's not in there tight, it's all right to give it a couple of light taps without the nut on there. Just be careful not to hit the threads or mushroom the end over.
Use your 18-millimeter wrench, as well as the socket and ratchet, behind the flange nut. We're going to put a little pressure with that 18-millimeter wrench and spin the bolt out. Remove these 2 13 millimeter bolts. Steel bolts inside of an aluminum control arm create corrosion because they are dissimilar metals, so be sure to soak these in penetrating oil if you have it available to you.
To release the upper portion of the strut, we'll have to remove these four 18 millimeter bolts as well as this 18-millimeter nut. This one here is going to require you to carefully release this A/C line and pull it out of the way. Be very careful not to chafe through, kink, or puncture this line, as it is high pressure. We're going to break all of our hardware loose with a breaker bar and an 18-millimeter socket. Once it's cracked loose, we'll move on to a ratchet. Before removing the last bolt, you want to reach into the wheel well and hold the shock assembly. Once that bolt's out, remove the strut and upper control arm from the vehicle.
Using an 18-millimeter socket and ratchet, as well as a wrench remove the bolts to the upper control arm. Move the upper control arm from the strut now.
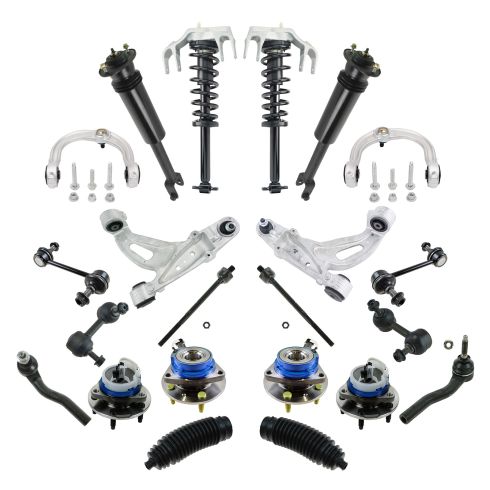
Here we have our old part that we removed from our vehicle and our new part from 1AAuto.com. As you can see, these parts are identical. We have the same mounting locations for upper control arms, as well as to mount the upper mount into the body of the car. We have the same spring per a new strut tube, same mounts on the bottom, nice fresh bushing in here. What happens to these old struts is over the course of so many miles eventually these strut tubes fail and don't slow the bounce of the car as well as they were designed to. What this is actually meant to do is when your spring compresses and comes back up, say over a bump in the road, it's to control that so the car only goes up and down one time. If your strut's blown out, not only will you possibly get a clunking noise like our vehicle was making, but you will also notice the vehicle tends to bounce more when it hits bumps. This new strut is going to go in direct fit.
Reinstall the upper control arm. For now, we're only going to put the nuts on by hand, so it'll make it easier to install the control arm back into the spindle, as well as allowing us to put the weight of our vehicle onto the suspension before tightening the control arm, making sure we don't pre-load the bushings and cause them to fail prematurely.
Now our assembly is ready to go back into the vehicle. Reinstall the assembly into the vehicle. Support it with one hand while you line up the hardware. Be sure not to tighten down any bolts until you have all of them installed hand tight, to make them easier to line up. Once all the hardware has been installed hand tight, go ahead and tighten it down with your 18 millimeter socket and ratchet. Torque these bolts 83 foot-pounds. Once the bolts are torqued, clip that A/C line back into place.
We're using a large screwdriver here to pivot this bracket on the bottom of the strut, to make it easier to line up and install our bottom strap hold. Once the other side's almost down tight, install the opposite bolt. Torque these bottom bolts to 18 foot-pounds. Line up the upper control arm into the steering knuckle. Send the pinch bolt through. Start the nut. Bring it down with an 18 millimeter socket ratchet and wrench. Torque the pinch bolt to 44 foot-pounds.
While I'm using a screw jack, you can do this with a floor jack. We're lifting up on the bottom of the lower control arm to set the suspension to its normal ride height position to be able to tighten the top 2 bolts with the control arm bushings as not to pre-load them.
With the load of the suspension on the vehicle, tighten these bolts with an 18-millimeter socket ratchet and wrench. It may be easier to access these with two 18-millimeter wrenches.
Reinstall the wheel onto the hub. We're going to bring them down as tight as we can, while the tire's still in the air. We'll finish tightening them once the vehicle has been taken off the jack stands. Always be sure to tighten your lug nuts in a cross pattern. Jack our vehicle off the stands, with the weight of the vehicle back on the tire. If you don't have a torque wrench, get them as tight as you can by hand with a breaker bar. It takes a lot of force to break one of these lug studs, so you don't need to go crazy tight, but don't be afraid to put a little bit of your weight into them, to make sure they're tight. Of course, if you do have a torque wrench available to you, you'll want to torque your lug nuts to 100 foot-pounds. You can see with the breaker bar we actually got it pretty close.
Thanks for tuning in. We hope this video helped you out. Next time you need parts for your car, please visit 1AAuto.com. Also check out our other helpful how-to and diagnosis videos.
Tools used
Tools used
Tools used
Tools used
Tools used
Tools used