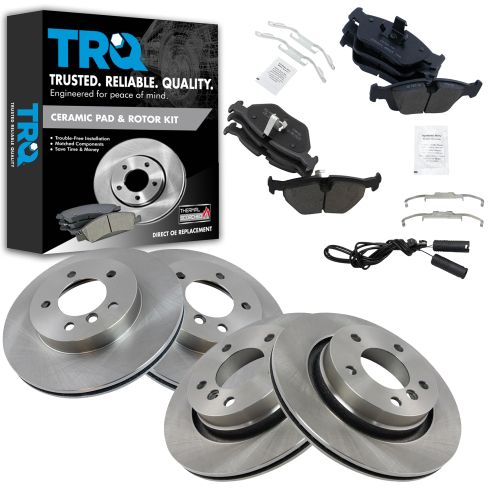
1ABFS01516-BMW 323Ci 323i 325Ci 325i 328Ci Front & Rear Ceramic Brake Pad & Rotor Kit TRQ BKA11214

Replaces
2006 BMW 325Ci Front & Rear Ceramic Brake Pad & Rotor Kit TRQ BKA11214

Product Reviews
Loading reviews
4.95/ 5.0
21
21 reviews
Great Value
February 27, 2017
Brakes installed easily and working perfect. Price impossible to beat. I recommend this buy.
August 28, 2017
1st time changing this part ever .. went very smooth ..
awesome deal!!
December 25, 2017
fit great, work great!! amazing deal. very nice performance, brakes work smooth, no noise at all! very very happy with this kit!!
good parts fast delivery
August 29, 2018
I got the parts in a few days and they fit as they should. I have only had the brakes and rotors for a few days but so far they are great. I would recommend this option for anyone looking for a cheap fix that works as they should.
Awsome service
March 21, 2019
My parts..rotors ans brakes and a crank valve came in next day!!! I will definitely order again. Thank you 1A auto
Great Kit
April 9, 2019
My rear rotors were warped and also needed the rear brake pads changed. Decided to go with this kit given that my mechanic said it would be a $200 job just for changing the rear brake pads. So I figured why not get a whole set and change everything out. Car feels like new, brakes are easy and smooth, and the kit came nicely packaged and was easy to install. Definitely if needed would buy from here again :)
1aauto
April 30, 2019
Parts were awesome, direct fit. Havent failed me yet and Im a continue to be a loyal customer. 03 e46
September 4, 2019
Good part love uaing A1-Auto you guys are the best ??
Consistent quality!
September 20, 2020
Consistent quality is the reason why I shop 1A Auto for all my parts needs.
Excellent
September 26, 2020
I had a warped rotor and buying this kit was a got price and came with everything I needed all brand new i highly recommend buying this kit now my car runs way smoother.
Very good quality
February 4, 2021
Package came on time it was exactly as advertised and good quality parts.
Front & rear Brake rotor and pad kit
May 3, 2021
Parts were exactly what I ordered and arrived one day later than expected. Parts fit onto the car perfectly and arrived in excellent condition. I have already recommended this site to others who have made purchases. Im about to place another order now. Very Happy with my experience...
Awesome
May 20, 2021
My parts fit perfectly and they also arrived before delivery date. I'm so happy with you guys service.
Awesome Kit
October 8, 2021
The price was amazing. I couldn't believe you could get pads, rotors, & sensors for less than $200. Everything fit great, except one item. The front sensor wire did not come with the rubber protector sleeve that also incorporates the clips to hold the wire out of the way. I was able to reuse the stock protector, but the rear sensor had it included so why didn't the front? This is my only complaint. Otherwise the kit is fantastic.
October 26, 2021
The experience to replace the brakes with your products. Is so easy just remove the old ones and install the new ones without any problem LIKE YOUR PRODUCTS keep the good job
Thank you
J. D.
Highly Recommend
December 21, 2021
A seamless transaction completely met my needs will definitely use your services in future
Brakes and rotors for BMW 325i
May 20, 2023
Replaced the front and rear brakes and rotors. Everything was easy to replace, no issues.
Great prices, great product & great customer service.
[{"url": "https://wac.edgecastcdn.net/001A39/prod/media/pNISJll75W64CYGsite/ff45bb25fe6bed263d72450b2f0da465_1687971760237_0.jpeg", "caption": "They were perfect!"}]
June 28, 2023
Everything was perfect. All fit well... If there is one thing I would say that would be, labeling could be better... When your ready to install, unpack and open everything and compare to what your removing and this specifically for the brake pad sensors.
Good Buy
November 14, 2023
Came just as I expected it to be and every part for. Great timing too since I needed to change the rear brakes rotors ASAP.
2004 BMW 325i New 1A Auto Brake Set up
March 26, 2024
I want I start off buy saying I've had this brake set up on my car for 1,000 miles so far and they have been fantastic. No squealing, no noise at all. No shaking. They seem to be holding up really well thus far. They do put off quite the brake dust but that's okay I wash it regularly. I will update my review overtime and explain if they're still living up to these expectations.
June 26, 2024
Good decent brakes/rotors ??
Customer Q&A
This kit includes front and rear pads and rotors correct?
August 2, 2016
10
Yes
August 2, 2016
Anthony R
10
Yes it does
August 2, 2016
Michael P
10
Yes
August 2, 2016
Noah R
10
Yes it does.
August 2, 2016
Derrick S
10
Yes
August 4, 2016
Brian F
10
yes
August 6, 2016
Paul M
10
Yes
June 30, 2020
C T
10
Yes
February 4, 2021
Amber B
10
Yes it does
May 20, 2021
Vern B
What is the return policy?
September 20, 2017
10
We offer a 60 day return policy for the brake kits as long as they are not installed for a full refund in the amount of the part price. If you experience any defects or faults in the parts then you would be covered under the manufacturer warranty.
September 20, 2017
Alex P
will this fit my 2002 330i 4D sedan rwd, Even though the title says 03 325i??
April 14, 2018
10
This part is not listed to fit your vehicle, but the correct part number for your model would be 1APBS00471!
April 15, 2018
T I
This rotor is anti corrotion ?
April 26, 2021
10
Hello, these rotors are not g coating for anti corrosion.
April 26, 2021
Ricale A
Does the kit include the wear sensors, as depicted in the photo?
September 8, 2021
10
Yes, the brake pad wear sensors will be included as pictured.
September 8, 2021
Emma F
Son compatibles con un bmw 328i ?
March 30, 2022
10
No, these parts will not fit on the BMW 328i.
March 30, 2022
Andra M
Is this fit for 2006 BMW 325i?
September 3, 2022
10
Currently, we do not carry this part for your vehicle. We're always updating our inventory so please check back soon!
September 6, 2022
Emma F
BMW is a registered trademark of Bayerische Motoren Werke AG. 1A Auto is not affiliated with or sponsored by BMW or Bayerische Motoren Werke AG.
See all trademarks.


