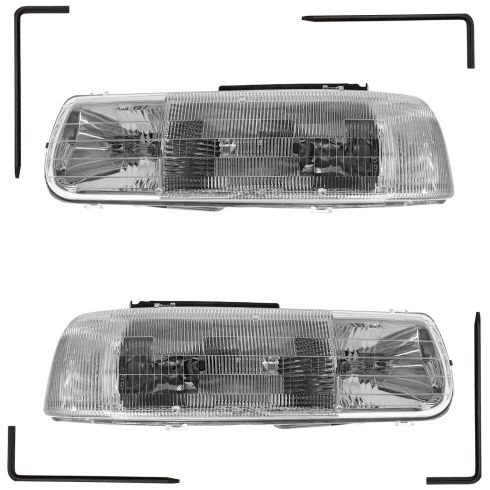
Complete Repair in One Purchase - Stop searching for parts individually and complete your repair with a customized kit or set from DIY Solutions.
High-Quality Parts from Trusted Brands - DIY Solutions' kits and sets are selected from the best automotive brands and include hard-to-find and even obsolete parts you may need for your vehicle.
Guaranteed Fit - DIY Solutions ensures its selected parts are quality-tested to guarantee fit and function.
Assemblies may include halogen or incandescent test bulbs that should be replaced before installation.
Features and Benefits
Direct Fit - No vehicle or wiring modification necessary
DOT, SAE, and FMVSS Compliant - Meets on-road use regulations
Matching set for a restored look
Item Condition:New
Attention California Customers:
WARNING: This product can expose you to chemicals including Chromium (Hexavalent Compounds), which is known to the State of California to cause cancer, and birth defects or other reproductive harm. For more information, go to www.P65Warnings.ca.gov
Lifetime Warranty
This item is backed by our limited lifetime warranty. In the event that this item should fail due to manufacturing defects during intended use, we will replace the part free of charge. This warranty covers the cost of the part only.
FREE Shipping is standard on orders shipped to the lower 48 States (Contiguous United States). Standard shipping charges apply to Hawaii and Alaska.
Shipping is not available to a P.O. Box, APO/FPO/DPO addresses, US Territories, or Canada for this item.
Expedited is available on checkout to the United States, excluding Alaska, Hawaii.
Final shipping costs are available at checkout.
How to Replace Headlights 2000-06 Chevy Suburban 1500
How To Replace Headlights 1999-2006 GMC Yukon
Created on:
Tools used
No Tools Needed
1. Removing the Headlight
Remove the two rods from the headlight bracket
Pull the headlight out by maneuvering it from the grille
Disconnect the two headlight wiring harnesses
2. Servicing the Bulbs
Twist the bulb socket counterclockwise out of the light
Pull the bulb off of the socket
Push on the new bulb
Twist the bulb clockwise into the light
3. Installing the New Headlight
Reconnect the two wiring harnesses to the headlight
Push in the outside end, pull back on the grille, and push in the inside end of the headlight
Slide the two rods into the headlight bracket
Brought to you by 1AAuto.com, your source for quality replacement parts and the best service on the Internet.
Hi, I'm Don from 1A Auto. I hope this how-to video helps you out, and the next time you need a part for your vehicle, think of 1AAuto.com. Thanks.
In this video, we're going to show you how to service the bulbs, as well as replace the entire headlight assembly on this 2002 Chevy Suburban. It's the same part and similar process on these Suburbans from 2000 to 20006. There are no tools required for this procedure.
Just pull out on these rods and then lift them up and out, and now your headlight will pull free. You do have to maneuver it by pulling out on your grill a little bit. Just lift up on these tabs and pull these harnesses free. Now to service the bulb: you just twist the socket counterclockwise and pull it out. Then twist your new one in clockwise to lock it. Both bulbs are the same procedure.
On the left is the old headlight assembly; on the right is the new one from 1A Auto. You can see they're identical, and they're going to fit exactly the same. We also have a couple performance options at 1AAuto.com that will also fit just as well.
Take your new headlight and reconnect those two harnesses. Then push the outside end in first, pull back on your grill, and push in the inside end. Once you have it back in place, you want to just slide that rod back down in. Once the headlights lined up properly, it'll slide right down, and just push it in to lock it. Do the same thing with this one and then you're all set.
We hope this video helps you out. Brought to you by www.1AAuto.com, your source for quality replacement parts and the best service on the Internet. Please feel free to call us toll-free, 888-844-3393. We're the company that's here for you on the Internet and in person.
Tools used
No Tools Needed
1. Removing the Pins
Open your hood, and locate the pins that hold the headlight in. Twist these pins, and remove to release the headlight from the mounting bracket.
2. Disconnecting the Headlight
Pull the headlight forward, and locate the low beam and high beam connectors. Disconnect them by putting your thumb into securing clasp and pulling.
The headlight is now free from the vehicle.
3. Connecting the New Headlight:
Bring your new headlight over and reconnect the low beam connector. Do the same for the high beam connectors.
4. Replacing the new Headlight
Slide the headlight back into the vehicle, making sure the low beam connector is pushed back into the hole so it doesn't get caught between the headlight and the mounting bracket.
Press everything down and lock them back into place with the pins.
5. Test the New Headlight
Make sure to test both low and high beams.
This video will detail headlight replacement on 2000 to 2006 GM SUVs pickups.
This replacement is similar for our 2000 to 2006 Yukons and Yukon Excels, 2000 to 2006 Tahoes and Suburbans, 1999 1500-series pickups to Sierra and Silverado, and 2007 classic series.
The headlight procedure is the same for all trucks that look similar to our example truck a 2002 Yukon Denali. It has the projector beam headlights. The procedure to replace the headlights is the same, whether or not you have the projector beam headlights or regular headlights. No tools are required for this and it only takes about three to five minutes.
The process to remove the headlight is very easy. Open your hood, locate the pins that hold them in, twist them, hold them up, and remove them to release the headlight from the mounting bracket.
Then, pull the headlight forward. Locate the low beam and the high beam connectors. Disconnect the connectors by putting your thumb into the connector and pulling.
Now the headlight is free from the vehicle. Get your new headlights and reconnect the low beam connector. Now reconnect the high beam connector, and then slide it back in the vehicle, making sure that on the pigtail of that low beam connector is pushed back into the hole so it doesn't get caught between the headlight and the mounting bracket.
Now press everything down and lock them back into place and you're done. Do a test and you're set.
Again, this goes for most 2000 to 2006 GM Trucks and SUVs.
Product Reviews
Loading reviews
5.00/ 5.01
1review
5 Stars
4 Stars
3 Stars
2 Stars
1 Star
1
0
0
0
0
Proper fit, well made, included bulbs
Christopher
August 25, 2020
The package arrived days before the predicted delivery date. The headlight units fit perfectly, and I was happy that they already have the bulbs installed. Thanks!
Customer Q&A
No questions have been asked about this item.
Customer service
877-844-3393
Monday - Friday 8:00am - 9:30pm ET Saturday - Sunday 8:00am - 4:30pm ET
Chevrolet is a registered trademark of General Motors Company. 1A Auto is not affiliated with or sponsored by Chevrolet or General Motors Company.See all trademarks.
Enter Vehicle Year Make Model
Specify your vehicle's year, make and model to guarantee fit.
Year
Make
Model
Options
Drivetrain
This part doesn’t fit a . Select from parts that fit.