Replaces
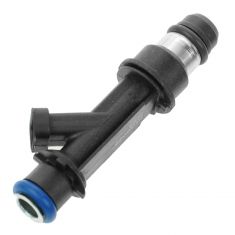
Replaces Chevrolet Buick Pontiac Olds 6 Piece Fuel Injector Set Standard Motor Products 1AEEK00493
$535.45
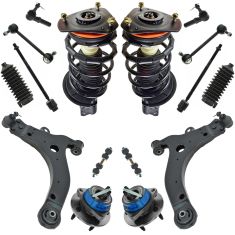
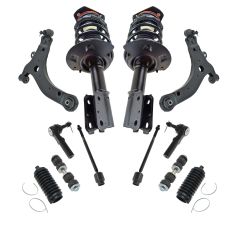
Replaces Chevrolet Buick Front & Rear 16 Piece Steering, Suspension, & Drivetrain Kit TRQ PSA59133
$449.95
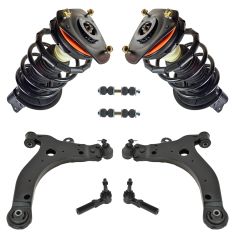
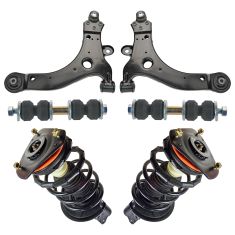
Replaces Buick Pontiac Front & Rear 8 Piece Suspension Kit TRQ PSA56340
$404.95

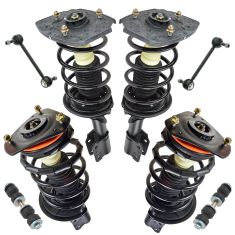
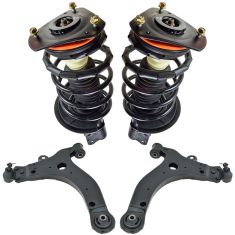
Replaces Buick Pontiac Front & Rear 4 Piece Strut & Spring Assembly Set TRQ SKA60878
$379.95
Replaces Buick Allure Century LaCrosse Regal Front 12 Piece Steering & Suspension Kit TRQ PSA31181
$337.95
Replaces Chevrolet Buick Front 8 Piece Steering & Suspension Kit TRQ PSA32892
$314.95
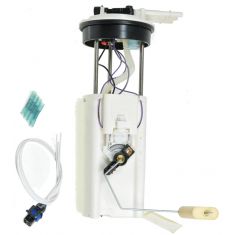
Replaces Chevrolet Buick Pontiac Olds Fuel Pump Module Assembly ACDelco MU1743
$304.95
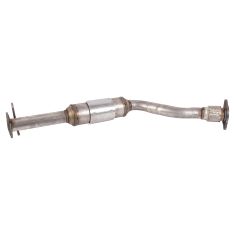
Replaces Chevrolet Buick Pontiac Center Catalytic Converter Davico Mfg 19057
$302.95
Replaces Chevrolet Buick Pontiac 4 Piece Suspension Kit TRQ PSA63623
$299.95
Replaces Chevrolet Buick Pontiac Front 6 Piece Steering & Suspension Kit TRQ PSA27582
$286.95
Part Details
Item Condition:
New
Attention California Customers:
 WARNING: This product can expose you to chemicals including 1,3-Butadiene, which is known to the State of California to cause cancer, and birth defects or other reproductive harm. For more information, go to www.P65Warnings.ca.gov.
Lifetime Warranty
This item is backed by our limited lifetime warranty. In the event this item should fail due to manufacturing defects during intended use, we will replace the part free of charge. This warranty covers the cost of the part only.
FREE Shipping is standard on Orders shipped to the lower 48 States (Contiguous United States). Standard shipping charges apply to Hawaii, Alaska and US Territories. Shipping is not available to Canada.
Expedited is available on checkout to the United States, excluding Alaska, Hawaii and US Territories as well as P.O. Boxes and APO/FPO/DPO addresses. Final shipping costs are available at checkout.


Created on:
Tools used
Brought to you by 1AAuto.com, your source for quality replacement parts and the best service on the Internet.
Hi, I'm Mike from 1A Auto. I hope this how-to video helps you out, and next time you need parts for your vehicle, think of 1AAuto.com. Thanks.
This video is part two of a three part series. We are replacing the lower intake manifold gaskets on a 3.4-liter V6 in this Grand Am. If you want to see the beginning where we take the intake manifold off, you go to part one, and here's a brief view of the tools you'll need. Somewhat basic tools, a few things like a torque wrench and a flexing socket extension.
Up to this point, we've removed the intake manifold. There is a section between the heads where just some RTV gasket maker has used, so you want to be very careful to clean that out. Use a putty knife or razor blade and clean that up as best you can. Obviously, the cleaner you get it, the better it's going to seal. The same thing with your valve covers and your intake manifold, the more you clean them up, the better they'll seal and go back together. We're using a parts washer and degreaser here. You can actually use gasoline is a good solvent to do this kind of work with. Just do it in a way that's environmentally friendly.
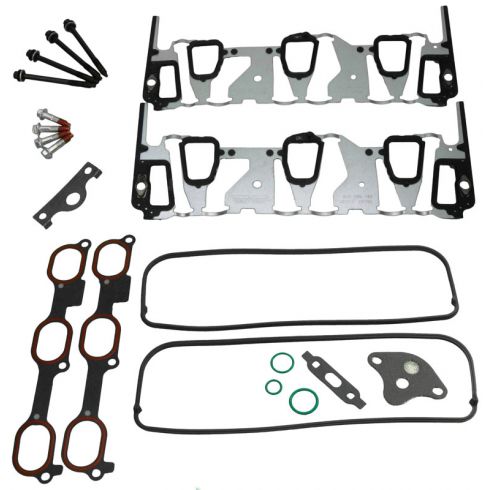
Here's the new gasket set from 1A Auto. You can see it comes obviously with the lower intake gaskets, the valve cover gaskets, there's some different O-rings and other gaskets for the EGR valve, etc., as well as bolts. I'm going to stop it right here. You can see right where I'm pointing on the old gasket.
This is what happens on these vehicles, these 3.4-liters. You can see the gasket has failed around the water jacket there, and that's allowing coolant to get into the oil. You just want to line up those pins, and you can see some of the push rods will have to go over and some will have to go under. You will actually be able to see from the indents in the gasket what goes where. You just want to put those all in place.
You want to make sure that you get your push rods back underneath the rockers and in place. Then just tighten those rockers up with a 10mm socket. We'll just fast-forward here as he repeats process on the other side. Again, just make sure the push rods are in place and tighten them up. Tightening the rocker arms is crucial. The specification is 14 newton meters plus 30 degrees. 14 newton meters also equals 124 inch-pounds which is about 10 foot-pounds. That will tighten all 12 of them up that much, and then you tighten it another 30 degrees. Tighten them all with a torque wrench and another 30 degrees with your wrench.
Then you want to take some RTV, which is like a liquid gasket, and you just want to attach the two gaskets on either side of the intake manifold using this. Make sure that you do this on both sides. Once you've given that time to set, take your lower intake cover, and you want to have someone pull back the fuel injectors, and you just set that down into place. You want to go around and replace those 10mm bolts.
Now, you just want to torque those upper bolts to 13 newton meters and the lower bolts to 25 newton meters or 18 foot-pounds. It helps to have a swiveling extension so that you can get to this bolt right here and just torque that. Here's our now cleaned up valve cover, and you want to take this gasket that comes with the gasket set, and you just want to put this on your valve cover and just push it into place.
Now, you want to put the valve cover on and have someone hold it while you start the first bolt, and you just want to tighten up all those 8mm bolts. Now, on the valve cover and the back, make sure you have someone again to hold back the coil pack. Then you can put that valve cover on, start a bolt, and then tighten all four of the bolts up. Right here, on this pipe, there's an O-ring.
You want to remove that O-ring, and then just kind of scrape at this with a flat blade screwdriver to try to clean it up a little bit. In that gasket kit, you'll see there's a replacement O-ring for this. Once you get it cleaned up, you just want to put the new O-ring from 1A Auto into place. Once the O-ring is on, you can push it down into place, and you just want to replace the bolt.
Now, you just want to replace the bolt that holds this line in place. Take a wire brush, and you want to scrape up some of this debris that's on this pipe here. It's mainly just dried coolant. To scrape off all that, clean it up a little bit, take that tube and slide it back into place. Take a pair of pliers, push the two parts of the clamp together, and slide it forward to lock the tube in place. Now, you want to do the same thing here. Push this tube into place, slide the clamp forward, and you can tighten that with either a 7mm socket or a flat blade screwdriver. Again, install the upper hose and re-secure the clamp.
Now, you want to take these pulleys, and you just want to line that up. Once it's lined up, you just want to feed it down to the hole right there, as you can see, and you just want to turn that bolt to secure it into the hole there. You can do it by hand to start. Replace the 15mm bolt back here, and then there is a 15mm and a 16mm bolt that go on the side. You just want to put these back in place.
Now, you just want to put your power steering pulley back into place and you can replace the 13mm bolts to secure that. Now, you want to replace the wires on the back of the alternator and tighten up that 13mm bolt. Once that's tightened up, you want to just take that rubber boot and slide it back into place. You want to make sure that this bolt is already in place on the side before you put your alternator into place because the firewall will be in the way of getting the bolt in. Once you get the alternator in place, you can tighten up that bold and then replace the bolt in the front. You can now replace the bolt in that bracket in front of the power steering pulley.
You can now put your fuel injector leads into place. They are numbered. Just put them in order. It does have a number to match up above each fuel injector. Once you have the leads in place, you can line up those fuel injectors and push them down into place. You want to just replace these two bolts right here. You want to connect the lead right here in your alternator, and this lead down here.
You want to take your new gaskets from that gasket pack from 1A Auto and just put them here into place. There's one for each side. Down here, on this tube, you just want to scrape off the old O-ring and just clean that up a little bit, and then your gasket pack. There's a new O-ring, and you just want to put that into place and push that line into place. You just want to replace the nut down by that line you just plugged back in. There's actually another one right below it, and you want to replace that one as well.
Take this bracket that's in that gasket set from 1A Auto. Take your upper intake plenum, and you want to just line it up. Make sure this harness goes up through that hole on the back on your right there, and then just put that plenum into place. You want to just replace all the bolts that go along this. Make sure that if there's a bracket that goes in that spot, you put the bolt down through the bracket like right here. Just fast-forward. Tighten these bolts up evenly and then these bolts should be torqued to 18 foot-pounds.
In this bracket, you want to make sure that the harness goes underneath it. Then you want to just take this, plug it in right next to that harness, and then plug the other end up here, and then take this, plug that lead into it, and set that down into that bracket. You want to just tighten those bolts. You want to just replace your coil pack bolts to secure the coil pack back into place. Tighten those up real quick.
Then you want to replace the two bolts back down underneath the coil pack. You want to just reach down there using a flashlight to see where the holes are and put those back. Do it by hand first and then tighten them up. You want to just put that hose back into place, take the clamp using pliers, slide it forward, and it locks into place. You want to push this hose back into place. Same thing with this one.
On this vehicle, there's actually a plug. Here's the old manifold. You just see there's just a rubber plug there. Take it off for the old manifold and install it the same place for the new one. Maybe you want to bolt your throttle body back into place. Then you want to replace that nut on the bottom corner of the throttle body. Just replace the bolts up above the throttle body and tighten them.
Take this hose here, push it back, and then slide it down into place. Then you want to take your pair of pliers and push that clamp together and slide that forward. Then you want to take this hose, and you can see using a flat blade screwdriver, he's just positioning the hose on to that into place there and it just slides down into place. Again, take pliers, push the clamp forward, and replace that bolt, and tighten it.
Before putting your EGR on, put the new gasket from that gasket pack into place, and then line up your EGR. Put that into place and replace the bolt on either side. Once we tighten up the EGR, then we're going to cut off this part of the video. The next part of the video we're just going to finish up and get the thing running.
We hope this video helps you out. Brought to you by www.1AAuto.com, your source for quality replacement parts and the best service on the Internet. Please feel free to call us toll-free, 888-844-3393. We're the company that's here for you on the Internet and in person.
Tools used
Brought to you by 1AAuto.com, your source for quality replacement parts and the best service on the Internet.
Hi, I'm Mike from 1A Auto. I hope this how-to video helps you out, and next time you need parts for your vehicle, think of 1AAuto.com. Thanks.
This is part three of a three part video of replacing the lower intake manifold. Up to this point, we've removed the intake manifold and put the new gaskets in, and are finishing up reinstallation. Here is just a look at all the tools you'll need. If you want to see the rest of this video, just check our other videos for parts one and two.
Now what you want to do is put the air intake hose back in. You want to use a Phillips head screwdriver to loosen up those bolts. Pull the intake cover back, put the hose into place, and then slide that cover forward until you can snap it down into place. Just want to tighten up those Phillips screws. Get a flat blade screwdriver and tighten up the bolts on the clamps. Just take this connector and plug it back in.
Then you want to take these hoses and put them into this clip. Right down here you can see there's a hole. Over here there's another hole. You want to take this and fit that down in behind and into the hole there, and wrap it around, and plug it into the hole at the top of that air intake hose. Then you want to take your EGR connector and plug that back in.
Now you can plug in your spark plug wires. You just want to clip that clip back on right there, and then push those wires down into place. We have the original wires, which have two, four, and six. Two is the first one we plug in, then four, then six. Two is on the passenger side, four is in the middle, six is on the driver side. Here is your belt diagram. If you can't find it on your vehicle, this is for this '99 Grand Am.
I can't really show you putting the belt back on because it's hard to video, but basically what you want to do is route the belt other than the top middle pulley, the idler pulley. Then you pull on your tensioner and put the belt down under that idler pulley. One thing we found is it's actually easier if you put it on your alternator, and then, using the tensioner and a piece of pipe for leverage to help move the tensioner, you just want to push the belt down underneath that pulley. Then you can put this box back into place and just close up that bracket. Then you can reconnect the negative battery cable on your battery.
We're going to refill the coolant. We're using a screen filtered funnel just to filter out any debris in the coolant that we drained. Beyond that, we'll fill the coolant to the correct level. Then you must do an oil change. You can see that pan of yucky brown oil is what came out of the vehicle. It's oil mixed with antifreeze. You can't run the vehicle with that so you must do an oil change before you start the vehicle up.
We hope this video helps you out. Brought to you by www.1AAuto.com, your source for quality replacement parts and the best service on the Internet. Please feel free to call us toll-free, 888-844-3393. We're the company that's here for you on the Internet and in person.
Tools used
Brought to you by 1AAuto.com, your source for quality replacement parts and the best service on the Internet.
Hi, I'm Mike from 1A Auto. I hope this how-to video helps you out, and next time you need parts for your vehicle, think of 1AAuto.com. Thanks.
This is part one of a three part video, and we're going to show you how to replace the lower intake manifold gaskets on this '99 Pontiac Grand Am. It has a 3.4-liter V6. This procedure is the same for a lot of GM vehicles with this 3.4-liter V6. Here's the tools list: you can see it's a wide variety of different tools to get different jobs done, but nothing is really any kind of specialty tool. You need a torque wrench and a swivel socket to get to some of the different bolts.
I'm going to start out by jumping ahead here a little bit. Here in this picture, you can see up at the top a finger pointing to the old gasket, and it's pointing to this area of the gasket where it failed. You can see the orange of the gasket has been compromised, and that's where it's allowing coolant to get through and actually seep down into the engine oil.
Basically, what the symptom is you're losing coolant but you don't know where you're losing it to, and then when you check the oil, your oil will look a little more light brown and foamy and that's because the coolant is mixing in with your oil. These are your spark plug wires. You just want to go ahead and remove all of those. Just unplug each of them. We'll fast-forward as he does this.
Now, you just want to disconnect those spark plug wires. There's a clip up there, you just want to pull that off, and then you just want to remove that hose from the top and that hose as well. On this clip right here, you'll see there's a 10mm bolt, just go ahead and remove that. Now what you want to do is loosen up the clamp on the air intake hose, so using a flat blade screwdriver just loosen up the bolts on those two clamps. With those loosened up, you can pull the hose off. You're just going to want to pull that back and away, and then disconnect the hose connected to the top of that. The harness on the side, and pull it free and away.
Now, as you can see right here, there's two 13mm bolts one at the top corner and one diagonally across from it. You just want to go ahead and remove those. Next, what you want to do is remove the bolts that secure the coil pack. There's actually different size bolts. The top two are 10mm and the bottom two on the back there are 13mm. You just want to go ahead and remove those.
Now, using a pair of pliers, you just want to grip that clip and slide it back on the hose. Then you just want to use a flat blade screwdriver to pry that hose off. Now there are two 7mm bolts. They're coming in from the side or from the back into that sensor, so remove those. Now with those bolts removed, you can just disconnect the harness on the bottom and pull that up and out. Then using a flat blade screwdriver, just pry that hose off.
Now, on either side of the EGR, you can see that there's two 10mm bolts. You just want to go ahead and remove those. Now, what you want to do is remove this upper intake plenum, and what you're going to need is a 10mm socket to remove the 10mm bolts, and then there's one 13mm nut right there. You just want to go ahead and remove all of those. Now, you just want to remove this 10mm bolt right here.
Now, you just want to remove the cap on your radiator overflow bottle, and then you want to take a drip pan and slide it underneath the engine right underneath these hoses right here. You just want to take some pliers, push those clamps, slide them back on the hose, and then we're going to take a flat blade screwdriver, and we're just going to pry that hose back and off. It's important to disconnect these hoses. You're going to see a lot of coolant comes out, that's why the drip pan's under there. We actually leave the screwdriver in there to help drain all of this coolant. However, there is an easier way to drain this coolant. In our case, this is how we had to do it. You can do it this way, but what you should do to drain your coolant quicker as you can see there's actually a bolt right there, and you just want to loosen that up and drain the coolant that way. Ours is actually broken so we didn't have a choice.
Once the coolant's pretty much drained out, you still want to make sure those hoses are pried off. Then you can just pull that hose free and that hose free. The next thing you want to do is just lift this up, and we can just set that aside. Then you want to just remove these gaskets. Our new kit comes with new ones, so we won't be needing those. You just want to disconnect this connector. Right here, you can see that there's two 10mm bolts. You want to go ahead and remove those. Now, what you want to do is you want to just vacuum out that top of the engine there, get all of the dirt and stuff that builds up in there.
Now, what you want to do is using a pry bar just pry up carefully, and you just want to pry the fuel injectors up and out. Once you've pried them enough you should be able to just lift them out. You can see right here there's a 13mm nut, and you want to just go ahead and remove that.
Now back to the fuel injectors. You want to just disconnect, there's a harness connecting each one, you want to just press on the tab and pull those free. A tab right there. We'll fast-forward as he does the others. Now this should just lift up. You should be able to set it aside. Now, at the front of the engine, you can see that's an 8mm bolt and an 8mm nut, you want to go ahead and remove those. Now, you just want to use a flat blade screwdriver to loosen up this clamp on the hose here. Once that's loosened, make sure you have a drip pan underneath there, and you just want to pull up and the coolant, there will be some coolant coming out.
Now, what you want to do is just pull the hose outward to free it, and then you just want to set that up over on the other side of the dipstick. Now, using pliers, you just want to push the two parts of the clip together and slide it back. Then, you want to do that again, there's a similar clip right down here, you want to do the same thing. Just push the two parts of the clip together and slide the ring back.
Now, you can detach both of those. You may need a screwdriver to help pry them apart. Now, on the other side of the engine, down here is your tensioner. You want to stick a 3/8 inch ratchet just the ratchet itself and you want to stick that down inside the tensioner. Then we use a piece of pipe here for extra leverage. You just want to push that back and you can pull the serpentine belt free.
Before we start working on the alternator, you want to just disconnect your negative battery cable, here. Now, on the alternator, there are two 15mm bolts: one there and then one right back there. There's actually this nut right here, you also want to remove, also 15mm. Now, with those bolts and that nut removed, you can lift the alternator up and out. Back here, there's a harness. You want to disconnect that clip, and then pull this rubber boot off, and you'll see there's actually a bolt in there. You want to go ahead and just remove that, it's 13mm. Once you've removed that you can just lift your alternator up and out.
Now, what you want to do, there's a 15mm bolt right there, underneath the idler pulley, and then there's another 15mm bolt right back here. Then you just want to go ahead and remove those. Now, what you want to do is just remove this 16mm bolt here, and after you get that out of the way that whole tensioner assembly will just come off. Now, right here, you can see there are four 8mm bolts on the front here, and on the back side there's another four bolts in the same spots. You just want to go ahead and remove those.
With those bolts out you can now remove those valve covers, just pull them right up and out and make sure you take that gasket too. You want to remove the back valve cover also. Because of all the harnesses and the coil pack there, it definitely helps right here to have another person to just hold all that stuff back. Now, in your power steering pulley, back behind it there are three 13mm bolts, and if you turn it you can see through those circles there and you can get it. It's a little difficult to get to at first, so what you want to do is just remove this box by pulling that bracket forward, and you can pull that box up and out and just set it aside.
Now to get to the final bolt behind the power steering pulley, you need to remove this 18mm bolt right here. Once that's removed, you'll be able to access that last 13mm bolt behind the power steering pulley. Now, what you want to do is remove these 10mm bolts: there's two here and then there's four along the top, and then two more on the side here. Now, what you want to do is, using a flat blade screwdriver, just pry that hose off right there.
Now have a helper hold the fuel injection rail, and you can pull the lower intake manifold out. You see some coolant drip down in there, we are going to change the oil later. Now, on these rockers, they're 10mm bolts. You just want to loosen up those 10mm bolts so that you can lift the rocker up and pull the push rod out. You want to do this on each of them, don't actually take the push rod all the way out if you don't have to just lean them forward, it makes it a lot easier and then once they're all leaned forward you just want to slide that intake manifold gasket up and out.
We'll fast forward a little bit here as we repeat that process on the other side and we've got the intake manifold off. We'll end this first part and if you want to see the rest go to the same video for part two.
We hope this video helps you out. Brought to you by www.1AAuto.com, your source for quality replacement parts and the best service on the Internet. Please feel free to call us toll-free, 888-844-3393. We're the company that's here for you on the Internet and in person.