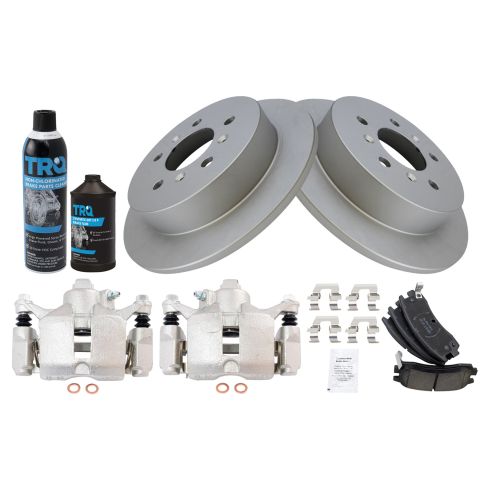
Kit Includes: (1) 12 oz DOT 3 & 4 Brake Fluid (1) 13 oz Non-Chlorinated 50 State Formula Brake Cleaner (1) Rear Ceramic Brake Pad Set with Contact Point Grease & Hardware (2) Rear Brake Calipers with Hardware (2) Rear G-Coated Brake Rotors
Specification
Location
Rear
Complete Repair in One Purchase - Stop searching for parts individually and complete your repair with a customized kit or set from DIY Solutions.
High-Quality Parts from Trusted Brands - DIY Solutions' kits and sets are selected from the best automotive brands and include hard-to-find and even obsolete parts you may need for your vehicle.
Guaranteed Fit - DIY Solutions ensures its selected parts are quality-tested to guarantee fit and function.
Replacement Brake Kits Features & Benefits
Longer life - Positive molded to ensure even wear and enhanced performance
Less dust - Cleaner, quieter, smoother braking
Reduce vibration and noise - Balanced, finished surface
Cast from premium G3000 alloy for strength and durability
WARNING: This product can expose you to chemicals including Lead and Lead Compounds, which are known to the State of California to cause cancer, and birth defects or other reproductive harm. For more information, go to www.P65Warnings.ca.gov.
Lifetime Warranty
This item is backed by our limited lifetime warranty. In the event that this item should fail due to manufacturing defects during intended use, we will replace the part free of charge. This warranty covers the cost of the part only.
FREE Shipping is standard on Orders shipped to the lower 48 States (Contiguous United States).
Shipping is not available to Canada. This item cannot be Shipped to AK Alaska, HI Hawaii, US Territories, P.O. Boxes, APO/FPO/DPO addresses or Expedited due to size limitations.
How To Install Rear Brake Pads 2000-07 Chevy Monte Carlo
Created on:
Tools used
14mm Wrench
Large C-Clamp
Hammer
Flat Blade Screwdriver
Torque Wrench
Jack Stands
19mm Socket
Ratchet
Wire Brush
Floor Jack
Brake Parts Cleaner
1. Removing the Wheel
Loosen the 19mm lug nuts with the vehicle on the ground
Raise the vehicle with a floor jack
Secure the vehicle on jack stands
Remove the lug nuts
Pull off the wheel
2. Removing the Brake Pads
Remove top 14mm bolt from the brake caliper and loosen the bottom bolt
Pull the caliper aside
Pry the brake pads off with a flat blade screwdriver
Remove the brake pad slides
3. Installing the New Brake Pads
Put an old pad in the caliper
Use a large C-clamp and the old pad to push the pistons back
Clean the slides with a wire brush
Apply brake grease to the brake pads
Install the new brake pads into the bracket
Hammer the caliper on
Tighten the 14mm bolts to the caliper
4. Reattaching the Wheel
Slide the wheel into place
Start the lug nuts by hand
Tighten the lug nuts preliminarily
Lower the vehicle to the ground
Tighten the lug nuts to 100 ft/lbs in a crossing or star pattern
Reattach the center cap
Tighten the lug nut covers with a 19mm socket
5. Testing the Brakes
Pump your brakes repeatedly until they feel firm
Test your brakes at 5 miles per hour and then 10 miles per hour
Road test the vehicle
Brought to you by 1AAuto.com, your source for quality replacement parts and the best service on the Internet.
Hi, I'm Mike from 1A Auto. I hope this how-to video helps you out, and next time you need parts for your vehicle, think of 1AAuto.com. Thanks.
In this video, we're going to show you how to replace the rear brake pads on this 2003 Chevy Monte Carlo. We show you on the passenger's side but the driver's side is the same procedure. The items you'll need for this include new brake pads from 1AAuto.com, a 19mm socket and ratchet, a 14mm wrench, a flat blade screw driver, a hammer, a large C-clamp, a wire brush, brake grease, jack and jack stands, and a torque wrench.
Loosen up the lug nuts, pull your hub cap off, and then remove the lug nuts. You want to loosen these while the vehicle is on the ground, then raise the vehicle and remove them the rest of the way if you don't have air-powered tools. Now, just pull the wheel off.
Next, remove the top caliper bolt and loosen the bottom one. I use a 14mm wrench and hook it on with another wrench to get some extra leverage. Again, remove the top one and loosen the bottom one. Once you remove the top one, then you can pull the caliper back. Once you pull back the caliper, just pry out the brake pads with a flat blade screw driver. Then pry out these brake pad slides.
On the top are the new pads from 1A Auto; on the bottom are the old ones. You can see that the new ones from 1A Auto are exactly the same. Pull back your caliper and then use an old brake pad and push in that piston. Just twist the large C-clamp. It will push the brake pad against the piston and push the piston in. Clean off your brake pad slides using a wire brush, and then push them back into place. Then apply brake grease to the tabs on either end of your brake pads. Slide the brake pads into place and then push your caliper back up into place over the brake pads. Then replace those two 14mm bolts and tighten them up.
Replace your wheel, replace the lug nuts, and then tighten them preliminary. Lower the vehicle and tighten them the rest of the way. Then torque each of these to 100 foot-pounds in a crossing pattern. Replace your hub cap and tighten up these lug nut caps. Whenever you do any work on the brakes, you want to just pump the brake pedal until it firms out and try a stopping test from five miles per hour, then ten miles.
We hope this video helps you out. Brought to you by www.1AAuto.com, your source for quality replacement parts and the best service on the Internet. Please feel free to call us toll-free, 888-844-3393. We're the company that's here for you on the Internet and in person.
BFS05441
In Stock
Product Reviews
Loading reviews
There are no reviews for this item.
Customer Q&A
No questions have been asked about this item.
Customer service
877-844-3393
Monday - Friday 8:00am - 9:30pm ET Saturday - Sunday 8:00am - 4:30pm ET
Chevrolet is a registered trademark of General Motors Company. 1A Auto is not affiliated with or sponsored by Chevrolet or General Motors Company.See all trademarks.
Enter Vehicle Year Make Model
Specify your vehicle's year, make and model to guarantee fit.
Year
Make
Model
Options
Drivetrain
This part doesn’t fit a . Select from parts that fit.