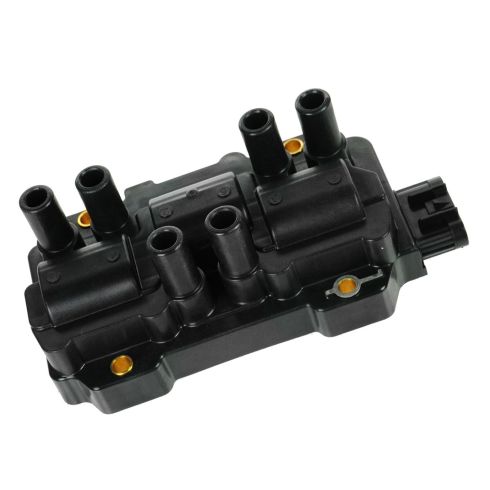
TRQ ignition coils will have your engine running like new. TRQ ignition coils are manufactured to precise specifications using premium raw materials to optimize each vehicle's ignition system. To ensure peak performance, TRQ recommends replacing ignition coils in sets to prevent electrical output imbalances. All products are fit and road-tested in our Massachusetts R&D facility to ensure we deliver on our promise of Trusted Reliable Quality.
Product Features
High dielectric epoxy and reinforced bobbins for extended service life
Rubber, Silicone, or Phenolic Resin Shell: Prevents premature boot wear
Application Specific Design: No modifications required
The ignition coil pack is a crucial part of your ignition system. It's function is to convert the 12 volt power of your vehicle's electrical system in to 35,000 or more volts. This produces a high intensity spark at the spark plug which then ignites the fuel in the cylinder. Coils in general will wear out over time.
Item Condition:New
Attention California Customers:
WARNING: This product can expose you to chemicals including Lead and Lead Compounds, which are known to the State of California to cause cancer, and birth defects or other reproductive harm. For more information, go to www.P65Warnings.ca.gov.
Lifetime Warranty
This item is backed by our limited lifetime warranty. In the event that this item should fail due to manufacturing defects during intended use, we will replace the part free of charge. This warranty covers the cost of the part only.
Returns: Parts with electrical components cannot be returned once installed.
FREE Shipping is standard on Orders shipped to the lower 48 States (Contiguous United States). Standard shipping charges apply to Hawaii, Alaska and US Territories. Shipping is not available to Canada.
Expedited is available on checkout to the United States, excluding Alaska, Hawaii and US Territories as well as P.O. Boxes and APO/FPO/DPO addresses. Final shipping costs are available at checkout.
How to Replace Ignition Coil 2006-11 Chevy Impala
Created on:
Tools used
Torque Wrench
10mm Wrench
10mm Socket
Ratchet
1. Removing the Engine Cover
Twist off the oil fill tube
Pull off the engine cover
Twist the oil fill tube back on
2. Removing the Ignition Coil Pack
Disconnect the ignition coil wiring lead
Disconnect the wires from the coil pack
Remove the four 10mm bolts from the coil pack
Pull off the coil pack
3. Installing the New Coil Pack
Push the new coil pack into place with the wiring lead connector facing the driver side
Start the four 10mm bolts by hand
Tighten the bolts to between 8 - 10 foot-pounds of torque
Familiarize yourself with the ignition wire diagram
Reinstall the wires as indicated by the diagram
The wires for the front cylinder bank are, left to right: 2, 4, and 6
The wires for the rear cylinder bank are, left to right: 1, 3, and 5
The wires at the ignition coil are, left to right: 1, 4, 2, 5, 3, and 6
Reconnect the ignition coil wiring lead
4. Reattaching the Engine Cover
Twist off the oil fill tube
Put on the engine cover
Twist on the oil fill tube
Brought to you by 1AAuto.com, your source for quality replacement parts and the best service on the Internet.
Hi, I'm Don from 1A Auto. I hope this how-to video helps you out, and next time you need parts for your vehicle, think of 1AAuto.com. Thanks.
In this video we're going to show you how to replace an engine ignition coil on this 2006 Chevy Impala, pretty much the same for any 2006 to '12 Impala with the 3.5 liter V6. The only tool you'll need is a 10mm wrench or socket and ratchet.
Start out by removing your oil fill tube and pop the engine cover off, put it to the side, and put that tube back in so that nothing gets into the engine.
Your coil is located at the back of the engine. There's a coil assembly there and you'll want to disconnect the lead by pressing down on the tab that's on top and pulling it off. Now, you'll want to disconnect all of the wires to the coil. We will, later in this video, show you a diagram that shows you the proper way to reconnect these. There are four 10mm bolts. You see one there, one that's down in the back .you can barely see it a little bit there . another one there, and another one in behind that. Those are 10mm and we'll just fast forward as we remove those. You can see as we remove that last bolt the whole coil pack comes up and out.
Now, install the new coil. Make sure that you have the harness connection facing toward the driver's side of the vehicle. Put it down in, and start your bolts on. I'm going to fast forward here. We always recommend you start the bolts first by hand to make sure you don't cross thread anything, and then tighten them up. These bolts should be probably tightened to about 8 to 10 foot pounds or 80 to 90 inch pounds.
Here's a very important diagram. You need to make sure you put the plug wires back on the right place on the ignition coil. As you can see if you're looking at the engine from the front of the vehicle, the front side of the engine is plugs number 2, 4, and 6. The back side is 1, 3, and 5. Then, you can see the ignition coil on the back, the first one you plug in is 1 . that's the first one on the left . then 4, then 2, then 5, then 3, then 6. You can see, here, Don is plugging those wires back in. Every once in a while you'll see him looking over his left shoulder there. He's got a little handwritten diagram next to him, the same as that one we just showed you just to show him how to put those plug wires on correctly.
Reconnect the electrical connection on the driver's side and then remove your oil fill tube and put the cover back on. It's just got a couple of rubber plugs that go over studs. Push it down on and put the tube back in and you're all set.
We hope this video helps you out. Brought to you by www.1AAuto.com, your source for quality replacement parts and the best service on the Internet. Please feel free to call us toll-free, 888-844-3393. We're the company that's here for you on the Internet and in person.
ICA61845
In Stock
Product Reviews
Loading reviews
5.00/ 5.02
2 reviews
5 Stars
4 Stars
3 Stars
2 Stars
1 Star
2
0
0
0
0
Perfect piece
mike-d
April 14, 2020
Great transaction definitely noticed improvement in g6 Pontiac with 200k+ miles. If you are going to go to the trouble of replacing this part it should go without saying just replace the wires and plugs also.
Good as it gets!
Michael
August 21, 2024
Good product at a fair price. Great Warranty. Feel I got a great deal.
Customer Q&A
Does it come with the grounding strap?December 22, 2018
Anthony P
10
No
December 22, 2018
S T
10
no it doesn't the bolts act as a ground
December 22, 2018
Luther K
10
yes it does
December 23, 2018
Joe B
10
no, I just swap the old one with the new one. You only get what is on the picture.
December 23, 2018
A J
Customer service
877-844-3393
Monday - Friday 8:00am - 9:30pm ET Saturday - Sunday 8:00am - 4:30pm ET
Saturn is a registered trademark of General Motors Company. 1A Auto is not affiliated with or sponsored by Saturn or General Motors Company.See all trademarks.
Enter Vehicle Year Make Model
Specify your vehicle's year, make and model to guarantee fit.
Year
Make
Model
Options
Drivetrain
This part doesn’t fit a . Select from parts that fit.