Replaces
This part doesn’t fit a . Select from parts that fit.
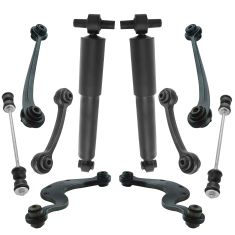
Frequently bought together
Part Details
TRQ suspension kits are manufactured using premium raw materials and coatings for extended service life. Each TRQ suspension component is designed to be a direct, maintenance-free replacement to the stock unit. To extend the life of your steering and suspension components, TRQ recommends replacing components in pairs, sets, or kits. All products are fit and road-tested in our Massachusetts R&D facility to ensure we deliver on our promise of Trusted Reliable Quality.
Product Features
Our direct fit gas-charged shock absorbers help restore your vehicle's handling and ride quality to just like new.
Our steering and suspension kits are offered in a variety of options to best fit your repair needs and your budget.
Our steering and suspension components are pre-greased and sealed for long life and do not require the extra maintenance typically required by greaseable versions.
Item Condition:
New
Attention California Customers:
 WARNING: This product can expose you to chemicals including Chromium (Hexavalent Compounds), which is known to the State of California to cause cancer, and birth defects or other reproductive harm. For more information, go to www.P65Warnings.ca.gov
Lifetime Warranty
This item is backed by our limited lifetime warranty. In the event that this item should fail due to manufacturing defects during intended use, we will replace the part free of charge. This warranty covers the cost of the part only.
FREE Shipping is standard on orders shipped to the lower 48 States (Contiguous United States). Standard shipping charges apply to Hawaii and Alaska.
Shipping is not available to a P.O. Box, APO/FPO/DPO addresses, US Territories, or Canada for this item.
Expedited is available on checkout to the United States, excluding Alaska, Hawaii.
Final shipping costs are available at checkout.


Created on:
Tools used
Remove the wheel, I'm gonna use a 22-millimeter socket. Take the wheel off. So I want to support the lower control arm. I am going to use a screw jack just to take the tension off the shock. You can use a floor jack or even a jack stand. Now I can use a 13/16-inch wrench or a 21-millimeter wrench, put it on the nut right here, and then a 21-millimeter socket, take this bolt out, and this bolt. All right. So that's separated down there. Now, before I take this bolt out here, I'm just going to loosen up these two bolts for this bracket. I don't have to take the bolts out completely, just loosen them. Use a 15-millimeter socket. That's good. Now I'll take that bolt out. Then take a 15-millimeter socket and an 18-millimeter wrench and loosen this up. Take that bolt out. You can slide that bolt out, watch the brake hose. I'm going to slide that out. And to loosen that bracket up, that just makes sliding this out and the new one back in a lot easier.
Before we install the shock, you just want to exercise the shock, just compress it and let it expand. It's going to get the fluid to go through the system and do its thing properly and then it'll be all set to put in the vehicle. And take the shock and the bolt, slide it in position, watch out for that brake hose. Just like that and get this started up here. And before I tighten that all up, let's put the lower bolt in. Now, there is this washer that is domed up a little bit, now that's going to go right in this position here on the control arm. And you can take the bolt, slide it through. If you have to move the control arm up a little bit, you can move it up. And take the washer and the nut, get that started. Now we'll tighten this and torque this to 52 foot-pounds. I'll just snug these two bolts up. Now I can lower the screw jack. Now put the tire back on. Now we'll torque these lug nuts to 140 foot-pounds in a star pattern, that way it tightens the wheel down evenly. And I'll just go around again, double-check.
Tools used
Tools used
Remove the wheel, and use a 22 millimeter socket. Take the wheel off. So that this wire doesn't break, I'm gonna disconnect this wire right here. Just use this pick tool. Just slide this out, right there. You can disconnect these retainers, just slide these off. That'll give me more slack. Just let that hang. That's good. Now, take a 21 millimeter wrench, loosen up right here, put on that nut, and then 21 millimeter socket, take this bolt and loosen it up. Just make sure you don't get too close to the rotor because once this bolt comes out, it is going to tip forward. There's the nut...oops, the nut and the washer. And you can push on the rotor a little bit. Try to pull this bolt out, and just slide that up.
Now, take the 21 millimeter wrench around that nut, put the 21 millimeter socket, take this bolt out. Oops. And there's the arm. Take the new arm and slide the bolt in position. And it goes on this way. If you look, there's a little raised section on that. This section's flat, where the bolts goes. Slide that in position. And put the nut and the washer on the backside. Then you're gonna snug...snug that up for now.
Put this bolt. Line this up here. Once you get that in a little bit, then grab this arm. Push this in a little bit, as you try to slide this down. If you can get the bolt to come through a little bit, then you can get this lined up. Just like that. Move it here a little more. There you go. Then you just hold this arm, and we hammer the rest of the way in. There you go. Take the washer and then the nut, put it on the end of the bolt. Just make sure the wires aren't in the way when you go to tighten this down. I'm gonna put the wrench on here. I'm gonna snug this down.
It is recommended that you replace this bolt when doing this job. We're gonna use a 21 millimeter, and I'm going to torque this with the wrench over here to 74 foot pounds. And then, the second pass you're gonna go 90 degrees. So you can put an angle meter on here, or if you don't have one, just do the best you can. All right. And then I'm just gonna tighten this bottom one down. Just snug it up tight. Now, put the tire back on. Now I'll torque these lug nuts to 140 foot pounds in a star pattern, that way it tightens the wheel down evenly. And I'll just go around again, double check.
Tools used
Hi. I'm Mike from 1AAuto. We've been selling auto parts for over 30 years!
Use a breaker bar and a 22mm socket to loosen the lug nuts with the vehicle on the ground. Just go around and loosen them all. Raise and support the vehicle. We're using a two-post lift. You can use a jack and jack stands. Use a socket and finish removing the lug nuts. Take the wheel and tire off.
The wheel and tire is stuck to the brake rotor. I have to put a lug nut on it. Put a second one on the opposite side here. Just lightly take a dead blow. We'll just break it free. It might take a couple hits. It might take one hit. The lug nuts keep it from falling off. Just put the wheel and tire aside.
If the shock bolt that goes through the top is covered with dirt, I’m going to take some rust penetrant, spray it on here, and with a wire brush, try and knock some of that dirt free so when I go to remove the nut it spins off the threads easily, so it doesn't get clogged up with dirt. I have to clean some of the dirt off the end. For the lower one, I'll do the same. Spray it with some rust penetrant.
I'll start by loosening but not removing the upper one. There isn't quite enough clearance to get an 18mm deep socket in here and a ratchet, so I'm going to use an 18mm box wrench. I'm going to loosen the nut, and I have a 15mm wrench to counterhold the bolts. Just keep going until you have the nut almost all the way off. You can change to the open ended part so it'll go a little quicker. I've got this loose but not all the way out. I'm going to spray some more rust penetrant in here. It is moving freely, but I want to make sure it comes out of this part of the shock.
The shock is mounted to the lower control arm with a large bolt that goes all the way through the control arm and is held on with a flange nut. Both of these are 21mm. I'm going to use a 21mm socket and a breaker bar. I'm going to hold the end of the bolt. I'm going to use a 21mm box wrench to break the nut free. It's a lot easier sometimes to break the nut free than try to turn the whole bolt.
I turn this pretty far out on the threads, and then I will use a floor jack to support the lower control arm and remove the lower bolt. Use our floor jack. I'll just lift up on the control arm just a tiny amount. Unthread this by hand now. Let's lift up on the jack a little bit. There it is. We're going to remove this upper nut from the long bolt. Give it a good push. Pull straight through, which is good, or else grab the shocks, and pull the bolt out. I'm just going to push the brake line just gently out of the way. I pulled the bolt out. I'm also supporting the shock. Just like that. Now, I'm just going to work on walking the shock out of the mount here. The hinge is caught on some dirt.
This is the original shock from our vehicle, and a brand new shock from 1AAuto.com. It comes wrapped with this shipping strap so it doesn't fully extend like this one is. I will actually install it with that in there. It also comes with this little conical washer to match the original. That'll go on the inside here. This'll fit great and work great in your vehicle.
I'm going to loosen this bracket here, these two 15mm bolts using a 15mm socket and ratchet. I'm not going to remove them, I'm just going to loosen them. That should give me enough movement. Install our shock. Okay, just slide the long bolt through. Install the nut. Tighten these bolts back up. Just go until they get tight. Now you cut this shipping strapping with some side cutters. The shock will start to expand.
This washer that comes with the new shock, the cone part is going to match the cone part in the control arm. Slide this over. You might have to push up the shock a little bit. Put the bolt through, just like that. The washer will go back around this side, and the large nut. Torque the lower bolt and nut to 74 foot-pounds. Lower the floor jack. I'm going to use a 15mm ratcheting wrench on the bolt end and counterhold the 18mm nut and snug this up. Counterhold the nut with the 18mm, and then torque the bolt's head 52 foot-pounds. It would be ideal if I could torque on the nut, but I can't get it in here with a deep socket.
Reinstall the wheel and tire. Thread the lug nuts on by hand. Now lower the vehicle to the ground and torque the lug nuts. Torque the lug nuts to 140 foot-pounds in a cross pattern.
Thanks for watching. Visit us at 1AAuto.com for quality auto parts, fast and free shipping, and the best customer service in the industry.
Tools used
Tools used
Tools used
Remove the wheel, I'm gonna use a 22-millimeter socket. Take the wheel off. So that this wire doesn't break, I'm going to disconnect this wire right here, just use this pick tool. Just slide this out, right there. You can disconnect these retainers, just slide these off. That'll give me more slack. Just let that hang, that's good. I'll take a 21-millimeter wrench. There's a nut right here, put it on that nut. And then 21-millimeter socket, take this bolt and loosen it up.
Just make sure you don't get too close to the rotor because once this bolt comes out, it is going to tip forward. There's the nut, it's a nut and a washer. Then you could push on the rotor a little bit. Try to pull this bolt out and just slide that out. Before I loosen up this cam nut right here, I am going to mark it. Just take a marker that you can use. That way, at least, the alignment's closer when you're done. You're still going to need to get an alignment done anyway, but at least it'll be close. All right, that's good.
Now I'm going to use a 21-millimeter socket to take this nut off. And then on the backside of the stud, you could use a 21-millimeter on the nut on that side but sometimes it's better just to use a 10-millimeter, put it on the end of the stud, prevent it from spinning, and loosen this up. Take this nut off and take this cam washer off. Then just hold the arm and then try to pull the stud and nut the rest of the way through. If you have to, you can use an air hammer. Sometimes that's all it takes. All right, and it slides out. You can grab the arm and just slide it out. There you go.
Now take the new arm and just slide it back in position. This wire is going to go around on that side. And take this bolt and stud, slide that back in position. And take that cam washer, slide that back on, put the nut back on. And with the 10-millimeter wrench on the backside, you can snug this up. Now just make sure your line lines up where you marked it. Then you can tighten that down a little bit more. Try to put this arm in position where it would be if the vehicle is on the ground. Generally right there is good. That's good.
Then you can tighten this nut to 103 foot-pounds. Make sure you have that 10-millimeter wrench on the other side. It's good. I'm going to take this bolt, line this up here. Once you get that in a little bit, then grab this arm, push this in a little bit as you try to slide this down. You can get the bolt to come through a little bit, then you can get this lined up just like that. Maybe a little more. There you go. And then just hold this arm while you hammer the rest of the way in. There you go.
Take the washer and the nut, put it on the end of the bolt. Make sure the wires aren't in the way when you go to tighten this down. And then put the wrench on here, then snug this down. It is recommended that you replace this bolt when doing this job. I'm going to use a 21 and I'm going to torque this with the wrench over here to 74 foot-pounds. And then the second pass you're going to go 90 degrees so you can put an angle meter on here, or if you don't have one, just do the best you can. All right.
And for the ABS wire, the wheel speed sensor wire, the clip was broken on the old one. So we're just going to use a wire tie and just trim it off. And then take these other clips. I'm just going to slide onto the bottom just like that. There you go. Now put the tire back on. Now, I'll torque these lug nuts to 140 foot-pounds in a star pattern. That way it tightens the wheel down evenly. And I'll just go around again, double check.