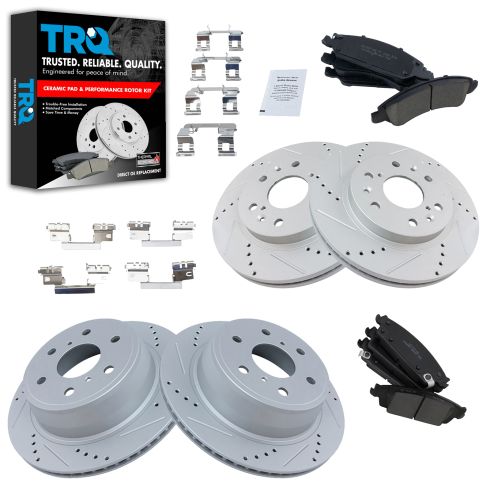
1APBS01098-Chevrolet GMC Cadillac Front & Rear Ceramic Performance Brake Pad & Rotor Kit TRQ Performance BKA12821

Replaces
2017 Cadillac Escalade ESV without Brembo Brake Package Front & Rear Ceramic Performance Brake Pad & Rotor Kit TRQ Performance BKA12821

Product Reviews
Loading reviews
4.77/ 5.0
112
112 reviews
Awesome price and service...
August 4, 2018
The brake kits were as described and work great. And the price couldn't be beat.
Brake kit
March 24, 2019
Great kit and well priced.
Quality parts
April 18, 2019
Quality rotors and pads, work very nice. Better than stock
Will buy again
April 29, 2019
Installation was quick and easy. If it's your first time installing drilled and slotted rotors, remember they are directional. I will definitely buy a set for my other truck.
Seem to be pretty good
August 14, 2019
These pads and rotors seem to be pretty good. They are not labeled for my vehicle specifically (18 Tahoe) but they did fit and matched the oem parts. I have noticed better stopping performance compared to the old worn out pads and grooved rotors. Time will tell how they hold up.
November 20, 2019
Fit good fash shipping and good description of parts
Great price
December 25, 2019
These work amazing and look great as well.
January 6, 2020
Great quality and fit perfect.
Silverado brake kit
January 31, 2020
Good product, good shipping
Exactly what I ordered
February 25, 2020
Perfect fit for my 2015 Silverado Z71 crew cab. Quality parts for a reasonable price!
Rotors and brakes
March 7, 2020
The rotors are good quality, the slots and drilled holes looks like the brake dust will leave the area adequately. The brake pads and parts looked great, they didn't get the squeaking when you first time use of them. Over all the product was very easy to install and they work great.
Front & Rear Brakes for my 2014 Silverado
March 23, 2020
Totally happy with my purchase and appreciate the helpful video offered as well. Will be recommending 1A Auto to my friends for sure.
Silverado brake set
April 1, 2020
Fast delivery,easy install, appears to be quality product, looks good as well on my 2017
Very satisfied customer!
April 3, 2020
I installed these brakes on my 2014 GMC Sierra. Its lifted and on large wheels and tires. For one, they look great, and give a little detail behind the wheels. Looks aside, the installation was fast, and both the rotors and pads were good quality! They definitely do the job. No issues so far, after about 200 miles. Ill continue to buy this product!
Brake job
April 13, 2020
Parts came fast had one problem with pads they took care of it right away no problem people I talked to were very nice and helpful thanks
Purchase
April 21, 2020
quality stuff, I like to change my own brakes and rotors, and these fit like a charm, I will use 1aauto again
Great Product exact fit
April 23, 2020
The complete order showed up within 24 hours of order placement. Product is an exact fit and a great cost savings compared to anything I've shopped elsewhere. Easy to install and everything needed was included. Brakes and rotors are working fine.
Brakes and Rotors
May 8, 2020
Quick delivery, Very good quality. Will be ordering again thank you.
Brake kit
May 19, 2020
Your brake kits are great and dependable.
Brake & rotors kit
June 27, 2020
I love the ceramic brakes and slotted/drilled rotors far as stopping performance goes wud buy them again for other vehicles at a reasonable price
La mercanca est al 100
July 6, 2020
Muy buen servicio y mucha calidad en los productos de frenos para m Chevy Silverado gracias a su equipo
Brake set
August 4, 2020
These were a perfect fit for my 2014 GMC Sierra 1500 All Terrain. Easy to install and work excellent. Great price.
September 14, 2020
Front and rear brake kit is awesome. It was easy to install. Brakes are immaculate now. And they look awesome on my truck. To upgrade didnt cost much. The results are awesome!
1A auto parts
September 23, 2020
recently purchased brakes and rotors for my 2014 Silverado. They fit perfectly. The videos I found on YouTube were excellent,all the information was spot on. Even the places where difficulty may occur were pointed out. 1A is an A1 company. Since my brakes worked so will I replaced my cracked tail lights as well.
Great price awesome product
September 25, 2020
Wicked easy to install. No rough break in. I haul a 12k lb enclosed 25ft race trailer and a 12k lb 36ft 5th wheel. Stops on a dine every time!
I have already recommended 1A as well as these brakes to Multiple people I work with.
Rotors and pads 2015 Silverado
October 1, 2020
Purchased these to replace factory parts. Thus far all is well, braking from higher speeds smooth and sure. There has been no shutter or noise of any kind and I am confident in trailer towing now with these new brakes.
Great service
October 10, 2020
Ordered up my parts, all were delivered in good shape in a timely manner. The fit was correct. I will be ordering parts from 1a Auto again.
Great value
January 8, 2021
Three kit is unbelievably cheap compared to most but the quality is great, Ive had there in for about two weeks and have had zero squeaks and stop very well. Have not stopped with a load but have no doubts
Great value.
January 17, 2021
Almost perfect. Rotors and pads are great. The hardware (clips) were low quality and didnt seem to fit tightly.
Performance Brake Pads and Rotors
January 29, 2021
The installation was straightforward on my 2014 Silverado 1500 and if you havent done a brake job yourself 1A Auto has a step by step tutorial on their YouTube channel.
I have noticed a significant difference compared to the OEM pads/rotors under normal driving conditions and everything feels like it should. I pull a boat quite a bit but have not yet tested them out under tow. I have no doubt theyll excel compared to OEM. 10/10
Great Product!
March 11, 2021
Just watch the video and you can get er done in just a few hours. The parts fit perfect and I saved some money! Have A Great 1... The Pool Guy...
Great product at a great price
March 21, 2021
This kit was perfect for my truck. It is a fantastic value when compared to the local car part stores. Comes with all the clips and everything necessary to install. Truck rides so smooth now. Will order from you again in the future. Thanks 1A Auto!
Great experience
April 17, 2021
I had a great experience with The finding of the parts. The ease of the checkout process and the speedy delivery service. I would recommend 1A Auto to anyone for their car part needs.
Amazing
April 22, 2021
Amazing price, perfect arrival time and everything was perfect!
Easy install perfect braking
April 25, 2021
Took me about a hr and a half to install all 4 sets and the stopping power is unbeatable for the money.
Top quality
April 26, 2021
The brake kit I purchased was the best quality I've seen anywhere! They arrived ahead of schedule, and with the installation video it was a peice if cake to install. I highly recommend 1A auto for all your automotive needs!!
Brakes
May 27, 2021
The best so far. I havent had any problems and very responsible price . Will be shopping with you guys again
Great breaks!
June 30, 2021
Great breaks and rotors. Exact fit and were shipped fast.
Good Value
July 21, 2021
Perfect fit went together smooth Good quality product.
Best quality and value
July 22, 2021
Great quality, thats why I always choose 1A auto!!!!
July 24, 2021
I didnt do the install a mechanic friend of mine dead but it was nice to have all of the parts needed and one kit front and rear.
TRQ front and rear rotors and pads for 2017 Chevy Tahoe Z71
July 30, 2021
Parts are very high quality and fit perfectly. Parts arrived on time. Parts definitely improved the braking on the vehicle.
August 17, 2021
Even better looking once they were installed.
Brake pad and rotor kit
August 22, 2021
The rotors look awesome, they stand out on my truck and the quality is great.
Double bonus!
August 27, 2021
I cant remember when the order process said that I would receive my order, but I believe my order came a day early. Bonus! I was able to maintain the appointment that I had today for the installation. The guys at the garage obviously allowed me to purchase the parts. So, when i picked the truck up the first thing they asked was where did I buy the parts. They were pleased with quality and had no problems. Another bonus!
So far so good!
[{"url": "https://wac.edgecastcdn.net/001A39/prod/media/pNISJll75W64CYGsite/927ab3d09ee655e82ca2082b9b56e2a9_1631537588806_0.jpeg", "caption": ""}]
September 13, 2021
They look like quality parts. I got 94,000 on the original pads and rotors - we'll see how long these go. I do feel like it stops better.
November 19, 2021
Havent had them long but can seems to be a great product. Install was quick and easy all parts where what I needed
November 21, 2021
They where delivered fast and install went easy. They dress up the wheel area of the truck very nice ND stop on a dime.
December 2, 2021
Looks good stops good I'm happy with the product
Great kit
[{"url": "https://wac.edgecastcdn.net/001A39/prod/media/pNISJll75W64CYGsite/b9149a386b50b1d160e37b398c95bd9d_1640283658427_0.jpeg", "caption": "Fit right in."}]
December 23, 2021
Love the new kit, feels live my truck stops quicker.
February 21, 2022
Great feeling and looking breaks. Smooth stops. Easy to install.
February 21, 2022
Great products at a great price. Shipping was fast.
February 22, 2022
Great product. Very satisfied. Install was easy !!!
March 10, 2022
Perfect figment. Had them 6 months with no problem. Stops well with low dust. Just ensure the parts are in good order as the boxes were pretty beat up upon delivery. But thats not 1As fault.
March 18, 2022
Parts fit perfectly!
Highly Recommend, works extremely well!
March 30, 2022
I installed this product on my 2017 Chevrolet Silverado 1500. Everything fit as should. I had a minor issue with part of the order when it was shipped and got in contact with customer service about the part and they got a replacement part out to me within a couple days. I was very pleased with the customer service people I talked with. I have had no issues since installing the product my vehicle seems to stop easier with out much pressure having to be applied to the brake pedal. The few times so far where Ive had to stop quickly everything was very responsive and stopped the vehicle much faster than on stock. Would very much recommend this to anyone looking to upgrade. But I mostly installed this setup for hauling, and Ive done some heavier loads and havent had any issues with brakes overheating or any uneven wear on pads or rotors. I have had these installed for almost 5k miles now and havent really seen much of any wear start. Ive been completely satisfied with this product!!
April 4, 2022
They warped very quickly
[{"url": "https://wac.edgecastcdn.net/001A39/prod/media/pNISJll75W64CYGsite/68b32b30c7263c2f95d492dbf450062c_1650046448426_0.jpeg", "caption": "Fronts"}, {"url": "https://wac.edgecastcdn.net/001A39/prod/media/pNISJll75W64CYGsite/cf888ca768087f202d1192c0eb764bd1_1650046494083_0.jpeg", "caption": "Rears"}]
April 15, 2022
Really nice kit. Direct bolt on with no modification as described. Shipped really fast. 10 out 10 highly recommend. Amazing product for the price.
Super fast shipping
April 30, 2022
Shipped super fast. Went right on no problems at all. Look like great quality time will tell but super happy they look great.
June 9, 2022
great parts and prices
Great set of brakes
June 17, 2022
I love these brakes. My truck stops like a car.
Very Nice!!!
June 26, 2022
Great product. Easy to replace both disc and pads. Beautiful disc design.
July 20, 2022
This one star review has nothing / Zero to do with 1A Auto. 1A auto has been great to deal with!! IT has to do with the Squeaks that I have received with my new brake pads. They have been noisier than the old ones that I replaced. Hopefully it is a break in period but as of right now (1 month after install) I'm not happy with the pads and rotors.
TRQ is for you. When times are tough , they are tougher.
July 24, 2022
I use TRQ brake products exclusively. The quality and value can not be beat. I am always amazed at the fitment and finish. It is what you would expect at twice the price. Their quality holds up over the long haul too.
August 12, 2022
Parts work perfect, all the hardware????
It looks good quality for 1/2 $????????
August 23, 2022
Same feeling like my stock ones don't feel any better. its just for the looks I guest
Works great
August 23, 2022
Worked great on my 2016 GMC Sierra. Very small packet of break grease included, I would recommend getting some additional grease but the product it self is great.
??????????
September 10, 2022
Just installed this package on my 2015 Z71 super easy perfect fit, great product
Great product, stop better than factory
September 28, 2022
Excellent, great product, highly recommend.
Great purchase.
September 29, 2022
These brake parts fit perfectly. So glad I upgraded. My mechanic was so impressed when he opened the box he called and questioned where I got them.
Thanks.
October 15, 2022
Easy replacement. Smooth operation! Would recommend and watch the videos for great tips.
October 28, 2022
Great quality, very quick shipping.very pleased!
Always a win
November 4, 2022
Great quality, perfect fit, awesome company!
November 18, 2022
Work well.
Awesome brake/rotor product
November 21, 2022
Great product -reasonable priced-quick delivery
Quality product for decent price.
December 10, 2022
Everything went smoothly with install thanks to the step by step videos. Breaks are smooth and work as they should. They could have sent more moly grease, that ran short.
February 7, 2023
Great product. Videos help you get what tools you need before you start.
February 22, 2023
Everything fit perfect.
Great Bang for your Buck!
March 9, 2023
Fast shipping and great pricing! This package came with everything I needed for a smooth install. I have only put a couple of hundred miles on them but I am very please with the performance so far!
Slotted/drilled brake rotor package.
March 15, 2023
This brake package is a great product. Not only do they look great, but they actually perform better than the original brakes did.
The installation was very easy. Everything matched up with the original equipment.
I cannot give a five star rating until I see how they hold up after about 20 to 30 k miles. So far everything has been superb
Chevy rotors and brake shoes replacement
April 22, 2023
All parts fit like a glove and great pricing. Would definitely order again
Excellent brake kit
April 23, 2023
As described, fast shipping via ups. Excellent quality, love the brake pads, brakes very smoothly without residue on rim.
2nd time around
May 3, 2023
This is my second set. That is how much I like these brakes and rotors.
Work great
May 5, 2023
Fit really well and work great on my 16 Chevy Silverado half ton. No issues for two weeks
May 16, 2023
2015 GMC Sierra 4wd, Came with everything you need, Will buy again
Silverado brakes
June 9, 2023
Parts arrived on time, everything was in order with help from my neighbor we installed front and back brakes on my Silverado. Good video on how to install was helpful.
Dusty and Warp
[{"url": "https://wac.edgecastcdn.net/001A39/prod/media/pNISJll75W64CYGsite/f05da22b6835fac0f05cff7ba707ce4b_1690778318881_0.jpeg", "caption": ""}, {"url": "https://wac.edgecastcdn.net/001A39/prod/media/pNISJll75W64CYGsite/2bbac0d87526efc0d4c86e0af1838496_1690778346051_0.jpeg", "caption": "Warranty"}]
July 31, 2023
If I could I would rate 0. Called for replacement after one year Warp and very dusty. I wish I could submit photos Very disappointed
September 3, 2023
Amazing product!
September 11, 2023
Parts arrived on time and well packaged. The price was amazing compared to other sites and stores. I do recommend doing your homework for break in period on these brakes & rotors plus getting extra ceramic grease for the back of pads to help with the vibration many others have mentioned.
September 25, 2023
Nothing but great words from me with 1a. These brakes are amazing, haven't towed my trailer yet but they look amazing, they stop amazing and all of the information from 1a was unmatched with any other supplier.
October 7, 2023
Good quality
Good Customer Service
November 1, 2023
I ordered the kit and got pads one day then 2 days later I got the front rotors. I waited 2 weeks for UPS to deliver the rear rotors and then UPS filed a claim. When A1 found out that I haven't received my rear rotors, they sent another set right away.
Great upgrade from stock parts.
November 28, 2023
All parts fit well and replaced stock parts seamlessly. The only trouble I had was the stock T30 set screw on the stock rotors, but once that was out the job was quick and easy.
Perfect fit
January 2, 2024
Perfect fit. The Tahoe benches like new again.
Works great
January 9, 2024
Great set of pads and rotors. Put on my 2017 GMC Sierra SLT
2015 Chevy Silverado
January 12, 2024
Great fit no issues! Thanks guys.
Great product
January 18, 2024
I spent a Sunday installing these brakes on my 2019 Chevy Tahoe LT. I'm very impressed at how quickly I received the brakes in the mail, how thorough the TRQ instructional video was explaining every single step about installing the brakes, and how well they work after installation. Thank you for the great products and website. Very helpful.
2014 Chevy Silverado brake replacement with rotors
February 27, 2024
Product was just as described. Perfect fit no hassle. Everything was shipped quickly and came together.
Great brakes!
March 2, 2024
This brake and rotor set has improved my stopping distance dramatically and makes pulling my trailer much more enjoyable. Also, as always the ordering process was very quick and painless!
Great value
April 15, 2024
This product was great. It shipped fast and was easy to install. The only issue I had was that the groove on one of the front rotors was slightly too deep so it caused rubbing on the wheel hub. This didn't end up to big of an issue where we were just able to grind it down a little and it worked. Otherwise I was very impressed with the product.
April 22, 2024
Everything went well. Fit was good. Product arrived in pretty good shape. Not real happy with the quality of the brake pads. They dust my wheels pretty bad. So far so good though.
Awsome quality
May 14, 2024
Great quality break kit at a good price!
May 23, 2024
Terrible! Rotors are fine. The pads are awful. After 5k miles brake dust like crazy, have to wash my wheels weekly, and the stopping power is worst than my bad pads i replaced. What a waste!!
Mpena
May 24, 2024
They are perfect. Completely satisfied. Glad I purchased them from you guys.
Thank you
May 25, 2024
I love your website very easy to order and fast shipping very helpful description of products great price thanks ??
[{"url": "https://wac.edgecastcdn.net/001A39/prod/media/pNISJll75W64CYGsite/7b371cf35b8fe582ae451be4faebd396_1717066468126_0.jpeg", "caption": "Looks good works better"}]
May 30, 2024
Looks fantastic. Stops like a race car. Thanks
Brakes
June 11, 2024
Very good brakes
July 11, 2024
Fastest delivery and fit exactly perfect!!!
2019 GMC Yukon
August 28, 2024
Good Parts
Silverado Brakes
September 6, 2024
Product came quick, fit perfectly, and video was spot on.
Brakes 2015 Silverado 1500
September 14, 2024
Everything was great worked as it should - Thank you
As expected
October 18, 2024
Great price, works as expected
Customer Q&A
Do these rotors have directional vanes?
May 4, 2019
10
Straight vanes
May 5, 2019
Robert W
10
Hello there
Thats a good question but that is some thing I did not even know about. So I never checked
Thank you
May 5, 2019
WILLIAM R
10
These will come with directional vanes.
May 5, 2019
Emma F
10
Yes,1APB01098 does have the directional vanes. This product is an excellent fit for my 2015 TAHOE.
May 6, 2019
Joseph H
Are these China rotors?
March 1, 2020
10
Thank you for your inquiry. These are manufactured by TRQ, TRQ is a high quality, high-end name brand that we offer and back with our 1A Auto Limited Lifetime Warranty. TRQ works with a variety of manufacturers around the world to produce these products. Please let us know if you have any further questions.
March 1, 2020
A C
What parts fall under Lifetime Warranty?
April 25, 2020
10
All of these items pictured are covered under a lifetime warranty against manufacturing defects. Please do not hesitate to contact us with any further questions.
April 25, 2020
Emma F
What is brembo brake package ?
August 19, 2020
10
Hello,
That is where your vehicle has performance brakes.
August 19, 2020
Corey M
what is G coated Rotor?
February 12, 2022
10
Hello, it is a clear coating to prevent rust and corrosion.
February 12, 2022
Ricale A
Do these work better for towing?
May 30, 2022
10
That is what I purchased them for. I have a 2014 GMC Sierra and pull a 20' camper. Have been working great so far. Been on about a year.
May 30, 2022
H A
10
yes they do work better
June 9, 2022
Sohrab V
Will they fit 2017 GMC Sierra Denali ?
September 12, 2022
10
Yes, this kit will fit the 2017 GMC Sierra 1500 Denali.
September 13, 2022
Andra M
Do these fit front brembo calipers?
December 7, 2022
10
This part will not fit your vehicle, but we may have a part that is listed to fit.
Please enter your vehicle's year make and model in the search bar at the top of the page. This will display parts guaranteed to fit your vehicle. Just be sure to verify all of the information shown in the Vehicle Fit tab before ordering.
December 7, 2022
Ricale A
Cadillac is a registered trademark of General Motors Company. 1A Auto is not affiliated with or sponsored by Cadillac or General Motors Company.
See all trademarks.


