/2008 Saturn Aura with 300mm Front Sway Bar Links with Hydraulic Steering without RPO Code FE5 (Performance Ride Handling Suspension) Front 14 Piece Steering, Suspension, & Drivetrain Kit TRQ PSA66552
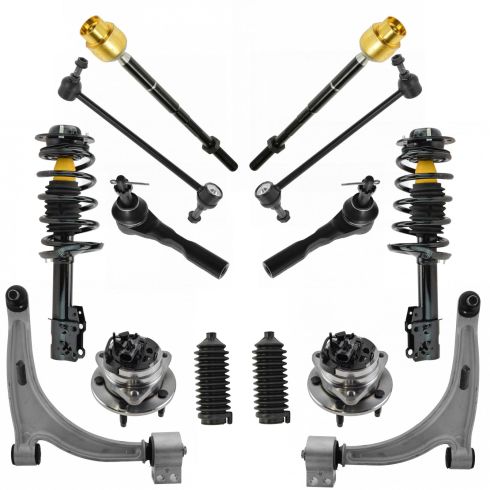
2008 Saturn Aura with 300mm Front Sway Bar Links with Hydraulic Steering without RPO Code FE5 (Performance Ride Handling Suspension) Front 14 Piece Steering, Suspension, & Drivetrain Kit TRQ PSA66552
Kit Includes: (2) Front Sway Bar Links (2) Front Lower Control Arms with Ball Joints (2) Front Strut & Spring Assemblies (2) Front Outer Tie Rods (2) Front Steering Rack & Pinion Bellows (2) Front Inner Tie Rods (2) Front Wheel Bearing & Hub Assemblies
Specification
Steering / Suspension Option
with 300mm Front Sway Bar Links
without RPO Code FE5 (Performance Ride Handling Suspension)
with Hydraulic Steering
Location
Front
Product Features
100% New: Manufactured to tighter tolerances for extended service life
Upgraded Elastomer: Premium seals to extended service life
Moly Greased: Specifically-designed grease shield to reduce premature wear
Restored Performance: Refreshed steering system for improved road-feel
TRQ drivetrain kits are manufactured using premium raw materials to restore original performance. Each TRQ drivetrain component is designed to be a direct, maintenance-free replacement to the stock unit. To extend the service life of your drivetrain, TRQ recommends replacing wheel hubs, bearings, and constant velocity (CV) drive axles at the same time to ensure even wear of components and improved ride comfort. All products are fit and road-tested in our Massachusetts R&D facility to ensure we deliver on our promise of Trusted Reliable Quality.
Replacing struts used to require specialized tools to compress, remove, and transfer the old spring and mount. Our Pre-assembled, complete strut & spring assemblies come with all new parts and make the job much quicker and easier for the do-it-yourself mechanic.
Strut & spring assembly contains:
Upper Strut Mount
Strut Bearing
Coil Spring
Boot & Bumper Kit
Gas-charged Strut
Install Tip: When replacing steering components, have a professional alignment performed afterwards. This ensures proper tracking and even tire wear.
Our steering and suspension components are pre-greased and sealed for long life and do not require the extra maintenance typically required by greaseable versions.
Item Condition:New
Attention California Customers:
WARNING: This product can expose you to chemicals including Chromium (Hexavalent Compounds), which is known to the State of California to cause cancer, and birth defects or other reproductive harm. For more information, go to www.P65Warnings.ca.gov
Lifetime Warranty
This item is backed by our limited lifetime warranty. In the event that this item should fail due to manufacturing defects during intended use, we will replace the part free of charge. This warranty covers the cost of the part only.
FREE Shipping is standard on orders shipped to the lower 48 States (Contiguous United States). Standard shipping charges apply to Hawaii and Alaska.
Shipping is not available to a P.O. Box, APO/FPO/DPO addresses, US Territories, or Canada for this item.
Expedited is available on checkout to the United States, excluding Alaska, Hawaii.
Final shipping costs are available at checkout.
How to Replace Sway Bar Link 2005-10 Chevy Cobalt
Created on:
Tools used
15mm Wrench
Hammer
Torque Wrench
18mm Wrench
8mm Wrench
Jack Stands
19mm Wrench
19mm Socket
Ratchet
Floor Jack
1. Testing the Stabilizer Link
Turn the wheel by hand or with the steering wheel
Try to move the stabilizer link by hand
A clanking or rattling noise indicates a faulty stabilizer link
2. Removing the Wheel
Loosen the lug nut covers with a 19mm socket
Pull off the hub cap
Loosen the lug nuts with the vehicle on the ground
Raise the vehicle with a floor jack
Secure the vehicle on jack stands
Remove the lug nuts
Pull off the wheel
3. Removing the Stabilizer Link
Apply penetrating oil to the stabilizer link bolts
Attach an 18mm wrench to the top stabilizer link nut
Attach an 8mm wrench to the top stabilizer link stud
Turn the 18mm wrench to remove the nut
Attach an 18mm wrench to the lower stabilizer link nut
Attach an 8mm wrench to the lower stabilizer link stud
Turn the 18mm wrench to remove the nut
Pull out the stabilizer link
4. Installing the New Stabilizer Link
Put the new stabilizer link into place
Start the nuts onto the stabilizer link
Attach a 15mm wrench to the upper stabilizer link bolt
Tighten the nut with a 19mm socket and ratchet
Attach a 15mm wrench to the lwoer stabilizer link bolt
Tighten the nut with a 19mm wrench
Tighten the nuts to between 40 - 45 foot-pounds of torque
5. Reattaching the Wheel
Slide the wheel into place
Start the lug nuts by hand
Tighten the lug nuts preliminarily
Lower the vehicle to the ground
Tighten the lug nuts to 100 foot-pounds in a crossing or star pattern
Put on the hub cap, lining up the hole with the tire valve stem
Tighten the lug nut cap
Brought to you by 1AAuto.com, your source for quality replacement parts and the best service on the Internet.
In this video, we're going to show you how to replace a front stabilizer link. The symptom of a bad stabilizer link is if you're hearing a clunking in the front of your car, but when you go around a curve, either left or right, the clunking seems to go away. That's usually a sign that your stabilizer link is starting to loosen up. Tools you'll need are 8mm to 19mm wrenches as well as a hammer.
Turn your wheel all the way to one side or the other. Then you can reach in behind and you can see it here. This is the top of your link. You can reach in behind and grab that with your hand and shake it back and forth and if you can duplicate that clanking or rattling sound then that's what you need to replace.
Start out by using a 19mm socket or a wrench and loosen the plastic covers and then remove the wheel cover. If you don't have the benefit of air tools, you'll want to loosen the lug nuts up while it's on the ground, then raise and support your vehicle and then remove the lug nuts and the wheel.
Right here is our stabilizer link. Use a little bit of penetrating oil on the upper and lower, let that sit for awhile. We've got an 18mm wrench on the bolt and 8mm wrench on the end of the shaft there. It looks like it actually coming loose, there goes that bolt. Get that started. Put this on there and I'm going to put this one on down there and same thing. Here's a close up look. I've got the 18mm wrench on there. The 8mm wrench is just holding that stud in place and I just keep flipping back and forth with the larger wrench, grabbing onto the nut and removing it. I'm just going to speed up the tape here. It takes a little while to get these things apart. It's a tedious task of getting the wrenches in there, holding it with the smaller wrench and then using the small one and then just angling the larger wrench in there as best you can. Eventually it comes apart.
Here's a new link from 1A Auto. Iit's a little bit different but it actually makes it easier to install. You'll need a 15mm wrench to hold this on that side and then a 19mm socket and ratchet to put the bolt on. We're going to put down in. It mounts in just like your original. Start the locking bolt on here and we'll start the locking bolt down here. Up top, I put my 15mm wrench through from the backside and then a 19mm socket and ratchet. I'll just speed it up as I tighten it up with the ratchet and you want to get it nice and tight and probably 40 to 45 foot-pounds. Then continuing on down to the lower, it's the same as taking it apart. You really can't get a wrench in there or a ratchet in there so you just have to use a wrench. I used the 15mm wrench to hold the stud and then a 19mm wrench to tighten up the nut and it just takes a little while and, then, again, tighten it up between 40 to 45 foot-pounds.
Once you have the wheel back in place then you put the lug nuts on by hand and I just use my impact wrench to just tighten them preliminarily. Now with the vehicle on the ground, torque the lug nuts to 100 foot-pounds using a star pattern. Now put your wheel cover back on, there's a hole for the valve stem then use a socket to tighten up the retainers.
We hope this video helps you out. Brought to you by www.1AAuto.com, your source for quality replacement parts and the best service on the Internet. Please feel free to call us toll-free, 888-844-3393. We're the company that's here for you on the Internet and in person.
PSA66552
In Stock
Product Reviews
Loading reviews
4.75/ 5.08
8 reviews
5 Stars
4 Stars
3 Stars
2 Stars
1 Star
6
2
0
0
0
Everhthjng was great
Caleb
March 1, 2021
5 outta 5 for great service quick delivery and the videos are awesome . The whole thing ended in disastoe tho after getting all the amIng pretty clean new parts on my car.. I took it to. Garage for an allignment and safety inspection in which they failed to do the inspection correctly and didn't catch that 3 lugs for some reason we're missing on my tires causing me to almost lose said tire at 40 and causing all new problems on top of potentially ruining all these parts j out on . Not y'all fault but just wanted to say how things went.. hall were great
Front suspension kit
daniel
March 27, 2021
The parts are great and straight forward. I would have liked and front and rear all in one package.
g6 front end parts
Helen
April 2, 2021
So glad could find everything as a kit instead of trying to figure out which and what needed and came quickly. Would definately buy again from this company.
Suspension and drive train parts
K
April 6, 2021
The parts was good reliable parts and the customer service was excellent. 1Aauto is a quality company from my experience and try their best to take care of their customers. I recommend everyone to give them a try. Thank you 1Aauto company and staff!
Good service and fast delivery
Keila
July 15, 2021
I received the package so fast and Im very happy with the service.
Awesome
Antonio
November 29, 2022
Provided a good smooth ride.
Satisfied
Jerry
August 20, 2023
The parts were a direct oem fit and easy to install and a excellent deal for the price.
Daniel
December 16, 2023
Fits exactly like the original equipment did. Quality parts.
Customer Q&A
Will this fit an Aura XE with the 3.6?August 16, 2020
Zachary V
10
Thanks for your inquiry. This part is specific to vehicles with a particular set of options. We will need more information about your vehicle to confirm the fit.
The information we will need in order to assist you is your VIN.
August 17, 2020
Emma F
Do you ship to alaska?September 25, 2021
Kyle O
10
We do ship to Alaska, but his particular kit cannot be shipped there as its weight exceeds the shipping allowance.
September 25, 2021
Cristina P
Does it fit a 2012 ?October 16, 2021
John D
Does this kit come with the necessary headwear, like new bolts, the pins, ect?December 2, 2021
Aaron R
10
No, these parts will come as pictured.
December 2, 2021
Andra M
Hello does this fix for 2009 chevy Malibu ltz 3.6L?? Also does that shocked have adjusted to move lower or ??December 26, 2021
Nestor P
10
These parts will fit the 2009 Chevy Malibu. The strut and spring assemblies are built to the same specs as the OE parts.
January 6, 2022
Andra M
I have a 2008 Pontiac G6 GXP Coupe is the front struts different from a base model G6?December 3, 2023
Asia B
10
No they are same the only I found out about this kit is the wheel bears are for ABS brakes as the come with plug for abs. Other than that everything fits.
December 3, 2023
Robby A
10
This kit is noted to fit all 2008 G6 models
December 4, 2023
Daniel F
10
I installed this kit on a 2008 Pontiac GT and it was a perfect fit. Quality parts.
December 16, 2023
Daniel S
Customer service
877-844-3393
Monday - Friday 8:00am - 9:30pm ET Saturday - Sunday 8:00am - 4:30pm ET
Saturn is a registered trademark of General Motors Company. 1A Auto is not affiliated with or sponsored by Saturn or General Motors Company.See all trademarks.
Enter Vehicle Year Make Model
Specify your vehicle's year, make and model to guarantee fit.
Year
Make
Model
Options
Drivetrain
This part doesn’t fit a . Select from parts that fit.