Replaces
This part doesn’t fit a . Select from parts that fit.
Frequently bought together
Part Details
TRQ suspension kits are manufactured using premium raw materials and coatings for extended service life. Each TRQ suspension component is designed to be a direct, maintenance-free replacement to the stock unit. To extend the life of your steering and suspension components, TRQ recommends replacing components in pairs, sets, or kits. All products are fit and road-tested in our Massachusetts R&D facility to ensure we deliver on our promise of Trusted Reliable Quality.
Product Features
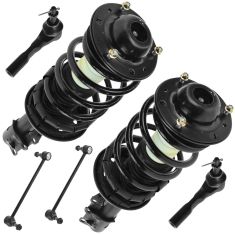
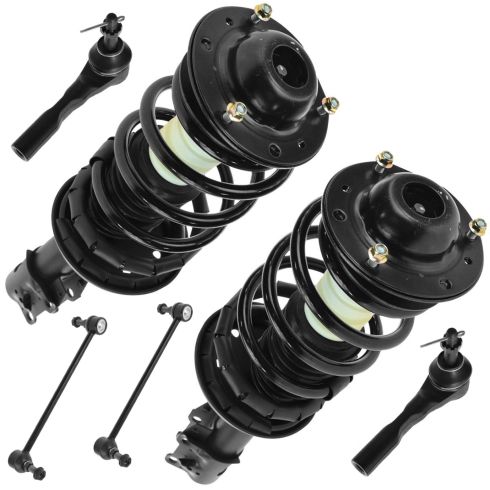
Replacing struts used to require specialized tools to compress, remove, and transfer the old spring and mount. Our Pre-assembled, complete strut & spring assemblies come with all new parts and make the job much quicker and easier for the do-it-yourself mechanic.
Strut & spring assembly contains:
Install Tip: When replacing steering components, have a professional alignment performed afterwards. This ensures proper tracking and even tire wear.
Our steering and suspension components are pre-greased and sealed for long life and do not require the extra maintenance typically required by greaseable versions.
Item Condition:
New
Attention California Customers:
 WARNING: This product can expose you to chemicals including Chromium (Hexavalent Compounds), which is known to the State of California to cause cancer, and birth defects or other reproductive harm. For more information, go to www.P65Warnings.ca.gov
Lifetime Warranty
This item is backed by our limited lifetime warranty. In the event that this item should fail due to manufacturing defects during intended use, we will replace the part free of charge. This warranty covers the cost of the part only.
FREE Shipping is standard on orders shipped to the lower 48 States (Contiguous United States). Standard shipping charges apply to Hawaii and Alaska.
Shipping is not available to a P.O. Box, APO/FPO/DPO addresses, US Territories, or Canada for this item.
Expedited is available on checkout to the United States, excluding Alaska, Hawaii.
Final shipping costs are available at checkout.


Created on:
Tools used
Brought to you by 1AAuto.com, your source for quality replacement parts and the best service on the internet. Hi, I'm John from 1A Auto. I hope this how-to video helps you out and the next time you need a car for your vehicle, think of the 1AAuto.com. Thanks.
In this video we're going to show you how to replace front struts on this 2007 Pontiac G6. Very much the same for any 2005-2010 G6 as well as the Saturn Aura. We're going to show you the right hand side. The left hand side is the same procedure and we always recommend that you replace your struts in pairs. And speaking of struts you want to get a nice new set of loaded struts from 1AAuto.com. We sell both brand name as well as private label: Jack and Jack stands, 10, 18, and 19 mm sockets, ratchet and breaker bar or pipe for some extra leverage, and 18 mm wrench and a hammer.
Start out by using just the socket to loosen the lug nut covers or the wheel cover as in this case. We're going to use impact or air tools sometimes. If you don't have the benefit of air tools just start with the vehicle on the ground, loosen the lug nuts then raise and secure the vehicle and remove the lug nuts, wheel, and tire and grab the suspension and turn the wheels or turn them with the steering wheel and there's a 10 mm bolt that holds the brake line bracket to the strut, remove that.
There are 2, 18 mm nuts on the back side of the strut. You want to use a ratchet, using a breaker bar and a pipe or something here for some extra leverage might be in order but you can see on our vehicle they come off with just a good amount of force. Use an 18 mm wrench to grab onto the nuts part of the stud of the stabilizer link and then use an 18 mm socket. Loosen up the nut and then it comes off. Use a hammer, be careful not to damage the bolts too much. You might want to put a nut on the back of them and although ours came out pretty easy, and just drive those bolts right out. Heading up top underneath the hood, there are three 13 mm bolts that hold the top of the strut in place and we'll fast forward as we remove those. You can remove 2 of them and then just loosen one up most of the way.
And as you're taking that last nut off, you can just keep your hand on the strut and as you take the nut off you will be able to lower the strut out. And then put the strut back in place and yes, you probably will notice that we're just putting the old strut back in. The struts in this car were in fine shape and so we're not usually ones to waste putting a new strut into a car that doesn't need them. We're just kind of doing this to show you how to do it but you put it into place, start one of the nuts on top and then start the other two and you can tighten those up and the top nuts you should torque to 20 to 25 foot pounds.
Back down under now, lift your brake hub assembly and steering knuckle back in to the strut. You can force it in there and you put one of the bolts in, and just kind of put it in a little bit and then as you move the knuckle around on the strut you should be able to get the bolt through. Then make sure you put the bracket back into place and you can get the second bolt through and if you like use a hammer or something just to drive the bolts all the way through. And it should be noted that we do recommend an alignment after you do this because the movement of these struts is something that affects the caster and camber of your wheels.
And torque those nuts to 85 foot pounds. Bring the sway bar link back into place and should you possibly feel the need to replace those sway bar links, 1AAuto.com, we sell those as well but then use a 18 mm wrench and an 18 mm socket and ratchet to tighten up that bolt. That bolt should be tightened somewhere around 70 to 75 foot pounds. Put the bracket that holds your brake hose back into place and start the 10 mm bolt on and tighten it up. Please install the wheel and put the lug nuts on by hand first just to make sure you don't cross thread them then tighten them preliminarily.
the vehicle on the ground, torque the lug nuts to 100 foot pounds using a star pattern. Now reinstall your hubcap and I'm going to do that with that 19 mm socket and then I'm just going to screw them in by hand. Also want to make sure that you line up the valve stem with the notch in the hubcap for the valve stem and I'll go ahead and fast forward through that.
We hope this helps you out. Brought to you by www.1AAuto.com, your source for quality replacement parts and the best service on the internet. Please feel free to call us toll free: 888-844-3393. We're the company that's here for you on the internet and in person.
Tools used
Tools used
Tools used
Brought to you by 1AAuto.com, your source for quality replacement parts and the best service on the Internet.
Hi, I'm Don from 1A Auto. I hope this how-to video helps you out, and the next time you need a part for your vehicle, think of 1AAuto.com. Thanks.
In this video, we're going to show you how to replace a front stabilizer link on this 2007 Pontiac G6. It's the same as any 2005 to 2010 G6, as well as the Saturn Aura. Not a difficult procedure. You will need jack and jack stands, and you'll want to jack up both front wheels off the ground and support it with jack stands. Then you'll need a lug wrench or a 19mm socket with a ratchet, maybe even a breaker bar and a pipe for some extra leverage. Then, after that, you'll just need two 18mm wrenches, one of those 18mm will have to have an open end.
Start out by using just a socket to loosen the lug nut covers, or the wheel cover as in this case. We're going to use impact or air tools sometimes. If you don't have the benefit of air tools, just start with the vehicle on the ground, loosen the lug nuts, then raise and secure the vehicle, and move the lug nuts from the wheel and tire.
Use an 18mm wrench to grab on to the nuts, part of the stud of the stabilizer link, and then use an 18mm socket, loosen up the nut, and then it comes off. Here's the fun part of the repair. You pull that down out of the way, and you can see the other end of the link right there. Put the 18mm wrench on the nut that's in the shaft, just like before. Then, there's not really enough room to get a ratchet back in there, so you basically just have to take a wrench and slowly, carefully, one eighth of a turn at a time, and I'll fast-forward the video as we do that.
Then, just reinstall the link as you took it apart. Go ahead and speed up as we tighten up that lower nut, and like I said before: it's not all that difficult; it just takes quite a bit of time because you can't move that nut too far each time.
Bring the sway bar link back into place, and should you possibly feel the need to replace those sway bar links, at 1AAuto.com, we sell those as well. But then use a 18mm wrench and an 18mm socket and ratchet to tighten up that bolt. And that bolt should be tightened somewhere around 70 to 75 foot-pounds. Put the bracket that holds your brake hose back into place, and start the 10mm bolt on and tighten it up.
Reinstall the wheel. Put the lug nuts on by hand first just to make sure you don't cross thread them, then tighten them preliminarily. Put the vehicle on the ground, torque the lug nuts to 100 foot pounds using a star pattern. Now, reinstall your hubcap and we're going to do that with that 19mm socket. I'm just going to screw them in by hand. Also, we want to make sure you line up the valve stem with the notch in the hubcap for the valve stem. I'll go ahead and fast-forward through that.
We hope this video helps you out. Brought to you by www.1AAuto.com, your source for quality replacement parts and the best service on the Internet. Please feel free to call us toll-free, 888-844-3393. We're the company that's here for you on the Internet and in person.
Tools used
Tools used
Brought to you by 1AAuto.com, your source for quality replacement parts and the best service on the Internet.
Hi, I'm Don from 1A Auto. I hope this how-to video helps you out, and the next time you need a part for your vehicle, think of 1AAuto.com. Thanks.
In this video, we're going to show you how to replace an outer tire rod on this 2007 Pontiac G6. It's pretty much the same as any 2005 to 2010 G6, as well as a Saturn Aura. We show you the right-hand or passenger side, but the left-hand driver side is the same procedure. You'll need a new tie rod or tie rods from www.1AAuto.com, jack and jack stands, 18mm and 19mm sockets with a socket wrench, maybe even a breaker bar or a pipe for leverage, tape measure, 18mm wrench, large adjustable or a 13/16 wrench, hammer, and a torque wrench.
Depending on what wheels you have, start out be removing the lug caps, and then we'll cover if applicable. Then, if you don't have the benefit of air tools, you're going to want to loosen the lug nuts with the vehicle on the ground. Then raise and support the vehicle. I'll remove the lug nuts, wheel, and tire.
Use a tape measure to get a general idea of a total length. You can use a reference point of the outer part of the boot, and then the outer part of the tie rod end, and just remember that number. On the end of the tie rod is an 18mm, so I'm using the socket and socket wrench to remove that nut. I'll fast-forward as I take off that nut.
Locate the nut at the end of the outer tire rod. We're going to go ahead and just loosen it just a little bit. I'm using a 13/16 wrench. You can use the metric equivalent. With a hammer, go ahead and give the end of that spindle a whack and pull the outer tie rod out. Then you can go ahead and unscrew it. I'll fast-forward through that. Be as careful as you can to not turn the inner tie rod.
Here, we're going to reinstall. You'll notice we are reinstalling the old one. There's nothing wrong with the tie rods on this vehicle. We just are doing this to show you how to do it. Tie rods from 1A Auto are going to be an exact match to the original. You may want to just measure the length. There could be a slight difference in length, and you would want to make sure you align it well.
Go ahead and put that 18mm nut back on the outer tire rod. I'm using a small pair of vice grips to hold the other part of the ball joint so that it doesn't spin as I tighten up that 18mm nut. There might be other ways that you would find easier to do it, but that's the one that I use. Then once I get it through, I'll be able to put the vice grip on the end that's coming through the nut. You can see here that once I take that socket off, I'll have plenty of room to put that on, and then use an open-ended wrench.
Here, I'm using that vice grip on the bottom, and I'm going to use an open-ended wrench to finish up tightening it up. I'll fast-forward through this. Now tighten up the nut on the inner tie rod that we just slightly loosened. Make sure that's snug up against the back portion of that outer tie rod. I'm just verifying that the tire rod is in somewhat of a right position, and it will be ready for me to take over to have an alignment done.
Install the wheel, and tighten up on your lug nuts. I'll go ahead and fast-forward through this. In a star pattern, go ahead and torque your lug nuts to roughly 100 foot-pounds. Reinstall your hubcap, and make sure that you line up the notch in the hubcap for where your valve stem is. Then, by hand, use your 19mm socket to tighten up those plastic lug nut covers. I'll fast-forward through that.
We hope this video helps you out. Brought to you by www.1AAuto.com, your source for quality replacement parts and the best service on the Internet. Please feel free to call us toll-free, 888-844-3393. We're the company that's here for you on the Internet and in person.
Tools used
Tools used
Tools used
Brought to you by 1AAuto.com, your source for quality replacement parts and the best service on the Internet.
In this video, we're going to show you how to replace a front stabilizer link. The symptom of a bad stabilizer link is if you're hearing a clunking in the front of your car, but when you go around a curve, either left or right, the clunking seems to go away. That's usually a sign that your stabilizer link is starting to loosen up. Tools you'll need are 8mm to 19mm wrenches as well as a hammer.
Turn your wheel all the way to one side or the other. Then you can reach in behind and you can see it here. This is the top of your link. You can reach in behind and grab that with your hand and shake it back and forth and if you can duplicate that clanking or rattling sound then that's what you need to replace.
Start out by using a 19mm socket or a wrench and loosen the plastic covers and then remove the wheel cover. If you don't have the benefit of air tools, you'll want to loosen the lug nuts up while it's on the ground, then raise and support your vehicle and then remove the lug nuts and the wheel.
Right here is our stabilizer link. Use a little bit of penetrating oil on the upper and lower, let that sit for awhile. We've got an 18mm wrench on the bolt and 8mm wrench on the end of the shaft there. It looks like it actually coming loose, there goes that bolt. Get that started. Put this on there and I'm going to put this one on down there and same thing. Here's a close up look. I've got the 18mm wrench on there. The 8mm wrench is just holding that stud in place and I just keep flipping back and forth with the larger wrench, grabbing onto the nut and removing it. I'm just going to speed up the tape here. It takes a little while to get these things apart. It's a tedious task of getting the wrenches in there, holding it with the smaller wrench and then using the small one and then just angling the larger wrench in there as best you can. Eventually it comes apart.
Here's a new link from 1A Auto. Iit's a little bit different but it actually makes it easier to install. You'll need a 15mm wrench to hold this on that side and then a 19mm socket and ratchet to put the bolt on. We're going to put down in. It mounts in just like your original. Start the locking bolt on here and we'll start the locking bolt down here. Up top, I put my 15mm wrench through from the backside and then a 19mm socket and ratchet. I'll just speed it up as I tighten it up with the ratchet and you want to get it nice and tight and probably 40 to 45 foot-pounds. Then continuing on down to the lower, it's the same as taking it apart. You really can't get a wrench in there or a ratchet in there so you just have to use a wrench. I used the 15mm wrench to hold the stud and then a 19mm wrench to tighten up the nut and it just takes a little while and, then, again, tighten it up between 40 to 45 foot-pounds.
Once you have the wheel back in place then you put the lug nuts on by hand and I just use my impact wrench to just tighten them preliminarily. Now with the vehicle on the ground, torque the lug nuts to 100 foot-pounds using a star pattern. Now put your wheel cover back on, there's a hole for the valve stem then use a socket to tighten up the retainers.
We hope this video helps you out. Brought to you by www.1AAuto.com, your source for quality replacement parts and the best service on the Internet. Please feel free to call us toll-free, 888-844-3393. We're the company that's here for you on the Internet and in person.
Tools used
Tools used
Okay, friends, before we get started, the first thing that I want to mention is you want to be safe. So have hand protection and eye protection. The next thing we're going to talk about is safely raising and supporting the vehicle so the suspension is hanging. So come right underneath here, this is where you're going to support the vehicle in the front. Now with the front of the vehicle safely raised and supported, we're going to remove all 5 of our 19-millimeter lug nuts. Remove your wheel. Now that the wheel is off, we have a nice clear view of our front strut. With that said, anything that you're going to be removing bolts or nut-wise, you want to of course, spray it down with some penetrant.
First, what I like to do is remove the sway bar link from the front strut. So I'm going to use some locking pliers, come from the backside right here and just try to hold onto the stud so it can't spin. All right. Let's get this off of here. Let's get the brake hose off of here. What we want to do here is just kind of move this brake line a little bit so we can give some slack between the stud and the strut, that way there we can lift this right up and out.
The next thing we need to do is loosen our 36-millimeter axle nut. The reason for that is because when this knuckle is going to want to pull away from the strut, we don't want to put a tug on any of our axle boots. A little bit of penetrant. The next thing you would want to do is either with a center punch, come right into that little dimple and just try to drive this axle into the bearing a little bit, just to give a little bit of slack, or of course, if you don't have a center punch, just put the nut so it matches up evenly, give it a couple loving bonks this way. That's nice and loose.
Next, we're going to remove our 18-millimeter nuts located right here and there. They hold the knuckle to the strut. Grab this bracket, carefully set it aside. These bolts right here are actually going to have to be forced out of the knuckle area. So what I always like to do is just take those nuts and I'm going to start them back on there, a few good threads, and you want to make sure that we're not going to damage the thread of the bolts. Give it a couple of loving bonks. Keep your ABS wire clear, do the same thing to the other one.
If you look at these bolts, you can see they're both the same, and if you look, you can also see that it's splined. That's the reason why it was stuck inside the knuckle.
Now we're going to carefully try to separate these two, but we want to make sure that this doesn't come down too far because once again, we don't want to put a tug on our axle boots, and we definitely don't want to put a tug on our brake line. If you want to have a bungee cord or something that's going to hold it at least away, but safely, that's up to you. There we are. I'm just going to set this right like that. Now we need to get under the hood. Now that we have the hood up, you have a clear view of the strut tower here. With that said, you don't want to touch this center nut. We're only going to remove these three, but when we remove all three, we want to leave one on there just a couple of threads for safety, and then we'll get under, we'll hold onto the strut and then we'll remove that nut.
If for some reason your strut didn't drop down when you removed all three of your nuts like that, it's because it's probably frozen along this area here into the strut tower. Use a little bit of penetrant and then carefully bonk right along here until it finally breaks free. Down like this, I'm just going to hold onto that strut, remove that last nut, and then I can remove it. There it is, friends. One thing that's always a great idea before you go ahead and try to put your new strut into the vehicle, is just line up the strut cap with the way the original was. So a match up from the bottom, make sure it's facing a straight line, and then just set these where they need to be. You can do that fairly easily by just holding the bottom and then turning the cap itself. Okay, friends, now it's going to be time to get our brand new front strut in here. As we do this, I like to mention that I always like to use a little bit of thread locker right on these studs. We'll call it your prerogative, but I recommend it. When we put this in, we want to make sure we line up the bolt holes with the studs coming out of our strut itself.
We'll start on all of our nuts, and then we'll snug them down and torque them to manufacturer specifications. Something that's important to make sure that I mention before we go ahead and put our knuckle up into the strut, is if you were to look along the backside of the knuckle, you might find that there's a lot of corrosion buildup. That's due to the fact that somebody made the knuckle out of aluminum and they put it in with the steel. When you have aluminum with steel, it just corrodes and that's what happens.
So feel along the back. If it feels as though it's raised, you need to make sure you take a chisel or whatever you might happen to have and clean that out. Now that I've got that knuckle cleaned up, let's go ahead and put this up so it's going to line up the bolt holes. Obviously, you want to clean up the threads on your mounting bolts. Something I always like to use is a little bit of red thread locker, we'll call it your prerogative. Go ahead and start those through from the front to the back. Grab your two mounting nuts and of course, your bracket for the ABS wire, start it on there. We'll start these nuts, we'll bottom them out, and then we'll torque them to manufacturer specifications.
Torque both these nuts to 89 foot-pounds. Let's get our brake hose back in there. It slides right into this little groove, and then of course we'll tighten it up. Let's get the sway bar link connected to the strut. Let's torque this to 48 foot-pounds. After you've bottomed out your axle nut, torque it to 159 foot-pounds. I like to put a bar straight across these studs like this, you want to be careful and make sure it's flat and not at an angle because you don't want to damage your threads on your studs.
We're going to go ahead and put the wheel on here. We'll start all the lug nuts, we'll snug them up and then we'll torque them to 100 foot-pounds. Torqued. Now it's going to be time to make sure we go ahead and torque these down. Before we do that though, you need to make sure you have your wheel on the ground with the weight of the vehicle. Let's torque them to 18 foot-pounds.
Tools used
Okay friends. Before we get started, the first thing that I want to mention is you want to be safe, so have hand protection and eye protection. The next thing we're gonna talk about is safely raising and supporting the vehicle so the suspension is hanging. So come right underneath here, this is where you're gonna support the vehicle in the front. Now with the front of the vehicle, safely raised and supported. We're gonna remove all five of our 19-millimeter lug nuts.
Remove your wheel. Now that we have the wheel off, we have a clear view of our tie rod area, I'm just gonna spray down these areas with some penetrant spray. Now we're gonna use some nice long pliers, and I'm gonna break this jam nut free. Turn this clockwise. There we are. Now, we're gonna remove our outer tie rod end nut.
If you find that the outer tie rod end nut just spins the whole stud inside of the knuckle, you could take those nice long pliers or whatever you might happen to have, and just try to squeeze this down as tight as you can. We're gonna apply a little bit of pressure, and we'll try again. If your tie rod still stuck in the knuckle, it's great to use a hammer, bonk right on the knuckle right here, and break it free.
For the next part, we're gonna want something that you can write with, because we're gonna take off the tie rod, but as we turn it, and we make a complete rotation, we're gonna count those rotations and take note of it. That's one, two, three, and so on. It's always important to make sure you coat your threads with something such as copper never seize.
Now it's gonna be time to put on our brand new outer tie rod end. As you go to install it, make sure you put on the same amount of turns that you had to remove the old one. One, two, three, and so on. Should pretty much line up. Let's put on our outer tie rod end nut. We'll snug it up, and then we'll torque it to manufacturer specifications as well. We wanna torque this to 18 foot-pounds and then add an additional 90 degrees, so basically a quarter turn after the 18. So that's 18. Now I need to take it another quarter turn. I'm gonna start approximately like that, and I'm gonna bring it right out to me. There we are.
The next thing we wanna do is pay attention to the slots on the nut compared to the hole in the stud. If it doesn't line up, you need to continue tightening until it does. Go to the very next slot. As you can tell I have that lined up now. Take your cotter pin, slide it through, and then peen it over so there's no way this nut can loosen up on its own.
Now it's time to tighten up our jam nut. We're gonna grab this, turn it counterclockwise. That feels good. Now just go ahead and grab onto that tie rod, make sure it's pretty level and it's not kinked in any way. Double check everything. We have all our clamps. Perfect. We're gonna go ahead and put the wheel on here. We'll start all the lug nuts, we'll snug them up, and then we'll torque them to 100 foot pounds. Torqued.
Tools used
Okay, friends. Before we get started, the first thing that I want to mention is you want to be safe. So, have hand protection and eye protection. The next thing we're going to talk about is safely raising and supporting the vehicle so the suspension is hanging. So, come right underneath here. This is where you're going to support the vehicle in the front. Now, with the front of the vehicle safely raised and supported, we're going to remove all five of our 19-millimeter lug nuts. Remove your wheel.
First, what I like to do is remove the sway bar link from the front strut. So, I'm going to use some locking pliers, come from the backside right here and just try to hold onto the stud so it can't spin. All right. Let's get this off of here. Okay. Now that we have the sway bar link off of here, we need to go over to the other side of the vehicle and remove the sway bar link from the strut as well. That way there, we can move the sway bar up and down as needed to get to that mounting nut. There it is, friends.
Okay, friends. Now it's going to be time to put it in our brand new front sway bar link. One thing I like to mention is it's always a great idea to do these as a pair. And if that's the case, now's the time to do it. So, let's go ahead and put this in starting with the bottom. Now, I'm going to use my 17-millimeter wrench to hold the stud from spinning, and then we'll snug it up. If you were to try to torque this you'd want to torque it to 48 foot-pounds. It's going to be very difficult to torque because as you try to twist, it's going to want to lift up on the bar. If you try to put the bar inside here, obviously, you're not gonna be able to get to it. So, 48 foot-pounds, if you can do it. Let's get the sway bar link connected to the strut. Let's torque this to 48 foot-pounds. We're going to go ahead and put the wheel on here. We'll start all the lug nuts, we'll snug them up and then we'll torque them to 100 foot-pounds. Torqued.
Tools used