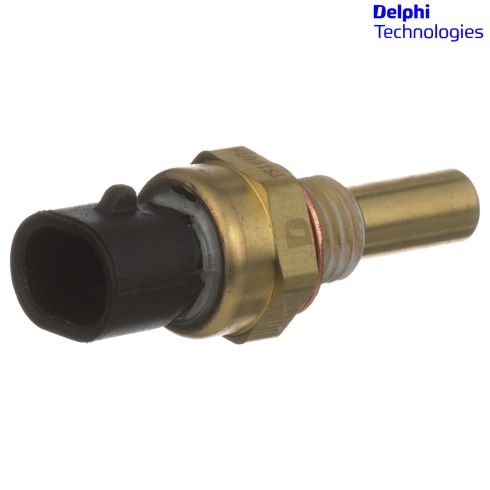
As an Original Equipment Supplier, Delphi Automotive products from 1A Auto come directly from the source. You wont have to worry about going to the dealership for Original Equipment - these parts are the exact same as the original. Delphi products come with the same quality from the dealership at a lower cost to you.
Item Condition:New
Attention California Customers:
WARNING: This product can expose you to chemicals including Lead and Lead Compounds, which are known to the State of California to cause cancer, and birth defects or other reproductive harm. For more information, go to www.P65Warnings.ca.gov.
Lifetime Warranty
This item is backed by our limited lifetime warranty. In the event this item should fail due to manufacturing defects during intended use, we will replace the part free of charge. This warranty covers the cost of the part only.
Returns: Parts with electrical components cannot be returned once installed.
This item ships directly from supplier.
How to Replace Coolant Temperature Sensor 2002-06 Chevy Silverado 1500 Truck V6 4-3L
Created on:
Tools used
Channel-Lock Pliers
19mm Socket
Drain Pan
Ratchet
Anti-Freeze
1. Draining the Coolant
Have a drain pan ready
Loosen the hose clamp on the coolant hose
Remove the hose
Drain the coolant
Slide the hose on to the radiator
Tighten the hose clamp
2. Removing the Coolant Temperature Sensor
Disconnect the electrical connector
Loosen the 19mm nut on the temp sensor
Remove the temp sensor
3. Installing the Coolant Temperature Sensor
Insert the temp sensor into place
Tighten the 19mm nut to the temp sensor
Connect the connector
4. Refilling the Coolant
Open the coolant reservoir
Fill the reservoir to the full line
Tighten the cap
Start the truck
Check the coolant level
Top off the coolant
Let the engine reach operating temperature
Let the engine cool and check the level
Top off the coolant as needed
Hi, I’m Mike from 1A Auto. We’ve been selling auto parts for over 30 years!
To drain the coolant, I'm going to go down here to the lower radiator hose at the radiator outlet, undo the spring clamp with a pair of pliers, and pull this hose off. I already have a drain pan underneath the truck to catch any coolant or all of the coolant that will leak out. All right, and then we'll release the clamp with a pair of pliers. Work the hose off the radiator. Pull it back and forth.
After you drain this coolant, if you're not going to reuse it, just make sure you dispose of it properly. With the majority of the coolant drained out, I'm going to put the lower hose back onto the radiator, and just kind of slide it back into place. We're not going to clamp it yet.
The coolant temp sensor on this 4.3 liter is down here on the side of the block. There's a connector to it that threads into the block. I'm going to take some brake parts cleaner, just sort of clean it off so you can have a better idea of what I'm doing, and kind of see it. There's an electrical connector on the top. I'm going to open it up. There it is. What I did, I had to find this little tab on the connector and pull it up to unlock it, and the connector came right out. We'll leave it up here, so we know where the connector is.
Engine coolant temp sensor is down here on the side of the block. There is an engine harness that normally runs along here and a bracket. We just pushed it out of the way and moved the engine harness up, just to give you a better idea of what we're doing. You don't have to move those things out of the way to replace it, but this makes it easier to see on video.
Take a 19mm deep socket—it's going to go over the sensor. Just kind of unthread it from the block. Before you do this, you want to make sure the coolant is drained because coolant will come of there. You could swap it, but it gets pretty messy, and you'd have to be pretty fast. I see it's still pretty tight, I'll loosen it some more. That is the coolant temp sensor if you want to know. This is our old coolant temp sensor.
Here's our brand new one from 1AAuto.com. See, they're identical in design, same style connector, same lock, two pin. Comes with new thread sealant. This'll go right in and work great for you.
Take the new sensor, install it in the same place. Get it started. It'll get harder to turn because of the thread sealant. Use the 19mm deep socket again to install it. I can see the red thread sealant is almost all the way in, and it's getting pretty tight. When I feel it getting tight, I'm going to stop.
Reinstall the harness. Coolant temp sensor is replaced. I've just got some slip joint pliers in here and reinstalling the clamp on the lower radiator hose, squeeze it together. Got to refill the system with the correct coolant. Open up the reservoir and then refill it. I'll just kind of refill it slowly and let any trapped air bubbles escape.
With the coolant filled to the full cold, I'm going to reinstall the cap. Start the truck up. It may suck some of the coolant back into the system. Then, I will shut the truck off and recheck the level, top it back off, then start it and let it run to bleed the system and come up to temperature. Just needs to be topped off a tiny bit. Let the engine come up to temperature and make sure the fluid level is correct afterwards. Top off as needed.
Thanks for watching. Visit us at 1AAuto.com for quality auto parts, fast and free shipping, and the best customer service in the industry.
TS10076
Product Reviews
Loading reviews
5.00/ 5.03
3 reviews
5 Stars
4 Stars
3 Stars
2 Stars
1 Star
3
0
0
0
0
I have 1 A auto in the past and parts always work well
Rodney
May 3, 2024
Part came quickly and fit correctly Thank you video is very good.
Proper
Dan
October 23, 2024
Proper fit, works fine
1A Auto is the best around
Danny
November 9, 2024
Received it within a couple of days. Great part fitting was perfect. Highly recommend 1A Auto
Customer Q&A
No questions have been asked about this item.
Customer service
877-844-3393
Monday - Friday 8:00am - 9:30pm ET Saturday - Sunday 8:00am - 4:30pm ET
Buick is a registered trademark of General Motors Company. 1A Auto is not affiliated with or sponsored by Buick or General Motors Company.See all trademarks.
Enter Vehicle Year Make Model
Specify your vehicle's year, make and model to guarantee fit.
Year
Make
Model
Options
Drivetrain
This part doesn’t fit a . Select from parts that fit.