Replaces
Part Details
Specifications:
TRQ suspension kits are manufactured using premium raw materials and coatings for extended service life. Each TRQ suspension component is designed to be a direct, maintenance-free replacement to the stock unit. To extend the life of your steering and suspension components, TRQ recommends replacing components in pairs, sets, or kits. All products are fit and road-tested in our Massachusetts R&D facility to ensure we deliver on our promise of Trusted Reliable Quality.
Product Features
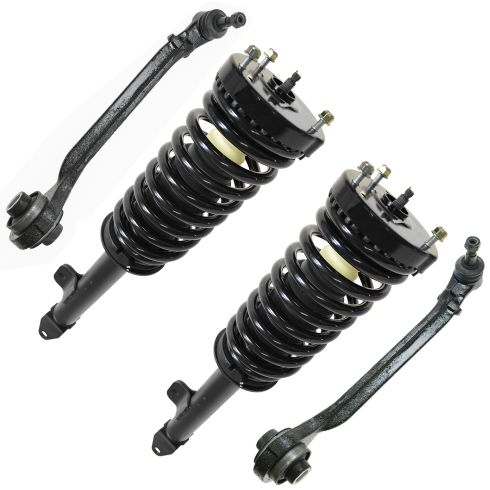
Replacing struts used to require specialized tools to compress, remove, and transfer the old spring and mount. Our Pre-assembled, complete strut & spring assemblies come with all new parts and make the job much quicker and easier for the do-it-yourself mechanic.
Strut & spring assembly contains:
Our steering and suspension components are pre-greased and sealed for long life and do not require the extra maintenance typically required by greaseable versions.
Item Condition:
New
Attention California Customers:
 WARNING: This product can expose you to chemicals including Chromium (Hexavalent Compounds), which is known to the State of California to cause cancer, and birth defects or other reproductive harm. For more information, go to www.P65Warnings.ca.gov
Lifetime Warranty
This item is backed by our limited lifetime warranty. In the event that this item should fail due to manufacturing defects during intended use, we will replace the part free of charge. This warranty covers the cost of the part only.
FREE Shipping is standard on orders shipped to the lower 48 States (Contiguous United States). Standard shipping charges apply to Hawaii and Alaska.
Shipping is not available to a P.O. Box, APO/FPO/DPO addresses, US Territories, or Canada for this item.
Expedited is available on checkout to the United States, excluding Alaska, Hawaii.
Final shipping costs are available at checkout.


Created on:
Tools used
Hi, I'm Mike from 1AAuto. We've been selling auto parts for over 30 years! We're dedicated to delivering quality auto parts, expert customer service, and fast and free shipping, all backed by our 100% satisfaction guarantee. So visit us at 1AAuto.com, your trusted source for quality auto parts.
In this video, we're going to be working with our 2006 Chrysler 300. We're going to show you how to remove and replace your vehicle's front lower control arm. This is the one in the front of your spindle with the ball joint installed in the actual arm, and not the one that connects to the spindle and the strut.
If you like this video, please click subscribe. We have a ton more information on this and many other vehicles. If you need this part for your car, you can follow the link down in the description over to 1AAuto.com.
Here are the items you'll need for this repair: full metric socket set, ratchet, socket extensions, 21mm wrench, 22mm wrench, breaker bar, torque wrench, 6mm Allen key, hammer, safety goggles, gloves, rust penetrant, jack and jack stands
Using a 21mm socket and a breaker bar, loosen all of your lug nuts about one turn. Raise and support your vehicle. We're using a lift to make it easier to show you what's going on, but this job can easily be done at home with a jack and jack stand. Remove your lug nuts the rest of the way by hand. Remove your wheel and tire.
After removing your wheel and tire, locate the bolt for the forward lower control arm on the sub-frame to remove this. We use an 18mm socket breaker bar, as well as an open ended 21mm wrench on the nut at the back. Make sure that's on there good and tight, because you have much fewer points of contact with a wrench. You don't want to risk stripping it. Once you get it loose, you should be able to switch over to a socket and ratchet. Finish removing the nut and bolt by hand. Be sure not to lose these large washers that are on either side of the sub-frame.
We'll place those somewhere safe while we finish removing our forward lower control arm. Remove the 22mm nut on the bottom of your ball joint with a socket and a breaker bar. Now, what we're going to do here is loosen that nut so it's flush with the end of our bolt.
Now, we'll hit the end of the stud and the nut with a hammer until it releases from the spindle. Be careful not to damage the backing plate in the process. Be sure to use safety goggles during this step. Using the 6mm Allen key to hold the stud on the ball joints steady, remove the nut. This step should only be necessary if in hitting the nut you get it wedged onto the stud, so be sure to check the condition of the threads once you finish removing the nut. You may have to swing the spindle away some in order to get that ball joint out. You may need to use a pry bar to help work the control arm out of the sub-frame if it's really wedged in there like ours is. Remove the control arm from the vehicle.
Here we have our old control arm, which we removed from our vehicle, and our new part from 1AAuto.com. As you can see, this new part is a complete assembly, which comes with a nice new boot. You can see how beat up this old one is. Has a new nut for the end of our ball joint. You can see, this is actually a really good example of some reasons you might replace this arm.
Here we can see how bad the ball joint on the end is, while our new one has no up and down play in it. You can see that our bushing is tearing through pretty bad over here. Now, there is evidence that this vehicle was lowered substantially, meaning that the suspension took much more abuse than it would at its factory ride height, so this new part from 1AAuto is going to get our vehicle riding back the way it should, like it did when it was new without the clunks and bangs and the poor feel of suspension and handling from this torn bushing and bad ball joint. It's going to go in direct fit, just like our original equipment, and fix this up right.
Reinstall the lower control arm. We'll have to start on the spindle end. Turning the wheel could help give us a little bit of the extra clearance we're going to need. Remember, without both lower control arms, you are able to move the hub a little bit. We'll line up the rear and reinstall our bolt hand-tight to start. The bolt will go through from the front. Now, ours was being pretty difficult going in, so I ended up using the 18mm socket and ratchet to help spin it into place. Make sure that there's no substantial weight on the control arm when doing this. Otherwise, you risk damaging your threads.
Now, we'll support the nut with our 21mm wrench. We're just going to get this down close, but not tight until the weight of our suspension is on the vehicle. Otherwise, we risk pre-loading the bushing and cause premature wear to our new part. Now set the ball joint end into its hole in the control arm. You may have to move the stud in the ball socket or turn the spindle one way or the other or pull it in and out to line everything properly. Start your new nut on the end of the threads.
Now, you'll notice I'm pushing down on the ball joint to set the taper into the spindle. This should help prevent the stud from rotating. If not, we'll have to use that 6mm Allen key to hold the stud in place while we tighten the nut with a 22mm open-ended wrench. Torque the ball joint to 50 foot-pounds and add 90 degrees to it.
Now, we're going to use a screw jack, but you can easily do this by reinstalling your wheel and tire and just letting your vehicle off the jack, or you can use a jack to push up on this lower control arm. Now we're going to put the weight of the vehicle back on to the suspension by lifting up on it, just until it comes off of your jack stands or in our case the lift. We'll torque our lower control arm bolt at the cradle to 130 foot-pounds. Remove your jack or a screw jack.
If you didn't use the weight of the vehicle on the tires in order to reinstall it, we'll reinstall your wheel and tire now. Get your 21 mm lug nuts as tight as you can by hand. Lower the partial weight of your vehicle back onto the tires. Torque your lug nuts to 110 foot pounds in a cross pattern.
Thanks for watching. Visit us at 1AAuto.com for quality auto parts, fast and free shipping, and the best customer service in the industry.
Tools used
Hi, I'm Mike from 1AAuto. We've been selling auto parts for over 30 years! We're dedicated to delivering quality auto parts, expert customer service, and fast and free shipping, all backed by our 100% satisfaction guarantee. So visit us at 1AAuto.com, your trusted source for quality auto parts.
In this video, we're going to be working with our 2006 Chrysler 300. We're going to show you how to remove and replace your vehicle's front strut assembly. Now, we're doing this on the passenger side by the procedure is the same on the driver's, and we do recommend you replace these as a pair.
If you like this video, please click subscribe. We have a ton more information on this and many other vehicles. If you need this part for your car, you can follow the link down in the description over to 1AAuto.com.
Here are the items you'll need for this repair: full metric socket set, ratchet, socket extensions, breaker bar, torque wrench, 14mm x 2 nut, locking pliers, bungee cord, gloves, rust penetrant, jack and jack stands
Using a 21 millimeter socket and a breaker bar loosen all of your lug nuts about one turn. Raise and support your vehicle. We're using a lift to make it easier to show you what's going on, but this job can easily be done at home with a jack and jack stands. Remove your lug nuts the rest of the way by hand. Remove your wheel and tire.
Remove the nut on the bottom of your ball joint with a 19 millimeter socket and ratchet. Using the 19 millimeter socket and ratchet, loosen the nut on the upper ball joint and remove it. Remove the 19 millimeter nuts securing the sway bar link onto the strut, and we're going to try this with a 19 millimeter socket and ratchet. However, we may need a breaker bar and pair of vice grips. We couldn't quite get it loose with the socket and ratchet, so we're going for a 19 millimeter socket and a breaker bar, which seems to have done the trick. Now that it's loose, we'll go back to our ratchet.
Now, fortunately, ours isn't very rusty, so I'm just holding the back side of the sway bar link by hand to remove the nut. You may have to clamp it down with a pair of vice grips in order to get it to stay still while you remove the nut. We'll remove the top of the sway bar from the strut.
Using an 18 millimeter socket and a breaker bar, we'll loosen the bottom bolt for the strut. Now, the nut on the back of the strut is welded, so you shouldn't have to counter-hold it. However, if it starts spinning, you should be able to hold it steady with a 21 millimeter wrench. Once the bolt starts loosening up, you may be able to switch to an 18 millimeter socket and ratchet. The trick here is I'm putting my fingers behind the head of the bolt while I twist and pulling back at the same time to help spin it out of the bushing. Once the bolt is out of the threads, you should be able to just wiggle it out. Using a 13 millimeter socket, ratchet and extension remove the three 13 millimeter nuts on the top of your strut.
Now, we installed a strut bar into our vehicle; yours may or may not have one, but this process will be the same regardless. When you're removing the last 13 millimeter nut, you'll want to be sure to reach underneath the vehicle and support the strut with your other hand to make sure that it doesn't just drop out and damage something. Be careful not to overstretch the hydraulic brake hose. Go ahead and snap that ABS sensor off to give yourself a little more slack. Should be able to push down and remove the strut assembly from the vehicle.
Here we have our old strut that we removed from our vehicle, and our new part from 1AAuto.com. What you see here is actually a quick strut or a complete strut assembly. This means that your new part comes with a new shock or strut tube with a new spring, new billow, new bump stop, and a new strut top and bearing. This means that the entire assembly can be changed out as a unit without the need for special tools and spring compressors, which can make the job more difficult and a little more dangerous. As you can see, there are some aesthetic differences where the springs look just a little bit different, but everything should match up to the same spring rates on our vehicle so it rides just like new.
We have the same flange here to mount the stud for our sway bar link, and we have the same forked flange at the bottom here, which will sit over the bushing in our lower control arm. However, the old part has this welded nut on it and the new part does not come with this. We needed to get our hands on an M14 by 2.0 nut for this; a flange nut would be preferred. Other than that, the new strut top has the same three bolt mounting location on it and comes with a nice new set of flange nuts for the top here.
If your old struts are worn out, riding and handling poorly, creating odd weight transfer of the vehicle or bouncy or making noise, this new part from 1A Auto is going to go in direct fit, safe, and easy and fix you up right.
Reinstall the strut. Try to line up the top first and then maneuver the bottom back over the lower control arm. Reach up and start one of your 13 millimeter nuts by hand. Once you've got that started to secure the strut, reinstall the upper ball joint and its 19 millimeter nut. Now, you'll notice I'm pressing down on the strut here while I install the nut. This is because the tapered seat helps prevent the threads from spinning, making it easier to install by hand. Finish tightening up your ball joint with your 19 millimeter socket and ratchet. We'll then torque it to 35 foot-pounds and add 90 degrees.
Finish installing your new flange nuts onto the top of the strut. You may have to move it around a little to get that top one to seat where you want it. Tighten and torque the 13 millimeter nuts to 20 foot-pounds with a 13 millimeter socket and a torque wrench. Align the bottom bolt hole and install your 19 millimeter bolt. In place of the welded nut, which does not come on our new strut, we're going to use another 14 by 2 nut that we had. We'll put a 19 millimeter wrench on that; yours may vary. Then we'll tighten up the 18 millimeter bolt with a socket and ratchet. Then we'll torque it to 128 foot-pounds.
Install the upper portion of the sway bar link through the strut and start the new, this is a 22 millimeter nut. Now, this has a nylon lock on the end, so we're not going to be able to put it on by hand, so we'll grab the back side with a pair of locking jaw pliers just like we did on the bottom. Use a 22 millimeter socket and ratchet to snug it up before torquing it to 95 foot-pounds.
Reinstall your wheel and tire and get your 21 millimeter lug nuts as tight as you can by hand. Lower the partial weight of your vehicle back onto the tires. Torque your lug nuts to 110 foot-pounds in a cross pattern.
Thanks for watching. Visit us at 1AAuto.com for quality auto parts, fast and free shipping, and the best customer service in the industry.


