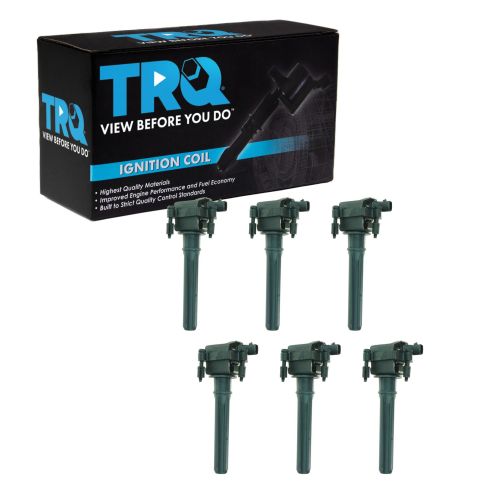
TRQ ignition coils will have your engine running like new. TRQ ignition coils are manufactured to precise specifications using premium raw materials to optimize each vehicle's ignition system. To ensure peak performance, TRQ recommends replacing ignition coils in sets to prevent electrical output imbalances. All products are fit and road-tested in our Massachusetts R&D facility to ensure we deliver on our promise of Trusted Reliable Quality.
Product Features
High dielectric epoxy and reinforced bobbins for extended service life
Rubber, Silicone, or Phenolic Resin Shell: Prevents premature boot wear
Application Specific Design: No modifications required
Complete repair to restore your engine to like-new condition
Item Condition:New
Attention California Customers:
WARNING: This product can expose you to chemicals including Lead and Lead Compounds, which are known to the State of California to cause cancer, and birth defects or other reproductive harm. For more information, go to www.P65Warnings.ca.gov.
Lifetime Warranty
This item is backed by our limited lifetime warranty. In the event that this item should fail due to manufacturing defects during intended use, we will replace the part free of charge. This warranty covers the cost of the part only.
Returns: Parts with electrical components cannot be returned once installed.
FREE Shipping is standard on Orders shipped to the lower 48 States (Contiguous United States). Standard shipping charges apply to Hawaii, Alaska and US Territories. Shipping is not available to Canada.
Expedited is available on checkout to the United States, excluding Alaska, Hawaii and US Territories as well as P.O. Boxes and APO/FPO/DPO addresses. Final shipping costs are available at checkout.
How to Replace Ignition Coil 1998-2004 Dodge Intrepid
Created on:
Tools used
Socket Extensions
8mm Socket
5/8 Inch Spark Plug Socket
Ratchet
1. Accessing the Ignition Coils
Undo the cable clip
Move the cables aside
Disconnect the PCV hose
Move the PCV hose aside
2. Removing the Ignition Coil
Disconnect the ignition coil wiring harness
Remove the two 8mm bolts from the ignition coil
Pull the ignition coil up and out
3. Removing the Spark Plug
Loosen the spark plug with a 5/8 inch spark plug socket
Remove the spark plug
4. Preparing the New Spark Plug
Find the spark plug gap for your vehicle in the under hood decal or your owner's manual
Check the gap with a spark plug gapping tool
The correct setting of the tool should slide into and out of the gap with some resistance
Adjust the gap as necessary
5. Installing the New Spark Plug
Put the new spark plug into place
Tighten the spark plug with a 5/8 inch spark plug socket
Tighten the spark plug to between 20 - 25 foot-pounds of torque
6. Installing the New Ignition Coil
Push the new ignition coil into place with the wiring connector facing the rear of the vehicle
Insert the two 8mm bolts into the ignition coil
Connect the ignition coil wiring harness
Repeat Steps 2 through 6 for the remaining coils
7. Reconnecting the Cables
Reconnect the PCV hose
Put the cables back into their clip
Fasten the cable clip
Brought to you by 1AAuto.com, your source for quality replacement parts and the best service on the Internet.
Hi, I'm Mike Green. I'm one of the owners of 1A Auto. I want to help you save time and money repairing or maintaining your vehicle. I'm going to use my 20-plus years experience restoring and repairing cars and trucks like this to show you the correct way to install parts from 1AAuto.com. The right parts installed correctly: that's going to save you time and money. Thank you and enjoy the video.
In this video, we're going to show you how to replace the ignition coil as well as remove and replace the plugs on this 2004 Dodge Intrepid. This car has a 2.7L V6. The procedure's basically the same for the 3.5L as well. The tools you'll need are 8mm socket and ratchet with an extension and a 5/8 spark plug socket with ratchet and at least a 6-inch extension.
Here are your coils on top of the engine. There is one for each cylinder. This is a 6 cylinder so there's three here and three on the other side. I'm going to change the most difficult one in this video. The only thing that makes it difficult is a few cables and stuff. There's a clip here. You're just going to push the clip over, pry it up, then these cables will kind of come up out of your way. There's a PCV hose here. Just twist and pull that out of your way.
Then, I'll show you here, these coils have a harness into them. You basically just push down on a clip here and pull them off. I'm just going to reconnect that one for now. I'll push down and pull this one off. Then there are two 8mm bolts, here and here, on each one. We'll fast forward a little bit as I remove those two bolts. Then, we have the bolts removed. You simply just pull right up on the coil. There it is out.
While you have that coil out, you can see down in there is actually the spark plug. So if you're going to change the spark plug, obviously this is the time to do it. To remove the spark plug you want a proper spark plug socket like this. This one's actually a little bit worn out so it doesn't grip the plug as well as it should. Obviously, you just kind of put the socket down in, and make good contact with the plug. You also obviously need an extension like I have here, even a little longer one would be good. We're going to hit fast forward again here as I remove that spark plug. You can get it loose with the wrench and then pretty much just turn it with your hands. Like I said, the grommet in my socket's not very good so I'm just going to take a little piece of paper towel, kind of stuff it in there with my pinkie and use that. Once it sticks down on the spark plug, you should get a good grip on it. It brings the spark plug right up and out.
You want to make sure you check the spark plug gap which is basically the distance between the diode and this tip. This vehicle calls for a .050 inch, which if you have a tool like this which is a spark plug gapping tool, you just run it through and it should go through there with a little bit of resistance. Then you use this to either kind of release it or bend it closer if you need to. You can find the gap usually on this decal. You can see right there, a spark plug gap of .050 inch or 1.27mm. This information usually is also in your owner's manual.
These plugs are pretty recent so I'm just going to put this back in. As you can see, I just put a little piece of tape with paper towel in there. Make sure the paper towel's not going to get down around the threads or anything. That holds it in although if you have a good spark plug socket you don't have to worry about that. Just like before, just kind of put it right down through the center. It should thread in easily. I'm just going to put an extra extension on here to make it a little easier. Then, you want to tighten it until it's seated, usually about another 1/8 of a turn. Spark plugs you usually want to have about 20, to 25 foot-pounds of torque. You don't want to overtighten them, but you want to get them in there firm.
Here's our original coil and a new coil from 1AAuto. You can see everything's the same. The plugs are the same and everything so it's going to all go right on there exactly the same way. The plug faces the rear of the motor on this side so it faces the rear on the other side as well. Put it down in, try to get it as straight as you can as quickly as you can. Put it down. Screw in the bolt. Okay, tighten these up nice and firm. They don't have to be extremely tight, but should be on there firm. Reconnect the harness and your PVC hose back on. Clip these cables back on. Now we can just do the rest of them and you're all set.
We hope this video helps you out. Brought to you by www.1AAuto.com, your source for quality replacement parts and the best service on the Internet. Please feel free to call us toll-free, 888-844-3393. We're the company that's here for you on the Internet and in person.
ICA61473
In Stock
Product Reviews
Loading reviews
5.00/ 5.03
3 reviews
5 Stars
4 Stars
3 Stars
2 Stars
1 Star
3
0
0
0
0
Best bang for your buck.
A
February 18, 2018
I purchased this set of 6 ignition coils after a local shop replaced one and told me that I'm good, well the problem came back no more than a week later and the shop wanted to charge me 75 dollars per coil plus labor.
I decided I'm going to do it myself because I want to make sure it is done right. Local stores had them for $55/per and only had 1 or 2 in stock at any given time. The quality of the coils I received are exactly the same as the new one the shop installed and I am pretty pleased.
Going on a week since installing them myself and haven't had the issue return.
Great product
Danny
April 22, 2021
Direct oem repladements fixed my misfire issues and helped me obtain a much better mpg.
I was glad to see each igntion coil came inside it's own box individually and all 6 cane inside a bigger box which was securely packaged.
Ignition Coil Set
Romeo
June 3, 2021
Bought this Ignition Coil for my 99 Chrysler 300M and I'm very happy about the performance and very easy to install. It took me 20 minutes to finish the job. Misfires were gone and no more hesitation at all. I definitely recommend this part. Thank you 1A Auto for your videos.
Customer Q&A
Will these coils fit a 2006 Chrysler 300?April 8, 2018
Brie D
10
This part is not listed to fit your vehicle. We may have a part that is listed to fit! Please search our site using your vehicle info and then choose the appropriate category. All the parts we carry are guaranteed to fit the vehicle they are listed for. Thank you!
April 9, 2018
T I
Will these coils fit a 2005 Chrysler Pacifica. 3.5 liter engine all-wheel drive ???March 14, 2020
Randy T
10
Yes, according to the information you provided, this part will fit your vehicle. Please let us know if you have any other questions!
March 15, 2020
Emma F
Customer service
877-844-3393
Monday - Friday 8:00am - 9:30pm ET Saturday - Sunday 8:00am - 4:30pm ET
Chrysler is a registered trademark of FCA US LLC. 1A Auto is not affiliated with or sponsored by Chrysler or FCA US LLC.See all trademarks.
Enter Vehicle Year Make Model
Specify your vehicle's year, make and model to guarantee fit.
Year
Make
Model
Options
Drivetrain
This part doesn’t fit a . Select from parts that fit.