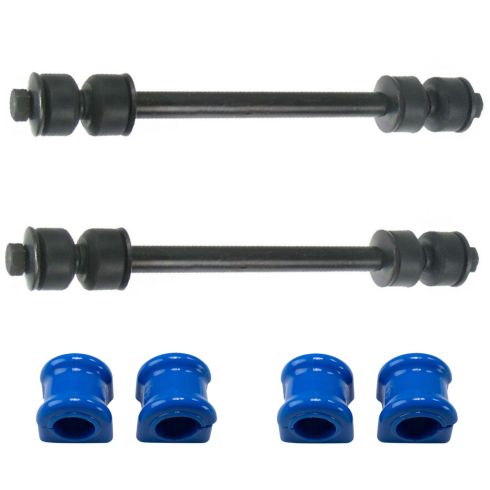
Hey friends, it's Len here at 1A Auto. Today we're working on our 1996 Dodge Ram 1,500 and I want to show you something very basic, replacing front sway bar links. It's going to be super easy. I can do it and you can do it too, and as always if you need this or any other part, you can always check us out at 1aauto.com, thanks.
So one of the first things we're going to do is take off this cotter pin. You can probably do the majority of this without actually having to take off the wheel. It's a little easier with the wheel off, and of course for video purposes it's much easier with the wheel off. If you can't get this cotter pin out, no big deal. Just cut it, break it, do whatever you got to do. There we are. We're going to remove this castle nut right here and this nut up here, and we should be able to get the sway bar link out.
So we're going to take this off right here. 17 millimeter. The same thing for up there. 17 millimeter, ratchet, airgun, whatever you got to do. Using an air gun, of course, make sure you're wearing hand protection and eye protection. There we are. The nut's still in there. put it on a second there. Get it off of there. Set this aside. Nut's on there. There it is. Set that aside. Hammer. We're going to try to bonk this through. Once you get it through this side, it'll come down this side. There we are. Doin' it right. We just got to get it all the way out of there. Let's see. Of course there's grease. Kind of is what it is. That bushing off of there. We don't need that. Cool. Let's take apart the other side at the same time. At that point, the bar will be able to move around and we'll be able to get this out much easier.
All right, so we went over and we did the same thing to the other side. Got it so the sway bar link's ready to come out. Now we can wiggle this bar around a little bit and that's nice because it's going to give us the amount that we need to be able to get this out. Just going to grab a pry bar, just walk this around a little bit and there's our sway bar link. Let's do a quick product comparison and we'll move along.
So here we are friends, a quick product comparison for you. Over here you have your original sway bar link out of the front of a 1996 Dodge Ram 1,500. We just took it out. And over here you have your brand new quality 1A Auto part. Both these parts are created equal. You've got the same overall length, which is very important. You don't want one that's way higher or longer than the other one way or the other. Okay. This comes with a brand new nut right here. Very important. It's got a sealed boot. That's great because it's going to keep the moisture out of there for you. Down this end, take this off of here, you have a neoprene locking nut. Super important. You want to make sure that this doesn't loosen up when you're going down the road. Brand new washers, there's two of them, and of course the brand new bushings as well.
As you could tell, this comes with everything you need to go ahead and mount it into the vehicle. Even a brand new cotter pin. Thank you 1A. I don't see any reason why this wouldn't be a quality part to install into the vehicle, so I'm going to go ahead and do it. And as always, if you need this or any other part, you can always check us out at 1aauto.com. Thanks
We'll take off this neoprene locking nut, one of the bushings and one of the washers. So those all right where we can grab onto them. Okay. Now this is important. The way that these bushings go, there's two sides. There's one with a little flappy thing right there, and then one that's rounded. This little flappy piton goes up inside here, or if you were looking at it from underneath, essentially this goes into the hole. Okay. Just right up in there. So you want to make sure that that faces towards the mounting area on the differential. Just like this. Get this nut off of here. Just going to bring this in. See if I can grab my pry bar. Pull down on this nice and easy. I'm just going to keep wiggling it around. There it is. Take our castle nut. That's the slotted nut, kind of looks a little bit like the top of a castle, that goes on the part with the sway bar. Okay. Grab our bushing, got a little piton. Just going to go in there. Okay.
Washer, they're kind of curved. This curves upward right here, and inward right there. They're not flat. I Don't know if you can see there. The curved up part faces up, it's going to go up like this. So the roundedness fits right in there. Very nice. Neoprene locking bolt, neoprene locking nut. That right on there. Awesome. We're going to do the same to the other side of the vehicle real quick, and then we'll go ahead and snug these down.
All right, so now what we're going to do is we're going to hold the sway bar link right along this edge right here. They made a nice area for you to grab onto with your pliers. I'm going to use a 16 millimeter. Tighten this up. When we tighten this, you don't want to go down until this rubber is completely flattened. You just want it so that this washer is touching and it's kind of squeezing it just a teeny weeny bit. Not very much. Little bit more. Check. Sure, feels good under there. That's perfect. Okay. So you see how much this is the squishing? It's not very much. I didn't crush it, so the washer is all the way down on here. It's not about that. It's just about making sure that it's tight enough so that the sway bar link can't move up and down, but not so tight that you're squeezing these so much that they're ready to blow right out of there.
Because then driving down the road, 100,000 miles, however long it takes, it's going to be a lot of pressure on these things and they're just going to give out over time. So the less amount of pressure on them, the better. We're just going to put this in. There we are. See if we can find where the slot is in the sway bar link. Looks like we're pretty close. Right there. Cool. It's a nice big cotter pin. I really didn't want it to come out. You're just going to bring this all the way down. There we are. Bring this over. Just like that. We know it's nice and tight. It's locked in, that and that right there can not come loose because it's got a dotter pin. This one can't come loose because it's got the neoprene lock in there. Let's move ahead and do the same to the other side.
Thanks for watching. Visit 1aauto.com, your place for DIY auto repairs, for great parts, great service, and more content.