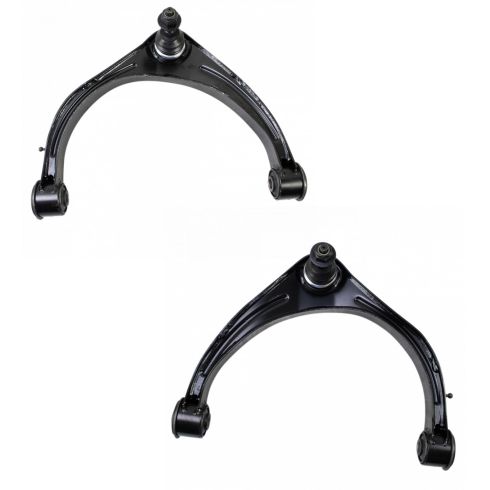
Hey, friends. It's Len from 1A Auto. Today I'm going to showing you a very simple task, and we're going to be replacing an upper control arm on a 2016 Ram, 1500 actually, on this one. It's going to be a very simple task, and I want to be the guy who shows you how to do it. If you need any parts for your vehicle, you can always come down to 1aauto.com and check us out.
We've got our vehicle set up on all the lift points. We've got the majority of the weight off of the wheel. It's still on the ground just barely. We want to make sure that it can't spin while we're trying to remove the lug nuts. All I'm going to do is, I'm going to break them free. Once they come a little loose, I'm just going to move along. We don't want to unscrew them very far to the point that the wheel can tilt and/or put more pressure on the wheel studs. We don't want to break any of those.
Now we've got it to this point. We loosened all five. We can bring up the vehicle, remove all five lug nuts, take the wheel off. Here we go. I'm going to continue using my 22-millimeter socket. You can use the ratchet to break it free if it's still a little tight. We're just going to remove the lug nuts. What I'll like to do is, I'll get one fully unscrewed here, the first one, once it's all the way off, take a look. Looks okay. I'm just going to go ahead and put in on a couple threads, and then I'll go ahead and remove the other four. The reason why I put this on a couple threads is so when I remove these, the wheel can't come off and hurt me.
I've got the other four lug nuts off. Now I'm going to hold the wheel stable as much as I can so it doesn't come falling off and hurt me, remove my last nut ... I'm going to set it aside. Grasp the wheel firmly. I can hold my leg underneath it to support the weight if I want, so I'm not using my back. I can hold this all day if I wanted to. Put it down. Roll it out of the way. Now we're all set to move on to our next step.
Now that we have our wheel off using our 22-millimeter socket to remove the lug nuts, we can go ahead and compare our parts. We're replacing the upper control arm. So, what we want to do is, we want to bring it right over. We're going to try to match it up, make sure that our bends match up. If you notice that the big bend's on the back side, then you've probably got the control arm for the other side. So, just go over and get the right one. Then you can line it up a little bit, see if it seems like everything's going to match up and align. Looks like it's pretty good. So, this shouldn't have any problem going in. Once we get it out, we'll do a better comparison, but we'll go from here.
Our next step: We're going to make sure that everything that's connected to the upper control arm is going to be released. So, we'll go ahead and relieve this right here. Just a little pocket screwdriver should pop that free, if you'll grab it with one hand while I'm holding the control arm. Nice.
We're going to take our small screwdriver, follow our ABS cable. Like I said, it comes up behind here. You can see it pretty good. If you want, I can try to get it back there, break it free. You could try to pull it all the way out of the vendor housing if you want. It's up to you. It's got a little red clip; so, what we're going to do is, we're just going to try to pry that up, if you can get in between here. Do that. Now this is two pieces. What we're going to do is, we're going to squeeze this black piece right here. If you have the thumb strength, you can do that, or you can try pushing with your screwdriver. Let me see if I can do it with thumb strength. Then I'm going to hold the top piece and pull down on the bottom piece while trying to wiggle it, and jiggle it, and do all that fun stuff.
All right. That came free. Now, what we can do with this is, we can just put it someplace where it won't get mangled, or tugged, or broken in any way. We'll just put it like that for now. We can move it in a minute. Now we're clear to move on to the next step.
For me, that would be: We're going to come up here. We're going to use an 18-millimeter. We're going to loosen this up, another 18-millimeter loosening this up. You'll notice that there's nuts on the back side here, but you'll also notice that there's this little metal shaft. What that's going to do is, when you're loosening the end of the bolt with your 18-millimeter socket, it's going to come spinning around. It's going to get caught on the frame. That's great. That means you don't have to hold this nut with anything like pliers, or a wrench, or whatever you have. It's going to do its own job. You just basically need to catch it when it's ready to fall off.
This is looking good to break free. As you can see, it's coming around. I'm just going to make sure I put on my safety glasses. They should have been on already. Safety's key. It's just going to keep coming around. That's okay. Make sure that your ABS wire's very clear of that. You don't want to get it caught underneath there. Maybe you tried resting it up there, thought that was safe. It's not. If you have access to an air gun, you can go ahead and use that if you want. It feels nice and loose.
Come over and we can do the same thing to the other side. You'll notice that there isn't much room, but that's okay. It's plastic. Go ahead and push this. We've got it coming around, so you want to make sure that you don't cut your hand there, because that might hurt you. Watch out for any pinch points. Our cable's definitely clear. There's nothing there. Yeah, looks good.
We can go ahead and loosen this right up. We don't want to fully remove it yet. We still have to remove the stud on the upper ball joint to the knuckle. We've got these two bolts loose. Like I said, we didn't take out the nuts all the way. We want to make sure that it's still secured. If you end up taking those all the way out, this is going to fall down. It's going to become a hassle. So, I'd just leave them in.
We're going to move on and we're going to remove this nut right here. You can remove it completely, and then we'll put it on a couple threads just to get it so it's going to hold. Now we're going to whack this with our big, fabulous hammer. I'm going to be using a 21-millimeter socket, long-handle ratchet. If you wanted to, you could come up here with an extension in your air gun. If you have access to that, that's great. Well, that broke free nice and easy. That's great. Like I said, I'm just going to remove this all the way, and then I'm going to go ahead and put it on a couple threads, and then we're going to give this knuckle a whack. Fabulous hammer time.
I'm going to go ahead and whack it. I've got my nut on here. I know that it's not going to come free and just come slamming down, hurt anybody, myself. I'm going to hit right here, closest to where the stud is. What should happen is, this is going to break free. The ball joint's going to want to lift up. You'll just notice it move around a little bit. From there we can move on.
Here we are. You might want to hit it a couple more times. But let's be real. That's enough. Going to remove that nut. Lift up on it. Move our knuckle out of the way. I'm going to put my ball joint where I can find it, even though we're going to be replacing it anyways.
Now I'm clear to remove these two bolts. You can pick whichever one you want to do first or do them both at the same time, if you want. I'm just going to go with one. We're going to be using an 18-millimeter again, like I said. I'm going to grab a ratchet wrench. That'll be my preference for this job. You could also use your air gun. I'm going to use my air tool. I'm going to use the little swivel. You could also use a wrench, a ratchet, whatever you want.
I'm going to go ahead and put it on here, being very careful to make sure that I pay attention to where this goes. I don't want it to smack me in the hands. I can put my hand down here to catch it once it comes free. Here we are. It's free. I'm just going to leave this in while I come over here to do the other side instead of removing it completely, because then, once that's out, this will be able to move around. Then, when it comes time to remove this one, there's really no control over the control arm. This way it can't go anywhere.
Coming around the back side here. This side might be a little bit more difficult. It's okay. There we go. That's what the nut looks like. I love that they put this on there for you. Okay. Hold our control arm. Pick which bolt you want to take out first. I'll pick this one. We'll just take note that it came through from the rear toward the front on the rear bolt, and the front bolt comes from the front to the rear. Remove that.
Now we've removed our upper control arm. As you can tell, we have our old part and our new part. We'll note that there's different bends. We've got this bend that scoops out quite a bit, and then this one's shorter. This one scoops out quite a bit; this one's shorter. So, there is an offset for the ball joint. If you had the other side ball joint, you would notice that this scoop right here would be on this side for some reason on the new one.
The upper control arms look very similar. This one has upgraded support right here. It's got an extra support area. This is on the new one, quality 1A part. This has a little piece right here. There's a hole. This has got the hole, so we can go ahead and transfer that right over. It should be very simple. I don't see any reason why this part shouldn't go right in, so let's go ahead and install it. If you need any parts, you can always come down to 1A Auto and check us out.
All right, we're ready to install this upper control arm. It's going to be very simple. We've got our two upper control arm bolts. You'll notice that they're both the exact same. There's nothing crazy about them. There's no differences, so we don't have to worry about mixing them up. The next way I want to show you is to make sure you take off this upper ball joint nut and remove this, just a little piece of plastic. It's garbage. Throw it right in the trash or recycle it, even better. That's only to cover this boot right here. You want to make sure that this boot isn't torn. Looks like it's in great condition, as I would expect. I'm going to go ahead and put this on there again so I don't lose it.
Now we're ready to start installing this, so we're going to get this up close. Fits in perfectly, as I expected. On the front, we're going to go into the front, just like that, and do the same for the rear, except we're coming from the rear. Let's try to line up those bolt holes. Not bad. If you wanted to, you could use a little bit thread locker. For this application, I'm not going to worry about it. We've got our two nuts. We don't have to worry about mixing those up. Doing the exact same as well. We're going to do this by hand a couple times. I'm just going to grab these bolts. I'm just going to turn it in. Once it gets started, we can move on to the next side.
Just come over. This one I'm going to have to pull away, because you'll notice there isn't very much room in between here. So, I just pulled the bolt back out a little bit to give myself a little bit of room. There we are. All we're doing right now is, we're starting these in. Perfect. Now, if I wanted to, I can make sure that this piece right here is going to go in the direction of me tightening it. It's going to hit up against the frame, and I'm going to make sure that there's nothing back there that it could pinch up against. You'll notice we've got a wire that runs back here. It's very clear. I can feel it. It goes down and around the back side.
I'll do the same for this side. If I was turning and tightening it, I would make sure that this isn't going to hit this brake line right here. It doesn't. It's very clear. Now, what we can do is, we can go ahead and tighten this up. What we'll do is, when we're tightening it and we're getting it close, we'll go ahead and hold the control arm up at the point that it would be if the vehicle was riding down the road. You don't want to tighten it all the way down like this, and you don't want to tighten it all the way up like that. We'll just go at an even playing field with the road, and then we'll go ahead and we'll get this mounted in, and we can go from there.
I'm going to take my 18-millimeter swivel. You can use a wrench, like I said before. It's all your preference on what kind of tools you want to use, what you have at your availability. I'm going to hold this up to about where I want it, which is, like I said, pretty much the flat plane with the road. I don't need to go too much tighter than that yet. We're going to check to see if there's a torque spec for it. But what I am going to do is, I'm going to come over here. I'm going to do the same to other side. I'm just going to blast it in. I don't have to go too crazy on it. Feels pretty good. Here we are. This can still move up and down with the rubber bushings, so it's going to be good go do its job.
Now we're just going to make sure we have these torqued. It an 18-millimeter socket. I'm going to go 130 foot-pounds. There's one. I'm going to do the same to the other one. Wants to hit it one more time. Let's make sure. Yeah, that was just it creaking. There we go. We've got those torqued in. Clear to move on to the next step.
We've got ourselves back up top here. I'm going to take off that upper ball joint nut. Lift up on the control arm, get it into a hole there, and then move it like that. There we go. Now I'm going to take a pry bar and go right in between the coil spring and the upper control arm, bring it down. I can get this started.
We're going to blast this nut in. We're not going to go too hard once it bottoms out, because we want to make sure we torque that as well. We're going to use our 21-millimeter socket. We're going to blast this right up. Once it bottoms out, we're going to stop. We're going to make sure we torque this and the lower ball joint. I'm wearing my safety glasses, as always. If it seems like it doesn't want to get all the way down, what you can do is you can grab your bar, try to lock it in a little tighter, and then blast it again. If that doesn't work and you don't have a bar, you can use a wrench, a 21-millimeter wrench, there, give it a tweak. Once it's on, you should be able to torque it right down.
I'm going to try with a bar first, and then if not, we'll go ahead and do the wrench effect. I'm going to go right on the spring, try to pull it down. There we are. It's bottomed out. Get my tool out of here. We're going to get our little clip out of here. I'm just going to use some cutting pliers, or whatever you want to call them. I'm not going to squeeze too much, just enough to grab it. I'm just going to give it a little tug. There we are.
This is what it should look like. It's got all these little teeth. That's what holds it in. It's still in usable condition. It looks like it could've used some more teeth on the back side, but we'll see if it goes in. This just holds the ABS wire.
We've got our little connector. We're just going to put it into our new control arm. We can do that by wiggling it. Looks pretty good. We've got our ABS wire. We're going to put it right in here. Here's a little clip. I'm going to try to wiggle it, and jiggle it, and all that. Got a little clip here. Clip that in. Behind here we've got our little harness. Take a peek in there. Make sure there's no funny colors: greens, blue, reds, purples. Nothing looking out of color. Nice.
We're to look at where our lock was and where it's going to be. Lines up this way. The red thing's going to line up with right here, so we know. Clip that in. Give a little tug. Feels good. We're going to make sure we resecure it to the uh, underflare. Just push this through. Everything feels like it's nice and secure. If this clip right here was broken for some reason ... Maybe you broke it coming off ... you don't want to leave your ABS cable just rattling around. If you have a little wire tie, you can go ahead and put that on there very loosely, just enough so that it'll keep it adhered to the brake hose, but not necessarily to the point that it's going to pinch the brake hose. You don't want to pinch the brake hose. Fluid needs to flow. But this ABS wire does need to be mounted to the flex hose so it doesn't go flopping around and get caught on anything.
Now it's time to get the wheel up on here. I want to make sure I empathize on the importance of not lifting with your back. You want to make sure that you're safe, you don't hurt yourself. So, don't grab your tire like this and expect to go "Ugh" and lift it up. It's big. All I'm going to do is, I'm going to roll it up my leg. I'm going to use my abs. That's why I have them, right? Roll it up. Lift my leg with my abs. It comes up right up nice and easy. I hardly use my back at all. Save your back. You're going to need it someday, or every day. Right?
I've got one lug nut on there. Now I can let go of the wheel. I'll get my other four on. I'll just bottom them out, and then we're going to torque them down to 130 foot-pounds. We've got our 22-millimeter socket, our torque wrench set to 130 foot-pounds. We're going to go ahead and we're just going to start with one. We're going to make a star pattern. If we want to, we can go around again just to double check. I'll just go around again now that I know they're all torqued down. You can go in a circle if you want or continue in your star pattern. There we go. Now we've got it all torqued up to 130 foot-pounds and we've completed our job. Great job, everybody.
Thanks for watching. Visit 1aauto.com for quality auto parts shipped to your door, the place for DIY auto repair. If you enjoyed this video, please click the Subscribe button.