Brought to you by 1AAuto.com, your source for quality replacement parts and the best service on the Internet.
Hi, I'm Mike from 1A Auto. I hope this how-to video helps you out, and next time you need parts for your vehicle, think of 1AAuto.com. Thanks.
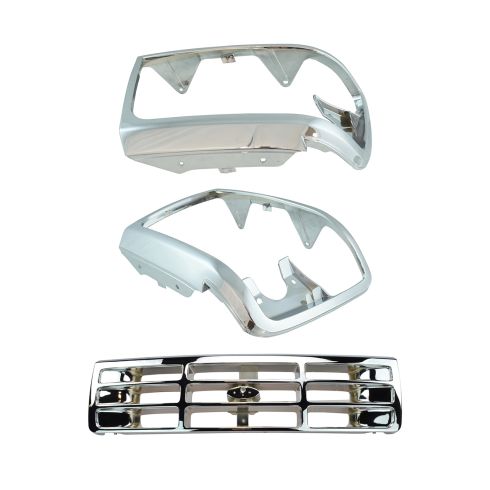
In this video, we're going to show you how to replace the headlight trim or the plastic trim that's around the headlights on this 1996 Ford F-150, pretty much the same as any '92 to '96 Ford pickup. Tools you'll need are 10mm and 11mm sockets with a ratchet, as well as a Philips screwdriver. This is useful, obviously, if that trim's been broken or if you want to upgrade from the painted or gray trim to the chrome trim.
We're going to start out working underneath the hood. We've got the hood open and we're between where the battery is in the back of the headlight and parking light. If you're looking to change the whole assembly, you'll need a long socket, 10mm. Right down in here, we'll put that socket in to a 10mm nut and undo that and then do the same thing over on this side. Right in here, there's the 10mm nut right there, and remove those two. I'm just going to fast forward through some footage here. I've taken those two nuts out of the back side. Obviously, I can't really film it that well. You can reach down in there with your wrench, your socket and ratchet. If you want, taking the battery out is an option. It lets you get down in there a little easier, but just remove those two nuts and then go from there.
I'm removing two Philips screws at the top of the headlight trim panel. I'm just removing the rest of the way, one of the nuts in the back side and, as I remove that, I'll just pull the assembly and the lights away. Pull out. Maybe there's a socket right here. Turn it counterclockwise. There's one down here. Turn that one counterclockwise as well.
So here, I'm just showing you a quick problem you may or may not run into with one of the studs from the parking light. When I went to remove the nut, the stud actually twisted out of the parking light. What I'm doing is just using a pair of vice grip or locking pliers, hooking them on to the stud, and then using my socket and ratchet to remove the nut and remove that out of there so I can put in a new one.
The side parking or side marker light is held in with two 11mm bolts, I'll remove those, put a little brace aside and remove the side marker light from the trim. Now, there are three Philips screws: one on the side and then two that are underneath. If you're looking at the trim the way it sits on the truck. Remove those three screws.
Here's our original bezel; it's actually in pretty good shape. I'm going to reinstall this. I'm just doing this video to show you. At 1A Auto, we sell a black plastic version. You can finish this black plastic. If you have one of these XL models, you can finish the plastic with some charcoal or argent silver paint to match that. Also, you would refinish it if you had a Lightning model or a model that had the trim that's the color of the truck. Then as well as that black, we also sell the chrome trim model and again, it's exactly the same. If you wanted to, you can just upgrade your truck to a chrome grill with a chrome headlight surrounds and everything, and everything goes together all the same.
It's all the same. It's going to go right in. Just put it into the inside of your bezel first, block it in here first, and then you have to pull. I'm just using my thumb. I'm pulling this right around and on there, making sure it all goes in. There are little teeth on the light that just kind of lock into the bezel. We've got it all lined up pretty well. I'll fast forward here. What I like to do is I put each screw in first, just tight them up a little bit, and then once you have them all in and just make sure they're all in and going in correctly, then tighten them up afterwards. You start them in first, and then tighten them up once you're sure that they're all in, they're in straight and they're not misthreading or anything like that. Make sure you put it right in here. Now, make sure you press it and slide it in and when I start this top one first, there's a little brace that goes on here and then we're going to start with bottom bolt in.To sum up, just remember to put that brace back on and put the bolt back on to the side marker light, tighten them up.
I'm just going to continue to fast forward here. Put the assembly close to your harnesses and put the side markers in. You can do the main parking light afterwards, just reach in behind, put the bolts on, tighten them up and then make sure you plug in that side signal or the front signal light. Finish up by reinstalling the two screws on the top of the trim.
We hope this video helps you out. Brought to you by www.1AAuto.com, your source for quality replacement parts and the best service on the Internet. Please feel free to call us toll-free, 888-844-3393. We're the company that's here for you on the Internet and in person.