Replaces
Part Details
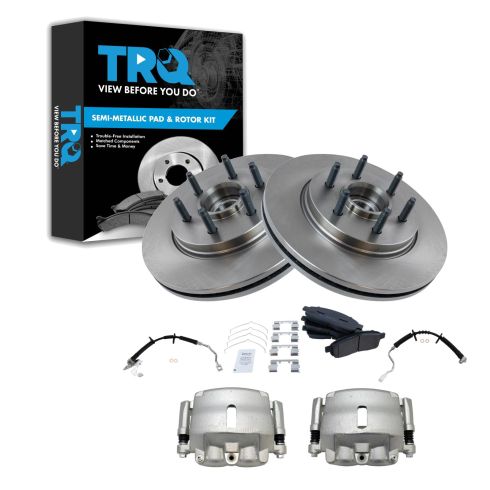
TRQ brake kits are designed to restore your brake system to like-new performance. TRQ brake pads are positive molded, thermal scorched, chamfered, and utilize a multi-layer shim for enhanced performance and service life. TRQ rotors have a non-directional finish that reduces the break-in period for new rotors as well as reducing vibrations throughout the rotor’s lifecycle. All products are fit and road-tested in our Massachusetts R&D facility to ensure we deliver on our promise of Trusted Reliable Quality.
Product Features
Item Condition:
New
Attention California Customers:
 WARNING: This product can expose you to chemicals including Lead and Lead Compounds, which are known to the State of California to cause cancer, and birth defects or other reproductive harm. For more information, go to www.P65Warnings.ca.gov.
Lifetime Warranty
This item is backed by our limited lifetime warranty. In the event that this item should fail due to manufacturing defects during intended use, we will replace the part free of charge. This warranty covers the cost of the part only.

Created on:
Tools used
Okay, friends, to get started on this job, the first thing that we need to talk about is safety. You want hand protection and eye protection at all times. With that said, safely raise and support your vehicle so you have your front wheel off the ground. We're gonna remove this center cover and then we're gonna remove the lug nuts as well. Get your wheel off of here. Okay, friends, now that we've got the wheel off of here, we have a clear view of our caliper. Of course, when we go to remove the caliper, we're gonna have to take the flex hose off of it. Flex hose is gonna have fluid inside there. We wanna make sure we have a nice collection bucket and it's also gonna be helpful if you have some hose pliers.
Put the bucket on the ground directly underneath where the fluid might come out of and then put our hose pliers right on the flex hose and this is just gonna help try to keep the majority of the fluid in the system. Okay. Now before we go ahead and take off our flex hose, there's a couple things that I wanna do. First, I wanna get the ABS wire away from here so I have a little extra slack. We don't have to worry about damaging it. A little bit of space. Awesome. The next thing I wanna do is remove these two bolts right here. Those are holding the caliper bracket to the knuckle. Once I get them out, I'm just gonna start one in just a couple threads that way there it's holding still and then I'll remove this.
There's that upper one. A couple of good threads like I said just for safety. Take your 14-millimeter and remove your banjo bolt. We wanna pay attention to these gaskets right here. We're not gonna be reusing them in any way but you definitely wanna make sure they come off of the flex hose. There we are. We got our flex hose off of here. Just give it a quick peek. Make sure it's in good enough condition to clean up. This one looks fair, so we'll move along. Let's get this caliper off of here now, and of course, dump out any existing fluid. Now it's time to quickly compare your calipers. Just make sure they're, overall, the same looking and, of course, the bleeder screw's on the same side. Once you've done that, we're gonna go ahead and get the pads out of this one.
A lot of times when you're replacing your caliper, it's gonna be due to a reason that could potentially cause issues with the pads. For us personally, our pads are in brand new condition due to another video that we did. So all I'm gonna do is remove these from here. Otherwise, if yours are in poor condition, it's a great idea to replace them anyway. I'm just gonna push this through like that. Take it out. Slide this. Do the same thing. There we are. Inspect your pads. Make sure they're in great condition. Recycle your caliper. Now it's gonna be time to prep our brand new caliper.
I always like to take off my bolts so I can get to where my sliders are because I wanna take a peek at those. Flip this right up. We'll set this part aside. Now we'll just turn this around. We can move our sliders around. These feel like they're flowing perfectly. Just double-check to make sure their boots are in great condition. Of course, they're brand new so they should be good but I always like to take a peek. Next, I'm just gonna take a little bit of caliper grease and I'm gonna go along this area here, here and then, of course, on the other side. You wanna lubricate any area that's gonna have tins on it. Your kit should have came with some brand new tins. We're gonna make sure we use those.
As you look at them, you're gonna see they have a little flippy do here. Kinda comes off shooting out. That needs to get pressed into this area of the caliper bracket. That's, kinda, what holds it in there. Put this on just like that and then, of course, squeeze right in the center and push it in. Give it a tug. Make sure it's not gonna fall off. Do the same to the other one. Also in your kit, came these little springs. These springs are gonna be what holds the pads separated from each other. If you wanted to, you can do this the way that I'm gonna do it now which is on the bench.
I'm just gonna put the caliper all the way together and then, of course, when we get over to the vehicle, we'll mount it on and then we'll torque everything down. I'll just take my pad. Slide it in right here. Should fit right into the tins. There we are. Do the same for the outer. Okay. We've got both pads in there. We'll put these here for now and then we're gonna move along to right here. On the caliper itself, you wanna add a little bit of the caliper grease along the piston itself right there and then, of course, on these three prongs right along here. That's gonna help with vibration dampening and noise reduction overall.
Now we're just gonna take our little springs. We're gonna put them into the pad. When you put them in, they should slide right into the hole and you're gonna notice it's gonna wanna push the pad out. It should stop once it gets to the little lip right there on each side. Take your caliper, slide it right over the top of these. Now it's gonna be time to install these. It's a great idea to use a tiny bit of thread locker, but we'll call it your prerogative. Let's just bottom these out. Back at the vehicle, next thing we need to do is clean up the flex hose, the area where those gasket is gonna be. I'm just gonna spray it down with a little bit of parts cleaner. Try to wipe it down with a rag.
If it seems as though there's still a lot of crud on there, you could try to pick it off with a screwdriver or a tiny piece of sandpaper, whatever you need to do but it needs to be clean. Go ahead and grab onto that caliper. We're gonna slide it right over the rotor here. There we are. We'll take our two bolts. Of course, if you wanna use a little thread locker, once again, it's your prerogative. Put them in, bottom it out, and then we'll torque them to manufacturer specifications. Now let's go ahead and torque these caliper bolts to 47 foot-pounds. Now we're gonna torque our caliper bracket bolts to 148 foot-pounds. Okay. It's gonna be time to get our flex hose on here. Let's go ahead and get this little piece out of our caliper. We're gonna use this in our old caliper. Now we have our brand new banjo bolt and, of course, two new gaskets. You absolutely need to use new gaskets, no matter what.
Put one of those gaskets right on the banjo bolt. Take the banjo bolt, go through your flex hose. Take your other gasket. Put it on that banjo bolt and now we'll go ahead and put it right onto the caliper and, of course, tighten it up. Okay. Once it's bottomed out, just go a teeny bit more. Give it a nice wiggle. Make sure it's not loose in any way. Remove your hose clamp pliers. Now it's gonna be time to get our ABS wire reconnected on here. You wanna make sure that's secure. If any of the clips are broken, make sure you use a wire tie to hold it on there.
Using a small pocket screwdriver, remove your bleeder screw cover. There we are. Set that aside. Next, what I always like to do is pump up the brake. You pump up the brake and then you come over here and you open up this bleeder screw. Okay. So, I got that pumped up. Now I'm just gonna use my 11. I'm gonna turn this so it's open and then we're just gonna watch right here for brake fluid to start coming out. As brake fluid starts coming out, you're also gonna see a whole bunch of air bubbles. Wait until you don't see any more air bubbles and then we'll continue on with a manual brake bleed. Okay. This is coming out great now.
So I'm just gonna go ahead and close this off and then, of course, we'll continue on with the manual bleed. Okay. So, now it's time for a manual bleed. Something that's important to remember before you go ahead and start that though is if you're replacing more than one caliper or more than one thing that's hydraulically related, you wanna start farthest from the master cylinder as possible. So, if you did anything in the left rear or the right rear, of course, you're gonna wanna go there. It's gonna go right rear, left rear, right front, left front. Where we're only doing the left front caliper right now, this is the only one you're gonna see.
With that said, we're gonna have somebody inside the vehicle. We're gonna make sure we check the brake fluid before we start this because, of course, we wanna have a full master cylinder. I know I do so I'm gonna continue. The person in the vehicle is gonna pump the brake three times slowly. On the third time, they're gonna stay holding and they're gonna hold the brake pedal. At that point, I'm gonna open up the bleeder and fluid's gonna come out. You wanna pay attention to make sure there's no air. Any time you see air, of course, you're gonna have to redo the service again and then once you don't see any more air, you should be all set. So here we go.
Go ahead and pump the brake for me. Here we go. So, I'm just gonna open this up. I can see a whole bunch of air bubbles coming out of there. Try to collect as much of this into the receptacle as possible. Okay. I'm closing it and now they're gonna pump it again. Once they're holding, we'll open it again carefully. Watch for those air bubbles. A lot of air. Let that go for a second here. All right. Go ahead and pump it again. Towards the end of that one, I noticed that I didn't see any more air coming out. It was just solid-fluid but at the beginning, I did see that there was air. So, that tells me that I wanna do it at least one more time and I wanna make sure I have a solid flow of fluid with no air. Let's try it again, please. Here we go.
Once again, still getting some more air but towards the end, I got minimal. Once again, we have to do it again. All right. I got a couple of tiny air bubbles on that one so let's just do it again. Okay. You can let up. At that point, I saw that it was a steady stream of fluid. So that tells me that this should be fine. If you wanted to go again, we'll call it your prerogative. Something else you wanna do is, of course, make sure you clean down any brake fluid that might have gotten on anything at all. Brake fluid will, of course, ruin any paint that it happens to touch on so you wanna clean that off and, of course, if any is on the ground, clean that up as well.
Now I'm just gonna grab my little boot here. I'm gonna pop it on there and we can move along. Now it's time to get our wheel back up on here. We'll start on all of our lug nuts, bottom them out, and then we're gonna torque them to 150 foot-pounds. Next, you need to get your vehicle so the tire is just barely on the ground so it can't spin. We're gonna torque the lug nuts, like I said, to 150 foot-pounds in a star pattern. Once you've torqued it, make sure you put back on your center cover, of course. You always wanna make sure you top off your brake fluid anytime you're done.
Tools used
Brought to you by 1AAuto.com, your source for quality replacement parts and the best service on the Internet.
Hi, I'm Mike from 1A Auto. I hope this how-to video helps you out, and next time you need parts for your vehicle, think of 1AAuto.com. Thanks.
In this video, we're going to show you how to replace the rear brakes on this 2005 Ford F150. We show you on the passenger's side but the driver's side is the same procedure. The items you'll need for this is a new brake pads and rotor kit from 1AAuto.com, a 10 and 21mm socket and ratchet, a hammer, flat blade screwdriver, large C-clamp, wire brush, torque wrench, brake grease and jack and jack stands.
Pry off the hub cap and then remove these 21mm lug nuts and you just want to loosen them each up while the vehicle's still on the ground. Then you want to jack the vehicle up and support it and then remove the lug nuts the rest of the way. Then your wheel will pull free.
With your wheel off, you can do a quick inspection. You just want to feel with the back of your fingernails the rotor and you're just feeling for any deep grooves. You're going to have slight grooves. You can see the brake pads. Actually you can see them better right through here. There's the brake pad and then the rotor and the brake pad. You can see, actually, the rear brakes on this look fairly new but we're going to replace them anyways just to show you.
We'll remove these two 10mm bolts. A good idea, just to help you get it apart, take a large screwdriver or pry bar and you can just pry against the rotor and just do it slowly and easily. If you get a good enough grip, you can actually push the piston all the way back in, which is what you want to do. Then you want to pull the top up first and then pull that right off. Now the rotor will pull right off.
To remove your shoes, you want to remove the outer one first. Pry it with a screwdriver and just pull the shoe this way a little bit, pry out, and the inner one just pulls right out. These are the surfaces that your brake pads slide on and what can happen is, as these trucks age, this cast iron bracket, caliper bracket . water will get in between the bracket and slide and it will start rusting and that will cause these slides to actually expand a little bit and they'll seize your pads into the one spot and your brakes really won't work. First just clean the slide itself off with a wire brush and then we want to remove the slide. Just pry out these end tabs a little bit and now we want to wire brush the caliper bracket itself, as well.
I'm seeing just a little bit of scale here so I'm just going to take a chisel and if yours is in good shape, you don't have to worry about this but I'm just going to scrape it down some. Then there's two little indents here, the indents on the slide go to the outside, just put it in place. Then we're just going to put some brake grease on the slides. We've repeated the entire process for the slide up above it and then we're just going to apply some brake grease to that as well.
On the right, are the old brake pads and rotor. On the left, are the new ones from 1A Auto. You can see they're identical and they'll fit exactly the same.You want to push the piston back in. I was able to do that with a screwdriver at an earlier step but if you wanted to make sure, you could use a large C-clamp and take the C-clamp and press it back in. You can also just put your old brake pad in there for something for the C-clamp to be able to push on.
I'm putting my old brakes back on because as you saw they're in good shape and when you put the rotor on, make sure it goes on. You want a little bit of contact from the emergency brake shoes. You can see there's a lot of play so we're going to adjust the emergency brake shoes. On this side, we're going to go down and it's exposing more threads so that means it's pushing the emergency brake shoes out. The rotor still has quite a bit of play, so we'll continue to adjust it.
For the inner pad, again I'm using my original ones because they're in good shape. It goes into the caliper and then the outer one pushes in. Here you want to make sure these are nice and free, push them that way so it will go on. You might have to pull them out a little bit and they go right in. We'll just fast forward as Mike replaces those two 10mm bolts and tightens them up. Now torque both of those to 17 foot-pounds.
We'll fast forward as Mike replaces the wheel and then replaces those lug nuts and tightens them preliminarily. Then lower the vehicle and torque each of the lug nuts in a crossing pattern to 120 foot-pounds. Then just replace that hub cap.
After doing any work on the brakes, you just want to pump the brake pad until it firms up and then doing a stopping test from 5 miles per hour, then 10 miles per hour.
We hope this video helps you out. Brought to you by www.1AAuto.com, your source for quality replacement parts and the best service on the Internet. Please feel free to call us toll-free, 888-844-3393. We're the company that's here for you on the Internet and in person.
Tools used