Replaces
This part doesn’t fit a . Select from parts that fit.
Part Details
Item Condition:
New
Attention California Customers:
 WARNING: This product can expose you to chemicals including Lead and Lead Compounds, which are known to the State of California to cause cancer, and birth defects or other reproductive harm. For more information, go to www.P65Warnings.ca.gov.
Lifetime Warranty
This item is backed by our limited lifetime warranty. In the event that this item should fail due to manufacturing defects during intended use, we will replace the part free of charge. This warranty covers the cost of the part only.


Created on:
Tools used
Tools used
Brought to you by 1AAuto.com, your source for quality replacement parts and the best service on the internet.
Hi, I'm Mike Green. I'm one of the owners of 1AAuto. I want to help you save time and money repairing and maintaining your vehicle. I'm going to use my 20+ years' experience restoring and repairing cars and trucks like this to show you the correct way to install parts from 1AAuto.com. The right parts install correctly. That's going to save you time and money. Thank you and enjoy the video.
In this video we're going to be replacing the serpentine belt tensioner on this 1997 Ford expedition. This procedure is the same for any Expedition, Excursion, F150, Navigator, even Blackwood; as long as you've got a 4.6L, 5.4L, or even the V10, this is the same. The tools you'll need are 8 mm 5/16 wrench to disconnect your battery, a 1/2-inch ratchet bar, and a bigger wrench to help you get your belt, and then a 10 mm socket and ratchet to remove the bolts. That size could change by vehicle but probably not.
What you want to is disconnect your negative battery cable. On these trucks it's either a this is a standard 5/16, or 8 mm's also work.
Okay, so you're obviously going to have to remove your serpentine belt. The belt tensioner has a 1/2-inch square hole in it, so basically what I'm showing you here is that's a 1/2-inch drive handle that is in the tensioner, so basically you want to take a 1/2-inch drive socket handle and get it into the tensioner. Now I'm going to take a large wrench and actually get it on that handle, which gives me more leverage, and then you pull up on the wrench, and then I'm going to fast motion here. Once you pull the wrench aside, you can pull the belt right off of the alternator. Then you basically you don't have to pull it all the way off, probably get the tensioner out, but you have to pull it at least partway out.
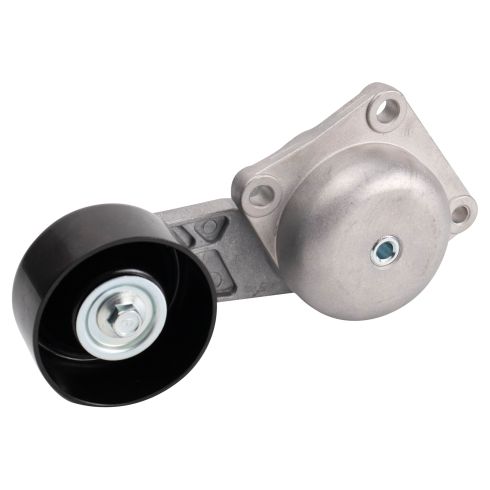
Your serpentine belt tensioner is right here. It attaches with three bolts: one there, one right down there, and one here. Those are 10 mm bolts. Okay, a little fast forward through the kind of monotonous stuff. Don't try to work this fast at home. Goes to here. I've got my wrench on this last one, not a lot of room to get my hand down in there to push. I'm having a lot of trouble with it, so I'm going to do here put this block of wood down in there to contact the wrench, and then use a little old-school impact here. Got it, loosen it up. Okay, and again, after that little tip, we'll go through a little fast forward. And again, do not try and duplicate my lightning-fast hands there.
The tensioner fell off and fell down, and so, there is the tensioner out of the vehicle. Obviously, our tensioners will not be exactly the same. This tensioner is fine, so I'm actually just going to mount it right back on the vehicle, which is going to be fun. The tensioner mounts in this way with the pulley facing in. So what I'm going to do is I'm going to get it down in there, and them I'm going to get this first bolt in, the easiest one to reach. So I feed it down, and I get my hand under here to support the tensioner, manage to the tensioner in place, get that first bolt in. One in place, and then the hardest one will be this right down here. I got all three bolts in place. I'll hand tighten them, and then I'll tighten them up.
Okay, we're going to some fast motion so you won't have to watch all this boring junk. I'm just using a little bit of air ratchet there, a little bit, and then tightening it with my hand.
Once those are tight, then you're ready to put your serpentine belt back on. When you're ready to put your serpentine belt back on, you definitely want to find this diagram right here. This is your routine diagram, and it's really going to be difficult for me to video putting the belt on; so I'm going to kind of show you what the best practice is.
What you want to do is curl your belt up and feed a loop down through here, and then put that loop around the AC compression. Then the same thing: take it, make a loop, feed it down in here to put around your crank, and then feed a loop down here to your power steering pump. Then make sure it's up and over your water pump, and then you basically should be able to pull your belt up, and then you put your handle back into the tensioner here, pull this way on the tensioner, and you should be able to pull up and onto the alternator.
Once you got your belt on, reattach your battery, and start up the car. Listen. Make sure there's no screeching or grinding or anything, and if it's all nice and quiet, then your belt's on there correctly.
We hope this helps you out.
Brought to you by www.1AAuto.com, your source for quality replacement parts and the best service on the internet. Please feel free to call us toll free, 888-844-3393. We're the company that serves you on the internet and in person.
Tools used
Brought to you by 1AAuto.com, your source for quality replacement parts and the best service on the Internet.
In this video, we're going to show you how to replace the serpentine belt tensioner on this 2003 Ford F250 Super Duty with the 5.4 liter engine. This process is pretty much the same for the 5.4 liter as well as the 6.8 liter, although the 6.8 liter has a little less clearance to get in there. Tools you'll need are a ½ inch drive breaker bar or a ratchet handle with pipe and you'll see how I use that when I reinstall the belt. You'll also need a 10mm socket with a ratchet extension or a 10mm wrench will work. In addition you'll need a stool and you'll hear some squeaking in the background a lot in this video and that's the stool slipping underneath me as I'm leaning over the hood of the truck.
Very important: find your belt routing diagram. On this truck, it's on the driver's side, right near the radiator. It looks like this. This is a very important piece of information. This help helps you get the belt routed correctly. It can be somewhat confusing if you don't have a diagram. If this has been painted over or is missing, I would actually draw a diagram just by hand, just so you have it. It helps.
Here is your tensioner right here, take a ½ inch ratchet, insert it there. Now force your ratchet clockwise to loosen the belt, and then take if off the alternator. Push down on the ratchet, grab the belt and slowly let your tensioner back, and pull the belt off. It goes down around your compresser here. Your tensioner is held on by three bolts: here, here and here, all 10mm. So I don't bore you, I'm going to hit the fast forward button as I remove those three 10mm bolts just using a regular socket and ratchet. The bolts usually come out pretty easy. Loosen them up a few turns and then they'll turn by hand. For the last one, you may have to reach down there with your other hand and hold up the tensioner some while you remove the last bolt.
The new tensioner from 1A Auto is the exact same as the old one. I'm going to put a bolt into it. Put it down in. Start that first bolt. Just fast forward again. Just like when you take it out, you start these bolts in and they'll pretty much thread in by hand. After you thread them in by hand, then, we'll tighten them up. Now tighten these up to about 25 foot pounds or good and tight with a small ratchet like this. Everything is aluminum so you don't want to over tighten it.
Take your new belt from 1A Auto and you want to make a nice tight loop and you're going to stuff it down in between where your tensioner and idler are. You're going to then reach underneath, grab that loop, and pull it through. I know you can't really see this, but I'm just pulling it through and then putting it around my A/C compressor pulley. Keep a loop down and around the crankshaft. After you're around the crankshaft, come up and ignore the alternator pulley for right now and put it down around your power steering pulley way over here. What you do is put a little loop between your bypass pulley and tensioner, get that down around the A/C, then put your loop around the crankshaft, then pull the loop up and around the power steering pulley and then you're on everything except the alternator. Closer up, you can see the belt is way down around the A/C compressor, around the tensioner there, and around the water pump and then down around the power steering pump over here. I can pull it up some. You can see I've got my ratchet in there. Take a piece of pipe; it's going to give me extra leverage to make this job really easy. Before I pull on that, I'm going to pull by belt up and make sure to feel down around the a/c pulley and the crank pulley and the power steering pulley. Everything feels like it's on there correctly. Bring my ratchet up, use the pipe, take the tension off, put the belt on and then slowly . I don't like the way it's looking on my tensioner here. I'm just going to pull it up a little bit. Slowly release that. Take the pipe off and take the ratchet off.
We hope this video helps you out. Brought to you by www.1AAuto.com, your source for quality replacement parts and the best service on the Internet. Please feel free to call us toll-free, 888-844-3393. We're the company that's here for you on the Internet and in person.
Tools used
Tools used
Hi, I'm Mike from 1A Auto. We've been selling auto parts for over 30 years. We're dedicated to delivering quality auto parts, expert customer service, fast and free shipping, all backed by our 100% satisfaction guarantee. Visit us at 1AAuto.com, your trusted source for quality auto parts.
We're going to remove this whole panel. We're going to start by taking off the spare tire jack crank. Take that off and now there's a series of clips they have Phillips head screws in them. We'll show you how to get them out.
There's four across the front. Two more which are missing on this vehicle and then there's two clips back here which are a different style, although I'm pretty sure they should be this Phillips screw style. The way these should come out is you turn them counter-clockwise and very lightly, almost pull up on the screwdriver while you're doing it so they come out. Then once you have that out the whole clip will come up and out. You may run into them where they don't want to come out that easily, in that case you'll probably need a little 90 pick tool, although sometimes you can be successful getting. Sometimes you can get a fingernail under there, but what you'll probably have to do is get a pick tool right in underneath just to pry up a little bit when you turn it and pull it out.
These ones back here are a different style you pry up. Pull the center up and pull it out. Although I'm pretty sure these should be the Phillips screw style. I should have all the clips off, panel lifts up and off. I'm going to remove this cover. Two 10mm bolts on this side and one over on the passenger side. And remove those, 10mm socket and ratchet. Loosen the throttle body clamp with a flat blade screwdriver. Then you just kind of pull up and down on the whole ducting.
There are tubes that go in the side, once you pull it off the throttle body you can twist a little bit and pull those tubes free. Clamp for the air filter, pull that off and there's two connectors. One easy to see here, press down on the tab and disconnect. You may press on the tab, use your screwdriver and pry a little bit to help loosen it up. Connector's off and then there's another connector. Press the tab and disconnect. And the intake tube comes up and out.
Okay, you can see we have a lot of stuff off the front of our engine, which is good so we can show you how the belt routes, but obviously it's going to be more compact for you. Here at the top, the belt's on the alternator, goes down around the power steering pump, back up around your water pump then down and around the crank, up and around your tensioner, back down for your AC pulley and then back up across this idle pulley and to the alternator.
You're going to want to feed a breaker bar up from the bottom. And you're going to have the fan here, but you should be able to reach up and in and get your breaker bar in and grab and pull down. Once you pull down, you can flip it off of one of the pulleys and then release your breaker bar slowly and take it out. And now you can reach down, bring the belt up, flip it off the water pump, and pull it up and out, and then pretty much the hardest part will be get it off your AC compressor, and pull it up through.
Three 10 millimeter bolts hold the tensioner on. One, two, and three. And they're all very reachable from up top. You'll have a little less room because the fan and fan shroud are in the way, but it's still very doable. And as the last bolt comes out, and I always save the top one for last because it's easiest to turn by hand, pull your tensioner up and out.
And to reinstall, put it down in place. Start your first 10 millimeter bolt back in. Torque these to 15 to 22 foot pounds.
Obviously we have a lot of stuff removed. This is so we can show you this process easier but you will have to contend with your fan and stuff. Take a loop between the idler and the tensioner pulleys. Push it down in and you can get it from below but push it down in and put a loop over your AC then take your belt, push it down underneath your crank shaft and put a loop around the crank shaft. Okay and then it comes up, over the water pump and down over the alternator and we'll leave it off of the power steering pulley. That'll be the last part we put on.
We're going to use a half in ratchet and the bigger ratchet you have, the better because you're going to want to feed it up into here, get it into your tensioner and keep in mind your fan will be on for some repairs. Get that ratchet as high as you can and then reach through, pull the tensioner down and then pull your belt onto your power steering pulley. It's not working on the power steering pulley, let it come off the water pump pulley, get it on the power steering pulley, sometimes it's easier to push up and onto the smooth pulley but again you'll have your fan in the way in some places. Then release the tensioner and remove your ratchet.
Put your air intake in place. Back in place over here. The tab winds up there and this clamp goes on. Just reach down and make sure nothing's getting pinched. Lock that down into place and your mass air flow connection, reconnect it. Reconnect this connector. Tube down here goes in there. Flat blade screwdriver to tighten up the clamp that holds it onto the throttle body. Throttle body cover back in place. And kind of move it around a little bit, figure out where the bolt hole is. I'm actually cheating, just looking right through here. See there, start it up and then push this side down into place and start my two bolts over here and then tighten them up.
Put the cover back on. It's in place, you can see all the holes. These back clips, just make sure the center's popped up. Push them down in, push the center in and then these ones across the front, clip in first and just push the center right in to lock it. Put your jack handle back in.
Thanks for watching. Visit us at 1AAuto.com for quality auto parts, fast and free shipping, and the best customer service in the industry.


