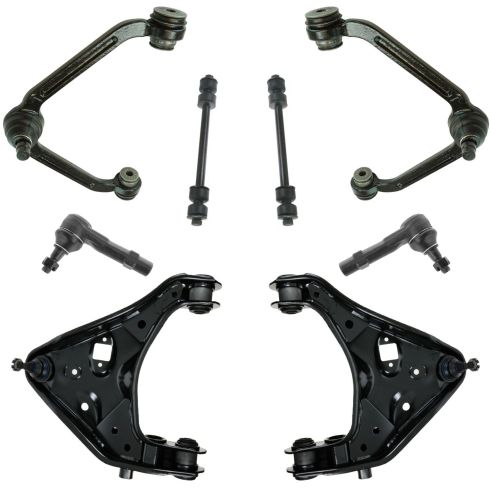
Kit Includes: (2) Front Sway Bar Links (2) Front Lower Control Arms with Ball Joints (2) Front Outer Tie Rods (2) Front Upper Control Arms with Ball Joints
Specification
Location
Front
TRQ suspension kits are manufactured using premium raw materials and coatings for extended service life. Each TRQ suspension component is designed to be a direct, maintenance-free replacement to the stock unit. To extend the life of your steering and suspension components, TRQ recommends replacing components in pairs, sets, or kits. All products are fit and road-tested in our Massachusetts R&D facility to ensure we deliver on our promise of Trusted Reliable Quality.
Product Features
Application Specific Design: No modifications necessary
Anti-Corrosion Coated: Enhanced surface life
Pre-greased: No additional maintenance required
Kitted for Restored Performance: Improved road-feel and handling
Install Tip: When replacing steering components, have a professional alignment performed afterwards. This ensures proper tracking and even tire wear.
Our steering and suspension components are pre-greased and sealed for long life and do not require the extra maintenance typically required by greaseable versions.
Item Condition:New
Attention California Customers:
WARNING: This product can expose you to chemicals including Chromium (Hexavalent Compounds), which is known to the State of California to cause cancer, and birth defects or other reproductive harm. For more information, go to www.P65Warnings.ca.gov
Lifetime Warranty
This item is backed by our limited lifetime warranty. In the event that this item should fail due to manufacturing defects during intended use, we will replace the part free of charge. This warranty covers the cost of the part only.
FREE Shipping is standard on orders shipped to the lower 48 States (Contiguous United States). Standard shipping charges apply to Hawaii and Alaska.
Shipping is not available to a P.O. Box, APO/FPO/DPO addresses, US Territories, or Canada for this item.
Expedited is available on checkout to the United States, excluding Alaska, Hawaii.
Final shipping costs are available at checkout.
How to Replace Sway Bar Link 1997-2010 Mercury Mountaineer
How to Replace Front Sway Bar Link 2006-10 Ford Explorer
How To Install Replace Front Stabilizer Links 2001-10 Ford Explorer Sport Trac
Created on:
Tools used
A Piece of Pipe (for leverage)
Hammer
Torque Wrench
16mm Wrench
15mm Socket
Rust Penetrant
16mm Socket
Jack Stands
19mm Socket
Chisel
Ratchet
Floor Jack
1. Removing the Wheel
Pry off the center cap with a flat blade screwdriver
Loosen the lug nuts with the vehicle on the ground
Raise the vehicle with a floor jack
Secure the vehicle on jack stands
Remove the lug nuts
Pull off the wheel
2. Removing the Sway Bar Link
Hold the sway bar link stud with a 16mm wrench
Remove the 15mm nut from the sway bar link
If the sway bar link is broken, fill the tube with rust penetrant
Hold the tube with vise grip pliers
Loosen the sway bar link stud with a 16mm socket and ratchet
Pull off the plastic tube
Remove any remaining plastic with a hammer and chisel
Loosen the sway bar link stud with a 16mm socket and ratchet
Push out the stud with a hammer
3. Installing the Sway Bar Link
Lift the opposite side of the vehicle with a jack
Put a washer onto the sway bar link stud
Put on a bushing
Put the sway bar link into place, through the control arm
Put on a bushing
Put on a washer
Put on the plastic tube
Put on a washer
Put on a bushing
Put the sway bar link into place, through the sway bar
Put on a bushing
Put on a washer
Thread on the 16mm nut
Tighten the nut preliminarily
Lower the jack
Support the suspension at ride height with a jack
Tighten the 16mm nut until the bushings are the same thickness as the washers
4. Reattaching the Wheel
Clip the ABS sensor wiring into place
Wipe down the rotor
Remove the placeholder lug nut
Slide the wheel into place
Start the lug nuts by hand
Tighten the lug nuts preliminarily
Lower the vehicle to the ground
Tighten the lug nuts to 100 foot-pounds in a crossing or star pattern
Reattach the center cap
Brought to you by 1AAuto.com, your source for quality replacement parts and the best service on the Internet.
Hi, I'm Mike from 1A Auto. I hope this how-to video helps you out, and next time you need parts for your vehicle, think of 1AAuto.com. Thanks.
In this video, we're going to show you how to replace the front sway bar link on this 2003 Mercury Mountaineer, same as any 2002 to 2005 Mountaineer, as well as Explorer. Our front passenger side is broken, so we show you how to get it out and replace it with a new one from 1A Auto. You'll need new sway bar link from 1AAuto.com, 16mm and 19mm socket and ratchet, a piece of pipe for some leverage, jack and jack stands and a torque wrench.
You'll want to remove your center cap. If you don't have the benefit of air tools, then loosen your lug nuts with the vehicle on the ground. Then raise both front wheels and support the car with jack stands and then remove the lug nuts and wheel the rest of the way. Now you can pull the wheel free.
This is the driver side, which is actually still together, so you would, if you're removing one that was still together, put a 15mm socket and ratchet on top and a 16mm wrench on the bottom, remove that top nut and then go from there. On ours, it's broken so I'm just filling, basically, the cavity with penetrating oil. This is pretty typical: it breaks off up top here and you saw where you just filled it up with penetrating oil and now we're just messing around with it. We locked some locking pliers onto it. That penetrating oil really helped the bolt start up and we've basically broken the plastic here. Now this plastic tube will slide off.
We're just going to use a hammer and chisel to remove the rest of the plastic. This, of course, is the worst case scenario, you just want to remove the plastic, you can use some locking pliers and then just remove the nut on the bottom or at least loosen it up as much as you can. Then just hammer this down and out.
Before installing it, just jack up the other side, just slightly. Now replace your sway link and the order it should go in is: washer, bushing, control arm, then bushing, washer, the tube, and another washer, and then the bushing, and then your sway bar, then another bushing, another washer, and then the nut. You just want to tighten that nut preliminarily,and then release the jack.
To tighten up the link, what you want to do is have the car back down on the ground, and now I have a jack supporting just the front suspension so that basically everything is level and the suspension is in its correct ride height. Then tighten up the link by holding the wrench on top and then turning the bottom. Tighten it up so that the bushings are all squeezed to about the diameter of the washers.
Replace your wheel, then replace all the lug nuts and tighten them preliminarily. Then you'd want to lower the vehicle and tighten them the rest of the way, then torque each of these in a crossing pattern to 100 foot-pounds. Now replace your hubcap. Just line it up and hit it back into place.
We hope this video helps you out. Brought to you by www.1AAuto.com, your source for quality replacement parts and the best service on the Internet. Please feel free to call us toll-free, 888-844-3393. We're the company that's here for you on the Internet and in person.
Tools used
Hammer
Socket Extensions
Torque Wrench
17mm Wrench
Rust Penetrant
16mm Socket
17mm Socket
Jack Stands
19mm Socket
Ratchet
Floor Jack
1. Removing the Wheel
Loosen the five 19mm lug nuts
Raise and support the vehicle
Remove the lug nuts
Slide off the wheel
2. Removing the Sway Bar Link
Apply rust penetrant to the sway bar link
Attach a 17mm wrench to the top sway bar link nut
Brace the wrench against the vehicle frame
Turn the 16mm bolt at the bottom of the sway bar link to loosen the nut
Remove the 17mm nut
Tap the top of the bolt with a hammer
Remove the sway bar link bolt
Remove the sway bar link bushings, washers, and sleeve
3. Installing the Sway Bar Link
Slide a washer onto the sway bar link bolt
Slide a bushing onto the sway bar link bolt
Slide the sway bar link bolt through the control arm
Slide a bushing onto the sway bar link bolt
Slide a washer onto the sway bar link bolt
Slide the sleeve onto the sway bar link bolt
Slide a washer onto the sway bar link bolt
Slide a bushing onto the sway bar link bolt
Insert the sway bar link bolt into the sway bar
Slide a bushing onto the sway bar link bolt
Raise the suspension with a jack
Slide a washer onto the sway bar link bolt
Thread the nut onto the sway bar link
Attach a 17mm wrench to the top sway bar link nut
Counterhold the sway bar link nut with the wrench
Tighten the sway bar link bolt with a 16mm socket and ratchet
Lower the suspension by lowering the jack
4. Installing the Wheel
Slide the wheel into place
Start the five 19mm lug nuts
Lower the vehicle to the ground
Torque the lug nuts to 100 foot-pounds in a crossing pattern
Hi, I'm Mike from 1A Auto. We've been selling auto parts for over 30 years. We're dedicated to delivering quality auto parts, expert customer service, fast and free shipping, all backed by our 100% satisfaction guarantee. Visit us at 1AAuto.com, your trusted source for quality auto parts.
In this video, we're going to be working with our 2006 Ford Explorer. We're going to show you how to remove and replace your vehicle's sway bar link in the front. If you like this video, please click subscribe. We have a ton more information on this and many other vehicles. If you need these parts for your car, you can follow the link down into the description over to 1AAuto.com. Here are the items you'll need for this repair.
Using a 19mm socket and a breaker bar, loosen the lug nuts on your tire. Raise and support your vehicle. We're doing this on a lift to make it easier to show you what's going on, but this job can be done at home on a jack and jack stands. Finish removing your lug nuts. You should be able to do this by hand at this point but you can use a ratchet if you need to. You can then remove your wheel and tire.
It may be a good idea to apply some penetrating oil to whatever parts you're going to be working with. Put a 17mm wrench on the nut on the top side of your sway bar link and brace it against the frame of the vehicle. You can then use a 16mm socket and ratchet on the bottom to loosen it. The sway bar link on these vehicles is essentially a series of bushing and washers with a sleeve all held together by one long bolt, as opposed to being a one-piece unit like some other vehicles.
You can see ours is pretty rough here, because there's usually not this much slack. That's actually what your bushing is supposed to look like on all four pieces, one on each side. You can see the old ones are worn down or cut there. It looks like they've actually fallen off over time. Once the nut's out, you can try to remove the bolt from the center of the sway bar link. This can be pretty difficult, so if it doesn't come out by hand, don't be afraid to get on there and give it a good hit with a hammer. The sway bar link will disassemble just like that when you pull it out, so just make sure you have all the old bushing material and all the old washers off of it.
Now you sort of need to build the sway bar link into the truck, so we'll start with a washer and then a bushing. We'll go up through the control arm, install a bushing with the tapered end down, followed by another washer, the sleeve, a washer with the cup end facing up, and a bushing with the tapered end facing up. We'll go through the sway bar, install another bushing. You may need to use a screw jack or floor jack to jack up the control arm to get enough slack on that bolt to install the sway bar link. Then install the washer and a nut and tighten your new hardware down. You'll want a 17mm wrench on the nut and a 16mm socket and ratchet on the bolt end. Just tighten that up until it compresses the bushings so you know that everything's nice and tight and there's no slop in there to make any noise when you go over bumps. Once that's down tight, you can lower the weight off of the screw jack or floor jack.
Reinstall the wheel and tire onto your hub. It's easiest to put a lug nut inside of the 19mm socket to start it onto the studs. Get all five of these down as tight as you can by hand, and then we'll torque the wheel once there's some weight on it. Lower the vehicle back down and put partial weight onto the wheel and tire. This means that you may have your jack or lift under the vehicle. Get the tire to touch and let the vehicle come down some without allowing it completely off of the lift or jack. Torque your lug nuts to 100 foot-pounds in a cross pattern.
Thanks for watching. Visit us at 1AAuto.com for quality auto parts, fast and free shipping, and the best customer service in the industry.
Tools used
Reciprocating Saw
Rust Penetrant
16mm Socket
Jack Stands
18mm Socket
Ratchet
Floor Jack
1. Removing the Stabilizer Link
Turn the wheel by hand
Hold the stabilizer link nut with a 16mm socket and ratchet
Remove the 18mm upper nut from the stabilizer link
Remove the 16mm lower nut from the stabilizer link
Pull off the stabilizer link
If the stabilizer link won't budge, remove the link with a reciprocating saw
2. Reinstalling the Stabilizer Link
Remove the top two bushings and washers, the shaft, and one bushing and washer from the link
Push the stabilizer link into place
Insert the lower bushing and washer into place
Insert the shaft into place
Insert the washer, bushing onto the shaft and insert the link into place
Insert the bushing and washer into place
Hold the lower stabilizer link stud with a 16mm socket and ratchet
Fasten the 17mm upper nut onto the stabilizer link
Brought to you by 1AAuto.com, your source for quality replacement parts and the best service on the Internet.
Hi, I'm Mike from 1A Auto. I hope this how-to video helps you out, and next time you need parts for your vehicle, think of 1AAuto.com. Thanks
In this video, we're going to show you how to replace the stabilizer bar links on this Ford Explorer Sport Trac. It's the same process for many of the Explorer Sport Tracs, as well as the regular Explorer Mountaineer, Ranger, etc. We show you on the right side, but the driver side is the same procedure. Items that you'll need for this repair are new stabilizer links from 1AAuto.com, a jack, 16mm and 18mm sockets with two ratchets or wrenches, and you'll need a reciprocating saw if your link is as rusty as ours is, and then some penetrating oil.
Our truck was making some rattling noises, and we can feel a little bit of clunking in the steering wheel. Coming under here, this is your stabilizer bar, and it's linked to the control arm with these links. When you grab hold and shake them, they should be nice and firm. This isn't the best shot, but as you can see, as we grab hold and shake it, it'll move around some. That's causing some of our clunking and rattling.
This repair, actually you can keep the wheel on. I just have it off to make it a lot easier to film. What I've got here is you can see that the lift is underneath the frame so it's supporting it, and I just have the jack under here to put the weight back on so that you can see I can grab hold of the link and move it back and forth. That's how it would be if it was just sitting on its tire as well, but this makes it a lot easier to video. We use some penetrating oil and spray the top of the shaft. You'll see that was kind of a [mute 00:01:51] point. 16mm socket on the bottom and then an 18mm socket and ratchet on top. You're going to see it just breaks apart, which is actually a good thing.
I can see the condition is really bad, but I'm still going to make a half-hearted attempt. Spray the stud down with some penetrating oil. Then I take a few whacks at it with a hammer, but it makes no movement at all. I'm going to bring in the big guns. Lock onto that top stud with some locking pliers to hold it from spinning. Then, a reciprocating saw, and I'll fast-forward here as we cut through down at the other bushing. There you go. Your old one is out.
Take your new link. Just remove the nut, remove the top two bushings and washers, the shaft, and one of the bottom bushings and washers. You just now have the shaft and one washer and bushing at the bottom. Put it up through, put one bushing and washer with the washer up on, and then put the sleeve on. Jacking up the side you're working on and letting the wheel hang down some will help you get extra space. Now put the washer close to the sleeve and put the bushing on. The little step should go into the sway bar, then push the link up through. Put the top bushing on, then the washer, and the nut. I just jacked the suspension up a little bit more. If you're not taking the wheel off, you would let it down a little bit just so you can get things together and thread the nut on.
You want to replace the other side. You can see I've replaced it. I did it with the wheel on, and I've also tightened it up. Now you want to tighten them up. The new links may be a slightly different size. I think it's a 16mm link and a 17mm nut. When you tighten them up, you basically want to tighten them, make sure that the vehicle is in the correct ride position. Again, if you're just doing it with the wheels on, it's a little simpler, because with the wheels on it's in the correct ride position. You're basically tightening it up until the bushings push out enough so that they're the same kind of size or diameter as the metal washers. If you do end up taking your wheel off, make sure you reinstall it and torque the lug nuts to 100 foot-pounds each.
Thanks for tuning in. We hope this video helped you out. Next time you need parts for your car, please visit 1AAuto.com. Also check out our other helpful how-to and diagnosis videos.
PSA63544
In Stock
Product Reviews
Loading reviews
5.00/ 5.03
3 reviews
5 Stars
4 Stars
3 Stars
2 Stars
1 Star
3
0
0
0
0
Eduardo
October 21, 2019
Great quality parts
John
February 11, 2024
Great company too bad parts were lost in freight had to pay mech extra but i did get 2nd shipment in.
I will order other things when i need them thank u
I will recommend.
Kit fits like a Glove!
[{"url": "https://wac.edgecastcdn.net/001A39/prod/media/pNISJll75W64CYGsite/dc70f0340cac4a931aff30b333ce457b_1714000217362_0.jpeg", "caption": "Picture of the kit after I finished it."}]
Tyler
April 24, 2024
I bought a 02 ranger back in december to serve as a beater truck during my time in fort drum, ny. Me being me, it turned into a resto project.
Every single thing want to replace I watch removal and install videos on youtube. Low and behold I found 1A Auto, my saving grace.
As a thank you for the videos, I started looking and buying all my parts from 1A Auto. Shortly after arrive to new york my truck started screeching in turns and over any bump in the road. Research pointed at ball joints. Came here and boom whole kit.
I watched all the vids over and over while I waited for the kit to arrive. The kit arrived and I installed the entire thing in about hours using the Auto Skills Center on post.
I had 0 issues, my torsion bars slid in and out no problem. I did pb blast everything every day for 3 days given the truck has 268k miles and everything original, so that may have helped.
Only critique I could give on the kit is the ball joints are not serviceable. Mine came in with soli
Customer Q&A
are these parts made in america? PART #: 1ASFK06631April 13, 2019
Scythe S
10
1A Auto's house brand parts are manufactured by various aftermarket companies specifically for us and built to your vehicle's exact OEM specifications.
April 14, 2019
T I
I have a 99 Mazda b3000 4x4 with the torsion bar setup. Would this kit work on my truck?December 20, 2019
Shane B
10
Thanks for contacting us. This part is listed to fit the following:
1998-2002 Mazda B3000 Truck 4 Wheel Drive Steering & Suspension Kit 8 Piece Set
1999-2000 Mazda B3000 Truck Troy Lee Rear Wheel Drive Steering & Suspension Kit 8 Piece Set
December 20, 2019
Peter L
I have a 02 ford ranger edge 4x4 with a 2 piece upper on passenger side. Can this kit delete the 2 piece and be ok?October 29, 2022
Nicholas P
10
Yes, this style can replace the 2-piece assembly without any modification.
October 31, 2022
Andra M
Customer service
877-844-3393
Monday - Friday 8:00am - 9:30pm ET Saturday - Sunday 8:00am - 4:30pm ET
Ford is a registered trademark of Ford Motor Company. 1A Auto is not affiliated with or sponsored by Ford or Ford Motor Company.See all trademarks.
Enter Vehicle Year Make Model
Specify your vehicle's year, make and model to guarantee fit.
Year
Make
Model
Options
Drivetrain
This part doesn’t fit a . Select from parts that fit.