Replaces
2004 Ford Escape Front Steering, Suspension, & Drivetrain Kit TRQ PSA58837


PSA58837
In Stock
This part doesn’t fit a . Select from parts that fit.
Specify your vehicle's year, make and model to guarantee fit.
Orders must be placed by 2pm ET

Part Details
- Bearing Type: Ball Bearing
-
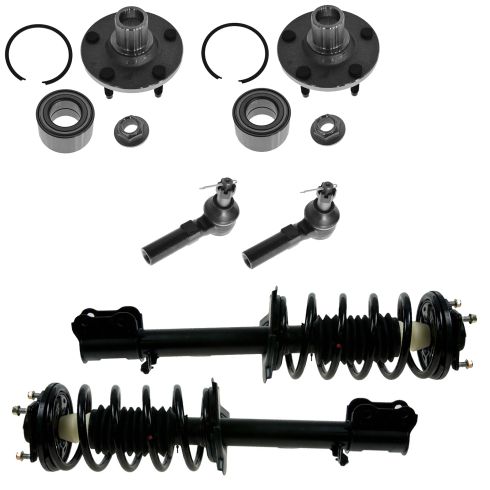
Kit Includes:
(2) Front Outer Tie Rods
(2) Front Strut & Spring Assemblies
(2) Front Wheel Bearing & Hub Kits
Specification
- Front
Product Features
TRQ drivetrain kits are manufactured using premium raw materials to restore original performance. Each TRQ drivetrain component is designed to be a direct, maintenance-free replacement to the stock unit. To extend the service life of your drivetrain, TRQ recommends replacing wheel hubs, bearings, and constant velocity (CV) drive axles at the same time to ensure even wear of components and improved ride comfort. All products are fit and road-tested in our Massachusetts R&D facility to ensure we deliver on our promise of Trusted Reliable Quality.
Replacing struts used to require specialized tools to compress, remove, and transfer the old spring and mount. Our Pre-assembled, complete strut & spring assemblies come with all new parts and make the job much quicker and easier for the do-it-yourself mechanic.
Strut & spring assembly contains:
- Upper Strut Mount
- Strut Bearing
- Coil Spring
- Boot & Bumper Kit
- Gas-charged Strut
Install Tip: When replacing steering components, have a professional alignment performed afterwards. This ensures proper tracking and even tire wear.
Our steering and suspension components are pre-greased and sealed for long life and do not require the extra maintenance typically required by greaseable versions.
Item Condition:
New
Attention California Customers:
![]() WARNING: This product can expose you to chemicals including Chromium (Hexavalent Compounds), which is known to the State of California to cause cancer, and birth defects or other reproductive harm. For more information, go to www.P65Warnings.ca.gov
WARNING: This product can expose you to chemicals including Chromium (Hexavalent Compounds), which is known to the State of California to cause cancer, and birth defects or other reproductive harm. For more information, go to www.P65Warnings.ca.gov
Lifetime Warranty
This item is backed by our limited lifetime warranty. In the event that this item should fail due to manufacturing defects during intended use, we will replace the part free of charge. This warranty covers the cost of the part only.
FREE Shipping is standard on orders shipped to the lower 48 States (Contiguous United States). Standard shipping charges apply to Hawaii and Alaska.
Shipping is not available to a P.O. Box, APO/FPO/DPO addresses, US Territories, or Canada for this item.
Expedited is available on checkout to the United States, excluding Alaska, Hawaii.
Final shipping costs are available at checkout.


Created on:
Tools used
- Pop the hood and apply penetrating oil to the top four bolts. Use a 14 mm socket and ratchet to remove the nuts.
- Loosen the lug nuts Raise and secure the vehicle Remove the lug nuts and the tire
- Apply penetrating oil to your 10 mm brake line bracket bolt, 14mm Stabilizer link bolt and two 18 mm strut bolts. Unbolt the brake line bracket bolt, and then use your 5 mm Allen wrench to stabilize the bolt and work the nut loose with your 14 mm wrench or socket. Continue to loosen, apply penetrating oil, tighten, loosen, apply penetrating oil and repeat until you work it loose. Use a breaker bar or pipe and ratchet to remove the 18 mm bolts.
- Position your strut into place and thread your 6 nuts on. Torque the top four 14mm bolts to 35 ft lbs. Tighten and torque the bottom two bolts to 85 ft lbs. Bolt your stabilizer link back in as well as your brake line bracket. Use your 14 mm socket, ratchet and 5 mm Allen wrench to install the stabilizer link. The brake line bracket can be reinstalled with a 10 mm socket and ratchet.
- Replace the wheel and hand tighten the lug nuts. Lower the vehicle and torque the lug nuts in a star pattern to 100 ft lbs.
Brought to you by 1AAuto.com, your source for quality replacement parts and the best service on the Internet. Hi, I'm Mike from 1A Auto. I hope this how-to video helps you out and next time you need parts for your vehicle, think of 1AAuto.com. Thanks.
In this video we're going to show you how to replace a front strut on this 2002 Ford Escape. The strut is the same for any 2001-2011 Escape, although getting the wheel off may be a little different for different vehicles. We show you the driver's side. Obviously, you want to replace struts in pairs and the passenger side is the same procedure. Tools you'll need are a jack and jack stands. You'll 10-19 mm sockets and wrenches. You'll need the ratchet, some extensions, a breaker bar or a pipe, because you'll need some extra leverage on some of those nuts and bolts. Flat blade screwdriver, large hammer, a 5 mm Allen wrench, and a torque wrench.
First, with the vehicle on the ground, you're going to remove the four bolts at the top of the strut right here in the engine compartment. Use a little bit of penetrating oil, make it a little easier to get them off. Let that sit for a minute. These bolts should only be tightened to 35 foot pounds, so they should come off pretty easy and they are 14 mm. Now, using a jack, raise the vehicle up off the ground, putting the jack right underneath the front control arm. Then make sure you put a safety jack stand underneath the frame rail there. Next, remove the wheel and tire. If you don't have the benefit of air tools, loosen the lug nuts while the wheel is still on the ground, then raise and support the vehicle and remove the tire the rest of the way.
Now we're going to have to remove this bolt here, which allows these brackets to just kind of move to the side. We'll need an Allen wrench and a wrench to remove this bolt that holds the stabilizer link. Then there's two large bolts here that we need to remove. Again, coat everything with penetrating oil and let them sit for a while. Again here I'll use a little fast motion as I remove that. The bolt that holds the bracket in place is a 10 mm and it can be a little difficult. In fact, you may break it on some vehicles. If you do break it, you'll have to just source a similar bolt from the hardware store. Okay, one thing I didn't go over, there is a clip that holds the brake line in, just use a large screwdriver and pry that clip out. It comes out pretty easily. Then we'll let the brake line down and out of your way.
Okay now, this probably about the most difficult part. I've got a 14 mm wrench on the nut that connects the stabilizer to the strut, then I take another wrench, connect it to it and that gives me some extra leverage and I can start the nut spinning. Then as you get it looser, usually the stud that's part of the stabilizer link will start spinning as well. See here, I take the 5mm Allen wrench and put it into the stud and the stabilizer and work it in there really well. It's usually kind of rusted in there. Maybe take a small screwdriver, clean it out a little bit. Really work that Allen wrench in there well and then hold the stud with the Allen wrench. Okay, this is where it gets difficult. If you have a torch or a Sawzall, I could recommend that you cut the stabilizer link stud and then just put a new one in, but most of the time you want to save that. Basically what you do is you loosen the nut up as much as you can while you're holding the Allen wrench and once you can't loosen it anymore, then you tighten it back up. Spray it with penetrating oil again, loosen it up again, tighten it up. Spray it with penetrating oil, keep loosening it and I probably did this a total probably of about 15-20 times and finally it worked the lock nut all the way off.
Okay, so now we're on to the large bolts that hold the strut at the lower end. You can see I have an 18 mm socket and I'm actually using a pipe and a ratchet. The pipe gives me some extra leverage. What I do is I position the wrench right up against the vehicle and then pull with the pipe. Okay, then we'll fast forward here as I use my impact wrench, put it on there and get that bolt off the rest of the way. Okay, here on the second bolt, you're going to see the bolt actually breaks and that's probably going to happen just about half the time with these. Okay, use a hammer and a punch to start driving the bolts out and then you can let down the jack that releases most of the pressure off the strut and then the bolts will come out and then you remove the strut. Okay, so here is our original strut, and you can see that the spring is actually broken. This vehicle was making a clunking noise whenever you turned the wheel and sometimes when you started out and stopped.
Here's our new strut from 1A Auto. The spring is assembled. It's got all the right brackets and everything on it. Just going to remove the nuts from the top here. Okay, so now we're going to take the new strut and make sure that the bracket that goes around the steering knuckle's pointing out, put it down through between the tie rod and the lower control arm and then bring it up in to place. Kind of get the lower mount set on the steering knuckle, so it kind of is now roughly in place. Now you can go up top and just take your nuts and, if you need to, you can jack up the jack a little bit, but just get those four studs on top in place, put those nuts on, and then just kind of preliminarily tighten them up; you'll torque them later. Okay, from here on out, it's pretty much a reverse of the procedure. You can see I lift the steering knuckle up and kind of work it in the position and get both of the bolts through the strut and into the steering knuckle. Then put on washers and lock nuts and obviously, because one of them broke, I'm using two brand new bolts. Now here I'm jacking the car back up to put the weight back on to the suspension. Tighten and torque these bolts to 85 foot pounds. Torque these upper bolts to 35 foot pounds.
Just speed up as I do those last two. Okay, and now to put the stabilizer link back together. It goes back together a lot easier than it comes apart, needless to say or regardless, I just use a little bit of penetrating oil on there anyways, then use the 5 mm Allen wrench and the 14 mm wrench and tighten that up. It does go a lot faster when you're at about seven times speed too. Now, put the bracket back in place and put that 10 mm bolt, again, if that bolt broke use a, it's probably about a M8 self tapping bolt that just kinds of bolts into the strut. Then put the brake line back in place. Use a small hammer to tap the clip in place. Then just check and make sure nothing's rubbing or chafing on anything. Now, put your wheel and tire back in place. Put the lug nuts on and just kind of tighten them preliminarily. You want to torque them once the vehicle's back on the ground and secured. Set your torque wrench to a hundred foot pounds and then tighten them up using a star pattern as the order and then put your cap back in place.
We hope this helps you out. Brought to you by www.1AAuto.com, your source for quality replacement parts and the best service on the Internet. Please feel free to call us toll free, 888-844-3393. We're the company that's here for you on the Internet and in person.
Tools used
- Loosen the lug nuts with the vehicle on the ground Raise the vehicle with a floor jack Secure the vehicle on jack stands Remove the lug nuts Pull off the wheel
- Secure the rotor with a pry bar Remove the axle nut with a 1-1/4 inch socket and breaker bar
- Remove the clip from the brake line with pliers Remove the 10mm bolt from the ABS wiring harness bracket Remove the 10mm bolt from the ABS sensor and remove the ABS sensor Remove the upper sway bar link nut with a 15mm wrench and 5mm hex wrench and 17mm wrench Remove the upper sway bar from the strut Remove the loosen nuts from the strut with an 18mm wrench, 18mm socket, 1/2 inch breaker bar, and a hammer Hammer out the lower strut bolts with a punch and hammer Lower the vehicle Open the hood Hold the strut by hand Remove the four nuts surrounding the center nut from atop the strut with a 14mm socket and ratchet Remove the strut
- Insert the strut into place Tighten the 14mm nuts atop the strut Torque the top nuts to 35 foot-pounds Connect the knuckle to the strut Insert the two lower strut bolts into place Tighten the lower strut bolts with an 18mm wrench and 18mm socket and ratchet Torque the lower strut bolts to 85 foot-pounds Line up the ABS wiring harness bracket Tighten the ABS wiring harness bracket with a 10mm socket and ratchet Tighten the 10mm bolt to the ABS sensor Insert the brake hose into the bracket Insert the clip to the brake hose with a hammer Tighten the upper sway bar nut with a 15mm wrench and 4mm hex wrench Torque the upper sway bar nut to 46 foot-pounds
- Secure the rotor with a pry bar Torque the axle nut to 221 foot-pounds with a 1-1/4 inch socket and torque wrench
- Slide the wheel into place Start the lug nuts by hand Tighten the lug nuts preliminarily Lower the vehicle to the ground Tighten the lug nuts to 100 foot-pounds in a crossing or star pattern
What's up, guys? I'm Andy from 1A Auto. In this video, I'm going to show you how to replace the front struts on this 2012 Ford Escape. If you need this part or other parts for your vehicle, click the link in the description and head over to 1aauto.com.
One thing you're going to want to do anytime you do any kind of front-end repair or suspension repair, you're going to want to go to a local shop and have your alignment performed. Otherwise, you're going to have premature tire wear.
I've raised and supported the vehicle, and I took the tire off, and now we're going to take this nut off. I'm going to use a pry bar and a 1 1/4 socket and a breaker bar. I'm going to use the pry bar to prevent the hub from spinning. I'm just going to set this up, just like that. Spin this around, and then the ground is going to support that from spinning. Just loosen this up.
Now that nut is loose. Now I can raise the vehicle up to chest level. I'm just going to use some pliers. I'm going to take this clip off that holds the brake line on. Just grab it and slide this out, just like that. And we can take this brake hose; slide it out of our way.
I'm going to take a 10mm socket, extension and a ratchet. Take this bolt out, right here. This holds the bracket for the ABS wiring harness. It's pretty rusty. If you have to, put a little rust penetrant on there. Pull that out. Slide that out of the way. Just so I don't break it, I'm going to take the bolt out, right here, that holds the ABS sensor in. I might be able to do it without taking this out, but I don't want to break the wire. Take that out. Pull this out of here. Slide that out of the way.
Before I take this nut off, I'm going to use a little bit of rust penetrant because—just make it easier taking it off. Let that soak for a little bit. With a 15mm wrench, I'm going to slide that over the nut, and then I can hold the stud with a 5mm Allen socket and a ratchet. Just put the ratchet on and tighten, and I'm going to loosen this. Loosen that up; get the nut off, like this. The backside, here—I can just take a 17mm wrench, hold the stud from spinning while I loosen up the nut. Alright. Pull that nut off and slide that out.
We want to take these bolts out. I'm going to take the—loosen up the nuts, right here. Before I do that, I'm going to spray them down with some rust penetrant. I'm going to take an 18mm wrench, 18mm socket and a breaker bar. I'm going to loosen up the nut—both of these nuts—and loosen up the lower one. Before I take these nuts off, I'm just going to take a hammer and I'm just going to tap them—tap the bolts out. The reason I left the nuts on is so that I don't mushroom the end of the bolts. Otherwise, you won't be able to reuse them.
Then I'm going to take a punch and the hammer. Just hammer it out, like this. This is going to move a little bit. Watch your fingers. Then I'll hammer this lower one out as well. Make sure you check the brake hose. Make sure there's not too much tension on the brake hose. That's good. Take those out and set them aside. Alright. So, these strut poles are not slotted, so you don't really have to worry about marking this. If these were slotted, you'd want to take a marker and just go around where the bolt holes are, or where the knuckle goes into the strut, so that when you put it back together, the alignment isn't very far off. It'll be less far off.
We lowered the vehicle and we opened the hood. And now we want to take these four nuts out, but we want to make sure we don't touch the nut in the middle because if you took that out, the spring is going to come separated from the strut and then it could be dangerous. So, just focus on those four. I'm going to use a 14mm socket and a ratchet. When I take this last nut off, I'll loosen this up. Before I take it off completely, I'm going to want to grab underneath here. Grab the strut itself—if you can grab it by the spring and hold it up, while I take that last nut off. Or you can have a partner helping you do this. Then once it's off, slide it down, just like that.
Here's our old strut assembly. Here's our new strut and spring assembly from 1aauto.com. As you can see, they look very similar. They both have the same springs. They both have a mount at the top. The new one comes with new nuts. The brackets on the bottom are the same—it's the bracket that holds the brake hose on, and the bracket for the sway bar link. These look the same. Get yours at 1aauto.com and you'll be ready to rock and roll.
Alright. So, before I install this, I want to take these nuts off. Then we're going to slide underneath, here, and slide it up. Get the studs lined up. Take the nut. Once you get some of the nuts on, then you can let go with a strut assembly—let it hang. I'll take a—for the new nuts, they're 15mm, so I'll use a 15mm socket and a ratchet. Now I'm going to use the 15mm socket and a torque wrench. I'm going to torque these to 35 foot-pounds.
Now we're going to reinstall this to the knuckle. Just slide the knuckle up. You might have to grab underneath. If you're doing this on the ground, you might be able to use a floor jack to raise this up a little bit. Pull that up. Take the strut bolts. Get that one in and then get this one in. Get the nut. Install that one; install this one. Take my 18mm wrench, 18mm socket and ratchet. I'll snug this up before I torque it. Then with a torque wrench, I'm going to torque this to 85 foot-pounds. And same with the lower one.
We want to reinstall this bracket for the ABS wiring harness. Get that lined up. Take this bolt. Get that started. I'll use a 10mm socket and extension just to get this tightened by hand, and then I'll snug it up and just use a ratchet and snug it up—not too tight.
Then I'll take the brake hose; get this lined up. There is some little keyways in the hose, so it only goes on a certain way. It looks like it goes on like that. Just make sure it's not twisted at all—up top or down below. Take the clip. Slide the clip in.
I might have to take a small hammer and just give it a tap. Tap the clip in. Now slide this in position—top. You might have to move this stud down a little bit. Just grab it; slide it down, just like that. You can line that up. Take the 15mm nut. I'm going to use my 15mm ratchet wrench, and it's short Allen—4mm Allen wrench. Now snug that up. Take that off.
Now I'm going to take a 15mm socket on a torque wrench and tighten this nut down to 46 foot-pounds. Now I'm going to take a pry bar. Just get in between these studs, right here. Have that set against the floor. I'll take a 1 1/4 socket and a torque wrench, and I'm going to torque this axle nut to 221 foot-pounds. Be careful when doing this. It's a lot of torque. There we go. At this point, we would put the tire on, put the lug nuts on, lower the vehicle and torque the wheels.
Thanks for watching. Visit 1aauto.com, your place for DIY auto repairs, for great parts, great service, and more content.

PSA58837
In Stock
Product Reviews
877-844-3393
Monday - Friday 8:00am - 9:30pm ET
Saturday - Sunday 8:00am - 4:30pm ET
Specify your vehicle's year, make and model to guarantee fit.
This part doesn’t fit a . Select from parts that fit.


