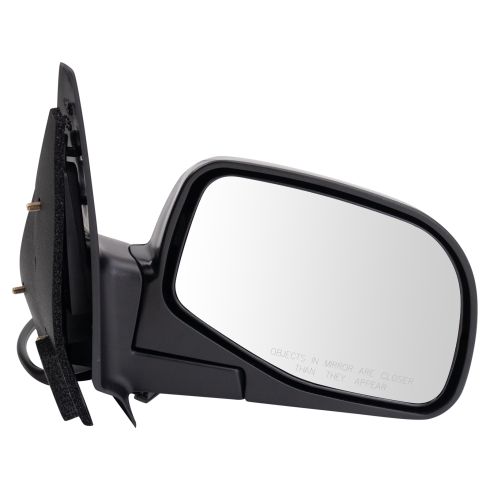
TRQ side mirrors and mirror components are designed to match the function, fixture, and performance of the original version for easy installation. TRQ mirrors are DOT certified, comply with all federal safety standards, and are independently lab tested to ensure our products comply with all government regulations. All products are fit and road-tested in our Massachusetts R&D facility to ensure we deliver on our promise of Trusted Reliable Quality.
Product Features
Direct Bolt-on Replacement: No modifications or special tools required
Complete Assembly: includes same mirror glass, housing, bracket and technology as the original unit
DOT Certified: Built to the highest quality standards
FMVSS-111 Compliant: Validated to be a dealership alternative
Exact fit - To obtain proper fit and function confirm your vehicle has the exact mirror options listed.
Item Condition:New
Attention California Customers:
WARNING: This product can expose you to chemicals including Lead and Lead Compounds, which are known to the State of California to cause cancer, and birth defects or other reproductive harm. For more information, go to www.P65Warnings.ca.gov.
Lifetime Warranty
This item is backed by our limited lifetime warranty. In the event that this item should fail due to manufacturing defects during intended use, we will replace the part free of charge. This warranty covers the cost of the part only.
FREE Shipping is standard on Orders shipped to the lower 48 States (Contiguous United States). Standard shipping charges apply to Hawaii, Alaska and US Territories. Shipping is not available to Canada.
Expedited is available on checkout to the United States, excluding Alaska, Hawaii and US Territories as well as P.O. Boxes and APO/FPO/DPO addresses. Final shipping costs are available at checkout.
How to Replace Side Power Mirrors 1995-2005 Ford Ranger
How to Replace Mirror 1993-2005 Ford Ranger
Created on:
Tools used
Socket Extensions
Flat Blade Screwdriver
Phillips Head Screwdriver
6mm Socket
Ratchet
11mm Socket
1. Removing the Door Panel
Remove the two Phillips head screws in the door pull
Pull the door handle panel out
Disconnect the wiring harnesses
Remove the Phillips head screw beneath the door handle
Remove the Phillips head screw in the bottom left corner
Lift the door panel up and off
2. Removing the Speaker
Remove the four 6mm screws securing the speaker to the door
Pull the speaker out
Disconnect the wiring harness
3. Removing the Side Mirror
Disconnect the wiring harness
Pry off the weatherstrip behind the mirror
Remove the three 11mm nuts from the mirror
Remove the mirror
4. Installing the Side Mirror
Insert the mirror into place
Tighten the three 11mm nuts to the mirror
Connect the mirror wiring harness
Press on the weatherstrip
5. Installing the Speaker
Connect the wiring harness
Insert the speaker into place
Tighten the four 6mm screws to the speaker
6. Installing the Door Panel
Insert the door panel into its slots
Press the door panel into place
Tighten the Phillips screw in the bottom left corner
Tighten the Phillips screw beneath the door handle
Connect the wiring harnesses to the door handle panel
Press the door handle panel into place
Tighten the two Phillips head screws to the door pull
Brought to you by 1AAuto.com, your source for quality replacement parts and the best service on the Internet.
Hi, I'm Mike from 1A Auto. I hope this how-to video helps you out, and next time you need parts for your vehicle, think of 1AAuto.com. Thanks!
In this video, we're going to be working with our 2001 Ford Ranger. We're going to show you how to remove and replace the driver's side-view mirror. This process is going to be very similar on the passenger's side.
If you like this video, please click Subscribe. We have a ton more information on this truck, as well as many other makes and models. If you need mirrors for your Ranger, you can get them through the link down in the description over at 1AAuto.com.
Here are the items you will need for this repair: Phillips screwdriver, flat blade screwdriver, 6-11mm sockets, ratchet, and socket extension.
Open your door, and remove the two Phillips head screws below the door handle. Open the door handle and release this panel from the door. Pry up and remove the electrical connectors from this panel, using a small flat-blade screwdriver to do this. You want to be careful not to break these arms off. This connector is removed by undoing the two Phillips head screws. You might have to just pry carefully to separate this connector with your flat blade. Remove the last connector the same way we did with the first one by prying up on those tabs and popping it off. Remove the Phillips head screw we just uncovered by removing that panel. One more Phillips head screw at the bottom corner here. Lift up on the panel and remove it from the truck.
Remove the four 6 millimeter screws securing the speaker to the door. We'll do this using a socket and ratchet. Remove the speaker from the door, and disconnect the electrical connector at the bottom.
The electrical connector for our mirror is located here, just behind the door speaker on the inside edge of the door. Remove that connector with a small flat blade screwdriver. Remove this cover to access the three bolts for the mirror. These are 11 millimeter. We're going to use a socket, ratchet, and extension. You have one in each opening. Go ahead and remove those. Don't worry if you drop any of the hardware undoing the three 11 millimeter nuts here, because we can reach down through the opening from our speaker, and get them out of the bottom of the door. When removing the last nut, support the mirror from the outside to make sure it doesn't fall. Remove the mirror from the door, and carefully pull the wiring out of the inside of the door.
Reinstall the harness through this hole. Line up the three holes that secure the mirror. We're reinstalling our old mirror because there's nothing wrong with it. These steps will be the same if you're installing a new one. Go ahead and take that socket and extension to make it easier to reinstall our three 11 millimeter nuts. Then we'll just snug them down with our ratchet.
Reconnect our electrical connector. Connect the electrical connector to your speaker. Set it into the door, and reinstall your four 6 millimeter screws. Tighten down your 6 millimeter screws with a socket and ratchet and extension. Re-adhere the cover over the holes for the bottom of the mirror.
These hooks on the inside of the door panel will slide into these slots on the inside edge of the door. Be sure that the wiring harness is pulled through when you start, and that you hook into the weather seal under the window here. Line up the door lock into its hole. With our lock in place, and our door in the weatherstrip at the top of the window, we'll push in there.
Then we can move along, lift up slightly, and push in to engage the rest of our door panel, before reinstalling the first two screws. Reinstall your electrical connectors to the appropriate switches. We'll have to reinstall the two Phillips head screws for our window switch. Once all your switches are reinstalled, line up this panel into your door. Snap the clips back into place and reinstall the two Phillips head screws under the door handle.
Thanks for tuning in. We hope this video helped you out. Next time you need parts for your car, please visit 1AAuto.com. Also check out our other helpful how-to and diagnosis videos.
Tools used
Flat Blade Screwdriver
Phillips Head Screwdriver
8mm Wrench
6mm Socket
Ratchet
11mm Socket
1. Removing the Door Panel
Disconnect the negative battery cable.
Remove the two Phillips screws behind the door pull.
Pull the panel out.
Disconnect the harnesses.
Remove the Phillips screws and disconnect the power window switch.
Remove the two Phillips screws in the door panel.
Lift the door panel up and off.
2. Removing the Side Mirror
Carefully peel off the water shield (If the truck has power mirrors).
Remove the 6mm bolts that secure the speaker.
Remove the speaker.
Disconnect the mirror harness.
Remove the three 11mm nuts that secure the mirror.
Pull the mirror out and off.
3. Replacing the Side Mirror
Feed the harness down through the door.
Line up the mirror and push it into place.
Replace the three 11mm nuts.
Reconnect the mirror harness.
Replace the speaker and the 6mm bolts that secure it.
Replace the water shield.
4. Replacing the Door Panel
Push the door panel down into place.
Replace the two Phillips screws in the door panel.
Reconnect the power window switch to the switch panel and replace the screws.
Reconnect the other harnesses to the switch panel.
Line up the panel and push it into place.
Replace the two Phillips screws under the door pull.
Reconnect the negative battery cable.
Brought to you by 1AAuto.com, your source for quality replacement parts and the best service on the Internet.
Hi, I'm Mike Green. I'm one of the owners of 1A Auto. I want to help you save time and money repairing and maintaining your vehicle. I'm going to use my 20+ years experience restoring and repairing cars and trucks like this to show you the correct way to install parts from 1AAuto.com. The right parts installed correctly, that's going to save you time and money. Thank you, and enjoy the video.
In this video, we'll be showing you how to remove the mirror on this Ford Ranger. This truck does have basically power everything, so some of the steps may be a little different if you have a manual mirror or manual windows, but you should be able to pick up enough and we have some other videos for getting the window handle off and stuff like that if you need to. Tools you're going to need are flat-blade screwdriver to help you with some electrical connections, Phillips screwdriver, some sockets, and 8mm wrench to disconnect your battery.
First thing you're going to want to do is disconnect your negative battery cable. Start by removing two screws that are right down here under the door panel. They're both Phillips screws. Again, depending on year and options, these screws might be from above on the door pull. Once we remove those screws, we can actually just pull on this panel, and it snaps in at the top so carefully give it a good tug. You can see that there's clips up here and one down here that hold it.
Now you'll actually want to push all these switches through. They all kind of have little thumb tabs that you push on and come through. This mirror switch, use a little screwdriver and kind of work it in there. Pull it off. Feel that harness back through. Push that switch through. That's the lock switch. Push it through. Use your screwdriver, work it in. Okay. Harness comes through. Power window switch has a couple of screws on it. Take them off the foray and feed the switch through. Just a little easier. Power window switch here, push it down. Push that tab down.
Once you have the window switch through, then you just want to pop this bezel off, which is on the top of the bottom, got to pry up like that. Pry up like that. That bezel comes off. We're going to feed that through the panel. That's off. Now you want to remove two more screws. One here and one down here. Once those screws are out, you just lift up on the panel. Lift it up over the door lock here. It comes off. Now the back side, it just has a bunch of hooks that hook into the door. To access the inside of the door, you'll need to remove this shield, and just do this very carefully because this protects your door panel and stuff from getting water in it.
If your truck has a manual mirror, you don't need to take the shield or anything off. There's three bolts up here that you can just undo and the mirror comes off. If your truck has a power mirror, as this one does, you're going to need to remove the speaker, here. These are 6mm bolts. Speaker comes out. If you want, you can disconnect the speaker. Then right in here, your mirror harness connection so you'd basically pry up under there and pull it apart. Get this back on here. Now on this power mirror, there's three 11mm bolts. One, two, and three. I'll remove those. The bolts are out. We're trying to just feed it through, and it's off.
Obviously reinstallation is the same thing. Get the harness down in if you have a power mirror. If you don't, then you don't have to worry about the harness. Put the studs in the holes. I like to start my top one first. Tighten these up. You don't have to have them really tight. It is a plastic mirror so just really snug. Plug in the plug. Put our speaker back on, you're in. Now we'll put the water shield back on and the door panel back on. Okay. We're going to fast forward through putting everything back together because once you've taken it apart, it's pretty easy to get it back together. You might be able to pick up enough here if you're worried about it, you can just check out our video for the Ranger door panel video. Once you get it all back together, you should be all set.
We hope this helps you out. Brought to you by www.1AAuto.com, your source for quality replacement parts and the best service on the Internet. Please feel free to call us toll-free, 888-844-3393. We're the company that's here for you on the Internet and in person.
MRA05186
In Stock
Product Reviews
Loading reviews
5.00/ 5.021
21 reviews
5 Stars
4 Stars
3 Stars
2 Stars
1 Star
21
0
0
0
0
as advertised
Rodney
February 20, 2017
Fit and worked perfectly. Ordering process was easy. Fast shipping.
Fantastic service/
john
February 20, 2017
High quality merchandize .,And the neatest packaging I have ever encountered.. I would be happy to recommend you to anyone.
the best !
anthony
March 31, 2017
super super fast shipping at high quality thank you so much
Mirror install
M
July 6, 2017
Arrived fast I put it on today took less then one hour. That's how I like it quick and easy. Perfect fit. Thanks
Best aftermarket mirror!
J
August 3, 2017
Being 52yrs young, i have bought my share of replacement auto parts. They say wisdom comes with age. I just recently began purchasing from 1A auto, and my only regret is that it took me so many years to do so. They have nailed it! Every aspect of replacing auto parts, from easy ordering, followed up by super instructional videos, that also list tools and tool sizes to complete the job. The quality of all their parts is without a doubt the highest i have ever used....for example, this mirror was boxed well And was in a bag inside the box to prevent possible scratches!!
I Can See Again
Tara
November 18, 2017
It went in perfectly and is working well. Easy to install.
victor
January 16, 2018
Found you guys fast. Very easy locating my car and my part.
Price was right. Easy to place order. Was suprised to receive it in 2 days. Followed your video and installed. Works great.
Ford Ranger side power mirror
E
February 10, 2018
1aauto was terrific. My side power mirror was shatterd. It was easy and efficient too find the right replacement on line with 1aauto. Their video gave me specific visible demonstrations on how to replace the mirror and then it came with specific point by point directions. Thank you 1AAuto!
I watched the video and everything worked out great
G-Robert
April 30, 2018
I watched the video and everything worked out great. No problems with the part.
Orderd side mirror
S
June 2, 2018
I purchased a side mirror for my Ranger pickup and if I need another product I wouldn't hesitate to order again from 1auto.com. Very pleased with the mirror and shipping.
Easy fix for my moms truck
Julie
June 24, 2018
Installation video made this a snap. Easy repair! Love the videos and always getting the right part from 1A Auto.
Parts
M
August 21, 2018
I have bought parts from here 4 or 5 times. They have always shipped out that day and two days later there here.
Two weeks ago I ordered a door handle for my 01 ranger.when I got it it was wrong part. Probably my fault
I called any they got the right out that day. Told me to keep the part that I couldn't use. They also refunded my money.
I believe there prices are the best I have found.i will be a loyal customer for life. I have also telling my friends to buy there. You can't beat it. Thanks
Ranger Mirror
J
January 3, 2019
Very nice replacement mirror at a reasonable price. Easy installation, buy it, you would not be disappointed.
1996 Ford Ranger Mirror. Perfect fit. Easy job.
Billy
March 25, 2019
On a narrow residential street, I got a little close to a full sized Dodge truck that had extended mirrors that I couldn't see in the dark. My mirror caught the outer edge of the mirror on the parked truck and snapped it right off. Did no damage to the other truck, but besides snapping the housing bracket on mine, it also shattered the mirror. I never realized how much I depended on that mirror when I'm driving. I wanted it fixed fast.
I figured it would either be an expensive repair to have a dealer put a replacement on or I'd have to drive a 60 mile round trip to get one off a junked truck at my local pick-a-part. That would require me to take the replacement part off and then replace mine with it. Lot of extra work and it would have cost about $40.00 for a used mirror, plus the gas used for the trip..
I decided to look for a used one on-line when 1A Auto popped up with an offer I couldn't refuse. The picture displayed was an exact match to mine. The description was perfect and they
Passenger mirror
T
June 22, 2019
I busted my mirror on a tree got online found the mirror on 1aauto.com and didn't have a single problem. They have ome for my truck and I will be using them from now on when I need a part. Thanks 1aauto
Ford Ranger Side Mirror
JOHN
November 16, 2019
I purchased this side mirror to replace the damaged passenger side mirror on my 2001 Ford Ranger. The installation and fit were simple and flawless. And the price? That was excellent too. I readily recommend this product and 1aauto.com
Rear view mirror
John
July 1, 2020
Easy to install and fit perfect. Watched 1aauto video first.
easy to install
Jeff
April 26, 2021
The mirror was much easier to install with the how to video. Very good prices as well as fast service. My new online auto parts store.
Danny
June 12, 2021
Perfect part. Looks and works just like a factory part.
Easy side view mirror replacement
pete
February 14, 2022
Exact replacement for my 2002 Ford Ranger. Easy replacement for a not very experienced auto repair person.
Right part, right price !
Percy
February 9, 2023
Right part, right price !
Customer Q&A
No questions have been asked about this item.
Customer service
877-844-3393
Monday - Friday 8:00am - 9:30pm ET Saturday - Sunday 8:00am - 4:30pm ET
Mazda is a registered trademark of Mazda Motor Corporation. 1A Auto is not affiliated with or sponsored by Mazda or Mazda Motor Corporation.See all trademarks.
Enter Vehicle Year Make Model
Specify your vehicle's year, make and model to guarantee fit.
Year
Make
Model
Options
Drivetrain
This part doesn’t fit a . Select from parts that fit.