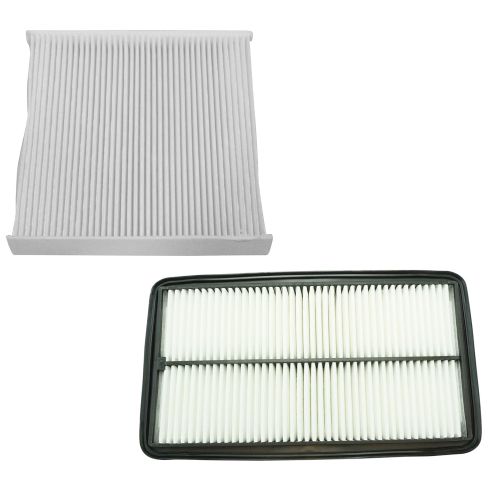
Complete Repair in One Purchase - Stop searching for parts individually and complete your repair with a customized kit or set from DIY Solutions.
High-Quality Parts from Trusted Brands - DIY Solutions' kits and sets are selected from the best automotive brands and include hard-to-find and even obsolete parts you may need for your vehicle.
Guaranteed Fit - DIY Solutions ensures its selected parts are quality-tested to guarantee fit and function.
Item Condition:New
Attention California Customers:
WARNING: Cancer and Reproductive Harm - www.P65Warnings.ca.gov.
Lifetime Warranty
This item is backed by our limited lifetime warranty. In the event that this item should fail due to manufacturing defects during intended use, we will replace the part free of charge. This warranty covers the cost of the part only.
FREE Shipping is standard on Orders shipped to the lower 48 States (Contiguous United States). Standard shipping charges apply to Hawaii, Alaska and US Territories. Shipping is not available to Canada.
Expedited is available on checkout to the United States, excluding Alaska, Hawaii and US Territories as well as P.O. Boxes and APO/FPO/DPO addresses. Final shipping costs are available at checkout.
How to Replace Cabin Air Filter 2005-16 Honda Odyssey
How to Replace Cabin Air Filter 2009-16 Honda Pilot
How to Replace Engine Air Filter 2009-15 Honda Pilot
How to Clean Mouse Nest Out Of Cabin Air System 2009-16 Honda Pilot
Created on:
Tools used
No Tools Needed
1. Removing the Glove Box
Open the glove box
Push down on the hook and release it so it's free
Push in on either side of the glove box
Remove the glove box
2. Removing the Cabin Air Filter
Press the tabs
Pull the cabin air filter casing out
Remove the cabin air filter from the casing
3. Installing the Cabin Air Filter
Insert the cabin air filter to the casing with the arrows facing down
Insert the casing into place with the arrows facing down
Press the cabin air filter in until it clicks
4. Reinstalling the Glove Box
Clip the glove box into the dash
Connect the hook to the flange
Close the glove box
Hi, I'm Mike from 1A Auto. We've been selling auto parts for over 30 years. We're dedicated to delivering quality auto parts, expert customer service, fast and free shipping, all backed by our 100% satisfaction guarantee. Visit us at 1AAuto.com, your trusted source for quality auto parts.
Here we have the dashboard of a Honda Odyssey. We want to change the cabin air filter, which is sort of tucked away behind the glove compartment. We're going to start this off by removing the glove compartment. We'll pop it open. Over on the left side you're going to push down on this little device here. Then, on the top sides of the glove box, you're going to push in. You'll see that there's a tab here, and there's the tab on the other side that's identical. Those hold it in. At that point, you can pull it completely out and you cannot even dump out all of your items, which is great. We're going to set this aside.
Then, right up here on the heater box is where the cabin air filter lives. There's a tab on each side of this which you can pull out. There's not a ton of room to pull it out of here. Here we go. Here's the cabin air filter. You can see it's got some leaves on it. We're going to go ahead and pop that right out. Remove all the bugs and the leaves, and set that aside.
Here we have the old filter, which you can see is full of bugs and debris. Over here we got the new filter. It essentially looks the same. You can see the bottom has the air flow marking on it, so you know which way to put it in. It's the same size and shape, so it's going to filter out all the future bugs and leaves just like the original one did. You can see on here the filter says "air flow down."
Then right on the holder it says "air flow down," so you know you're putting it in the right direction. It looks like I actually had to turn this 90 degrees and drop it right in the plastic holder. I got to make sure it's tucked in the edges because you don't want any open areas where the bugs can flow through. Otherwise, you're going to have bugs flowing through your vents. Now you can see it's tight around the edge, tight around this edge.
Now we can slide it back in just like that. Now we're going to clip the glove box right back into its dashboard area. It clips right in the bottom first on the driver side, then it clips on the passenger side right here. Then we'll lift this up just to make sure it's not catching anything. At this point you can push it right into place, then come down here. You'll see a little flange or something that this attaches to.
We'll pull it out and lift up on it. It's a little bit difficult to get with your fingers. There we go. You can see it comes up from the bottom and it locks onto this little tab right here. At that point, you can close your glove box and your filter is changed.
Thanks for watching. Visit us at 1AAuto.com for quality auto parts, fast and free shipping, and the best customer service in the industry.
Tools used
No Tools Needed
1. Removing the Cabin Filter
Open the glove box
Press the sides of the glove box and lower it down
Press the tabs on the cabin filter holder
Pull the cabin filter out of the housing
2. Installing the Cabin Filter
Insert the cabin filter into the tray with the arrow pointing down
Insert the tray into place
Press the sides of the glove box
Press the glove box into place
Hi, I’m Mike from 1A Auto. We’ve been selling auto parts for over 30 years!
We're going to open up the glove box. We're going to have to grab the inside of the glove box, and fold it in, like this, and then it will flip down. We can access the cabin filter right here. There's a little tab on this side. Right here, and push in on that. Same with the tab on this side. Push in, and then it'll release. We can pull it straight out. Just like that. I can pull the cabin filter right out, just like that.
As you can see, this is our old cabin filter. If you open the pleats, you can see how dirty it is. There's a lot of debris in there. This is our new cabin filter from 1aauto.com. It's designed the same. All the pleats are the same.
Right here there's an arrow of which direction the flow is. So you want the air flow to go down, and suck in from the blowing motor. Get yours at 1aauto.com, and you'll be ready to rock and roll.
So we're going to take the cabin filter. Remember the arrow, it's going to go down. So, the tray is like this. We want the arrow going down into the tray. This back part you want to line up in there, and push it down. Just like that. And we can slide it in to the slot, and clip it in. And we can take our glove box, we're going to fold these corners in a little bit, and push it back.
Thanks for watching. Visit us at 1AAuto.com for quality auto parts, fast and free shipping, and the best customer service in the industry.
Tools used
Socket Extensions
Phillips Head Screwdriver
8mm Socket
Ratchet
1. Removing the Air Filter
Open the hood
Support the hood with the prop rod
Remove the four 8mm bolts from the air box cover
Lift up the air box cover
Pull the air filter out of the air box
2. Installing the Air Filter
Place the filter into the air box
Line up the cover on the air box
Tighten the four 8mm bolts into the cover
Lower the prop rod
Close the hood
Hi. I'm Mike from 1AAuto. We've been selling auto parts for over 30 years!
To pop the hood, we're going to grab this little handle right here, right next to your footrest. To release the hood, we're going to slide this little lock to the right. Prop rod is right here, pull up on that, and there's two spots. You can either put it right there, or if you can't reach that spot, you can put it right here.
We're going to remove the air filter. We're going to take this upper part of the air box off. We're going to use an 8 mm socket and extension and a ratchet. You also could use a Phillips head screwdriver, but generally it's easier to use a socket and a ratchet. Take this bolt out and it is a caged bolt so it'll stay with the box. There's a bolt right here. Take this bolt out. That's loose. There's two more up top here: one right here and one right here. Once those are loose, the top part of the box will lift up. Pull the air filter out.
Now we're going to install the air filter. You want the air filter to go in this way, going down. So slide it in here. Set it down like that. You can lower the upper part of the cover. Make sure it's set down in there. Then we'll start tightening up the bolts. I'm just going to get them all snugged down and then I'm going to just tighten them up a little bit once they're all in there. Sometimes it's a little easier with a screwdriver to tighten them down because then you can push. Now I can snug them all up. Okay. Now we're going to close the hood.
Thanks for watching. Visit us at 1AAuto.com for quality auto parts, fast and free shipping, and the best customer service in the industry.
Tools used
FLT00020
In Stock
Product Reviews
Loading reviews
5.00/ 5.02
2 reviews
5 Stars
4 Stars
3 Stars
2 Stars
1 Star
2
0
0
0
0
MDX Filter
Matthew
December 3, 2018
Perfect fit,
great quality and fast shipping
I only use 1A Auto for all my vehicle needs
Huascar
December 2, 2021
muy buena calidad y encajan perfectos, sin duda alguna los volveria a comprar
Customer Q&A
Will it fit 2003 Honda pilot?March 1, 2024
John D
10
This part will not fit your vehicle, but we may have a part that is listed to fit.
Please enter your vehicle's year make and model in the search bar at the top of the page. This will display parts guaranteed to fit your vehicle. Just be sure to verify all of the information shown in the Vehicle Fit tab before ordering.
March 1, 2024
Kemal S
Customer service
877-844-3393
Monday - Friday 8:00am - 9:30pm ET Saturday - Sunday 8:00am - 4:30pm ET
Enter Vehicle Year Make Model
Specify your vehicle's year, make and model to guarantee fit.
Year
Make
Model
Options
Drivetrain
This part doesn’t fit a . Select from parts that fit.